This is official Amazon Web Services (
AWS) documentation for Amazon Elastic Kubernetes Service (Amazon EKS). Amazon EKS is a managed service that makes it easy for you to run Kubernetes onAWSwithout needing to install and operate your own Kubernetes clusters. Kubernetes is an open source system for automating the deployment, scaling, and management of containerized applications.
What is Amazon EKS?
Learn to manage containerized applications with Amazon EKS
Amazon Elastic Kubernetes Service (Amazon EKS) is the premiere platform for running Kubernetes clusters, both in the Amazon Web Services (AWS) cloud and in your own data centers (EKS Anywhere and Amazon EKS Hybrid Nodes).
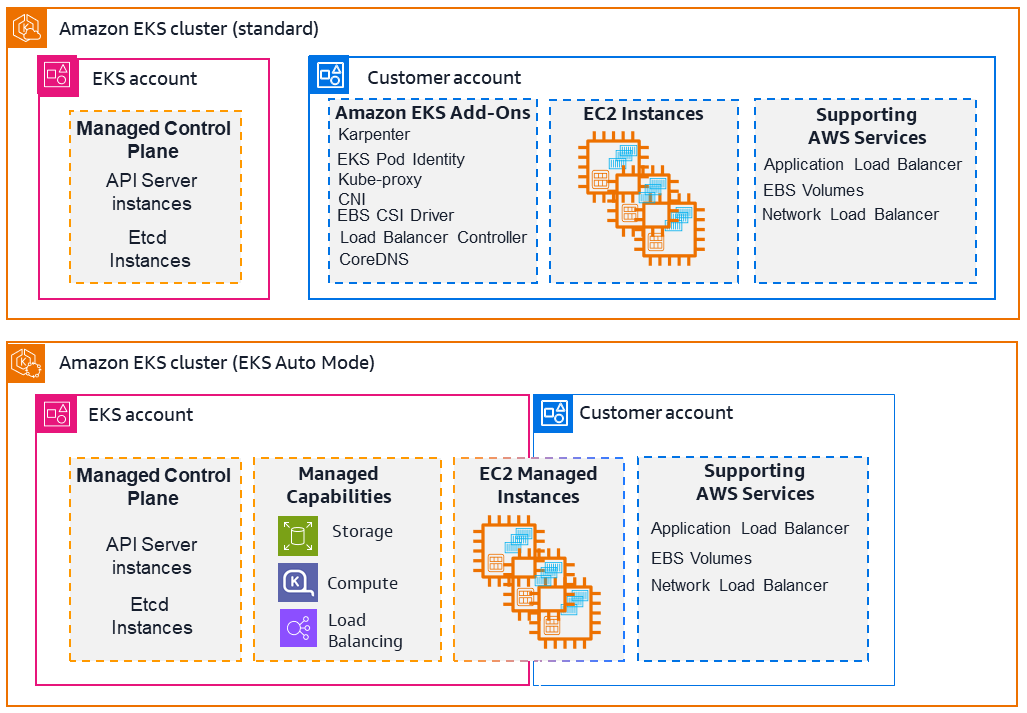
Amazon EKS simplifies building, securing, and maintaining Kubernetes clusters. It can be more cost effective at providing enough resources to meet peak demand than maintaining your own data centers. Two of the main approaches to using Amazon EKS are as follows:
-
EKS standard:
AWSmanages the Kubernetes control plane when you create a cluster with EKS. Components that manage nodes, schedule workloads, integrate with theAWScloud, and store and scale control plane information to keep your clusters up and running, are handled for you automatically. -
EKS Auto Mode: Using the EKS Auto Mode feature, EKS extends its control to manage Nodes (Kubernetes data plane) as well. It simplifies Kubernetes management by automatically provisioning infrastructure, selecting optimal compute instances, dynamically scaling resources, continuously optimizing costs, patching operating systems, and integrating with
AWSsecurity services.
The following diagram illustrates how Amazon EKS integrates your Kubernetes clusters with the AWS cloud, depending on which method of cluster creation you choose:
Amazon EKS helps you accelerate time to production, improve performance, availability and resiliency, and enhance system security. For more information, see Amazon Elastic Kubernetes Service.
Features of Amazon EKS
Amazon EKS provides the following high-level features:
- Management interfaces
-
EKS offers multiple interfaces to provision, manage, and maintain clusters, including
consolelong, Amazon EKS API/SDKs, CDK,AWSCLI, eksctl CLI,AWSCloudFormation, and Terraform. For more information, see Get started with Amazon EKS and Organize workloads with Amazon EKS clusters. - Access control tools
-
EKS relies on both Kubernetes and
AWSIdentity and Access Management (AWSIAM) features to manage access from users and workloads. For more information, see Grant IAM users and roles access to Kubernetes APIs and Grant Kubernetes workloads access toAWSusing Kubernetes Service Accounts. - Compute resources
-
For compute resources, EKS allows the full range of Amazon EC2 instance types and
AWSinnovations such as Nitro and Graviton with Amazon EKS for you to optimize the compute for your workloads. For more information, see Manage compute resources by using nodes. - Storage
-
EKS Auto Mode automatically creates storage classes using EBS volumes. Using Container Storage Interface (CSI) drivers, you can also use Amazon S3, Amazon EFS, Amazon FSX, and Amazon File Cache for your application storage needs. For more information, see Store application data for your cluster.
- Security
-
The shared responsibility model is employed as it relates to Security in Amazon EKS. For more information, see Security best practices, Infrastructure security, and Kubernetes security.
- Monitoring tools
-
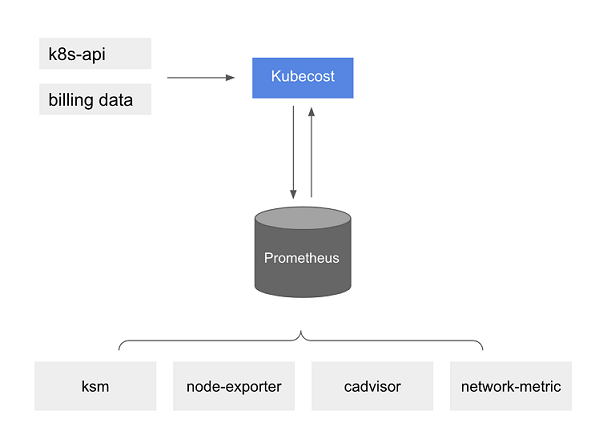
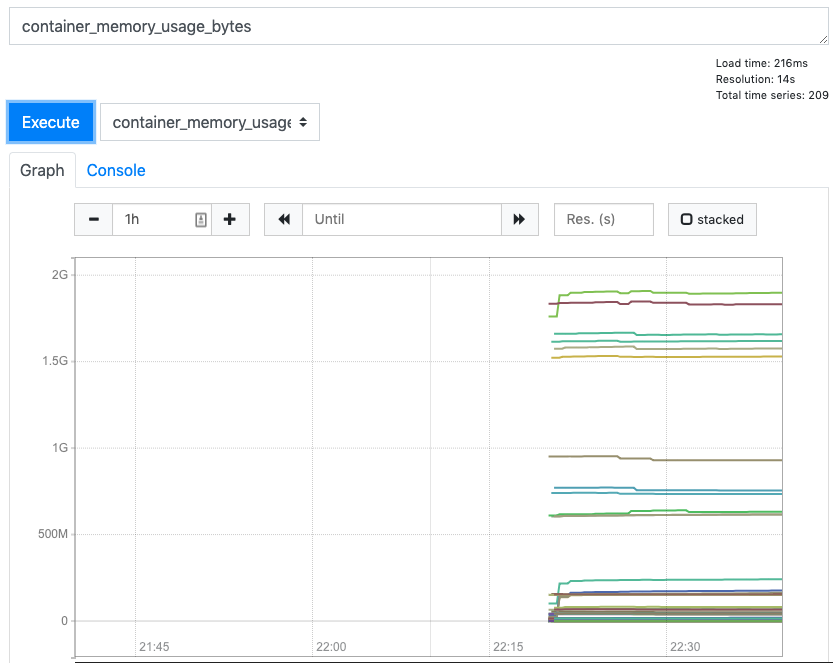
Use the observability dashboard to monitor Amazon EKS clusters. Monitoring tools include Prometheus, CloudWatch, Cloudtrail, and ADOT Operator. For more information on dashboards, metrics servers, and other tools, see EKS cluster costs and Kubernetes Metrics Server.
- Kubernetes compatibility and support
-
Amazon EKS is certified Kubernetes-conformant, so you can deploy Kubernetes-compatible applications without refactoring and use Kubernetes community tooling and plugins. EKS offers both standard support and extended support for Kubernetes. For more information, see Understand the Kubernetes version lifecycle on EKS.
Related services
Services to use with Amazon EKS
You can use other AWS services with the clusters that you deploy using Amazon EKS:
- Amazon EC2
-
Obtain on-demand, scalable compute capacity with Amazon EC2.
- Amazon EBS
-
Attach scalable, high-performance block storage resources with Amazon EBS.
- Amazon ECR
-
Store container images securely with Amazon ECR.
- Amazon CloudWatch
-
Monitor
AWSresources and applications in real time with Amazon CloudWatch. - Amazon Prometheus
-
Track metrics for containerized applications with Amazon Managed Service for Prometheus.
- Elastic Load Balancing
-
Distribute incoming traffic across multiple targets with Elastic Load Balancing.
- Amazon GuardDuty
-
Detect threats to EKS clusters with Amazon GuardDuty.
AWSResilience Hub-
Assess EKS cluster resiliency with
AWSResilience Hub.
Amazon EKS Pricing
Amazon EKS has per cluster pricing based on Kubernetes cluster version support, pricing for Amazon EKS Auto Mode, and per vCPU pricing for Amazon EKS Hybrid Nodes.
When using Amazon EKS, you pay separately for the AWS resources you use to run your applications on Kubernetes worker nodes. For example, if you are running Kubernetes worker nodes as Amazon EC2 instances with Amazon EBS volumes and public IPv4 addresses, you are charged for the instance capacity through Amazon EC2, the volume capacity through Amazon EBS, and the IPv4 address through Amazon VPC.
Visit the respective pricing pages of the AWS services you are using with your Kubernetes applications for detailed pricing information.
-
For Amazon EKS cluster, Amazon EKS Auto Mode, and Amazon EKS Hybrid Nodes pricing, see Amazon EKS Pricing.
-
For Amazon EC2 pricing, see Amazon EC2 On-Demand Pricing and Amazon EC2 Spot Pricing.
-
For
AWSFargate pricing, seeAWSFargate Pricing. -
You can use your savings plans for compute used in Amazon EKS clusters. For more information, see Pricing with Savings Plans.
Common use cases in Amazon EKS
Discover how Amazon EKS helps deploy highly available containerized applications, build microservices architectures, automate software release processes, run serverless applications, execute machine learning workloads, deploy consistently on-premises and in the cloud, process big data cost-effectively, and ensure security and compliance.
Amazon EKS offers robust managed Kubernetes services on AWS, designed to optimize containerized applications. The following are a few of the most common use cases of Amazon EKS, helping you leverage its strengths for your specific needs.
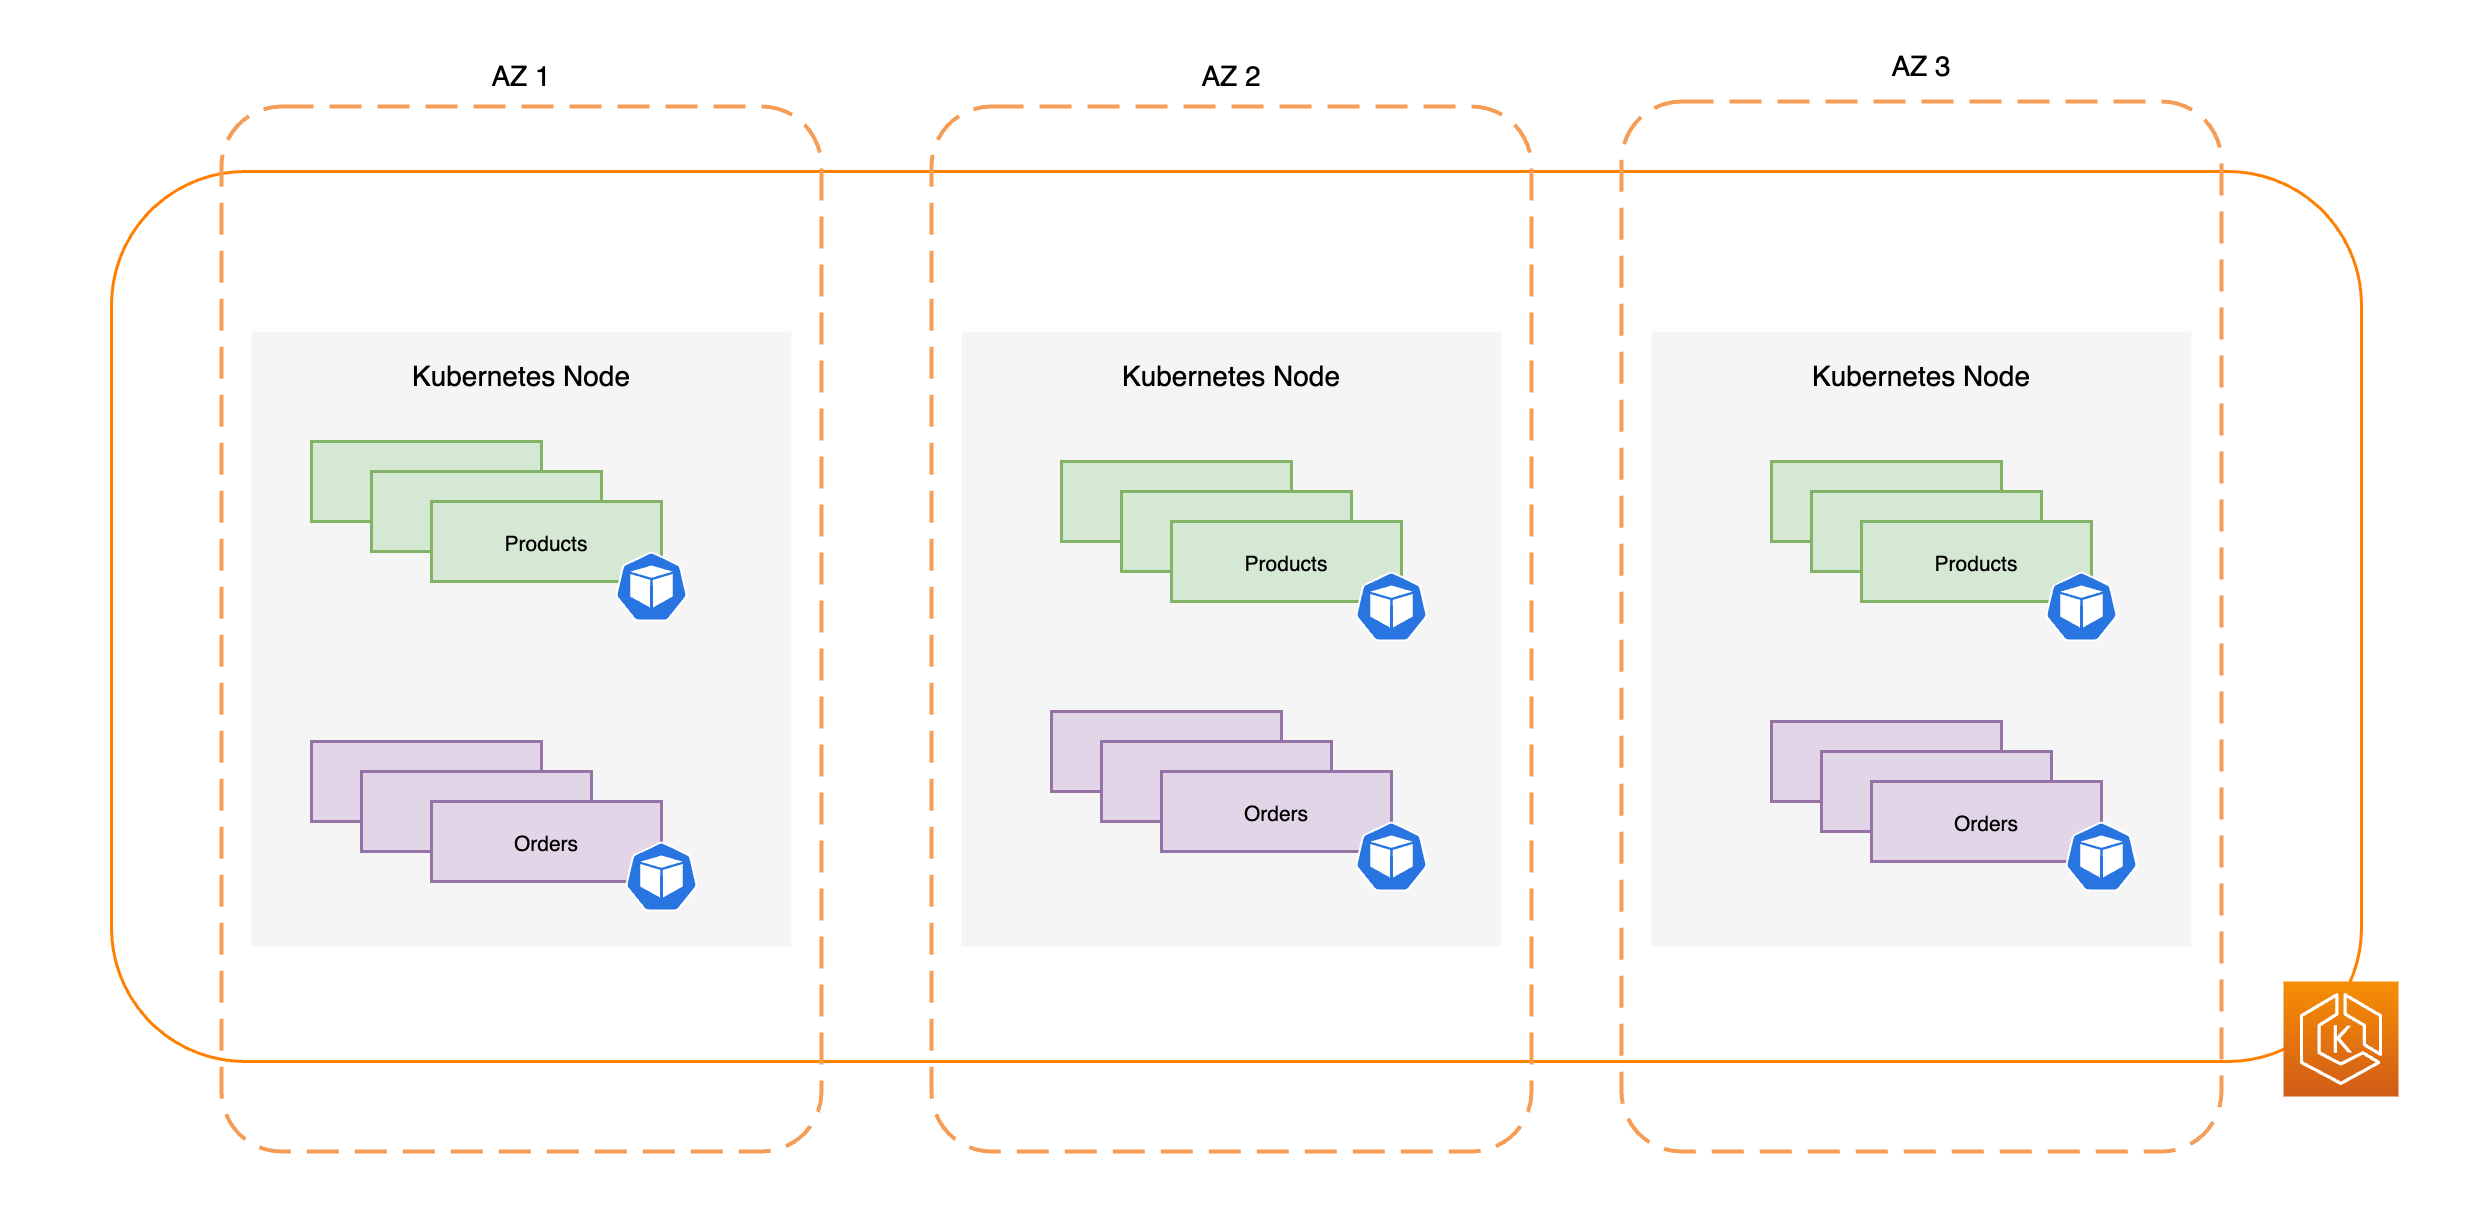
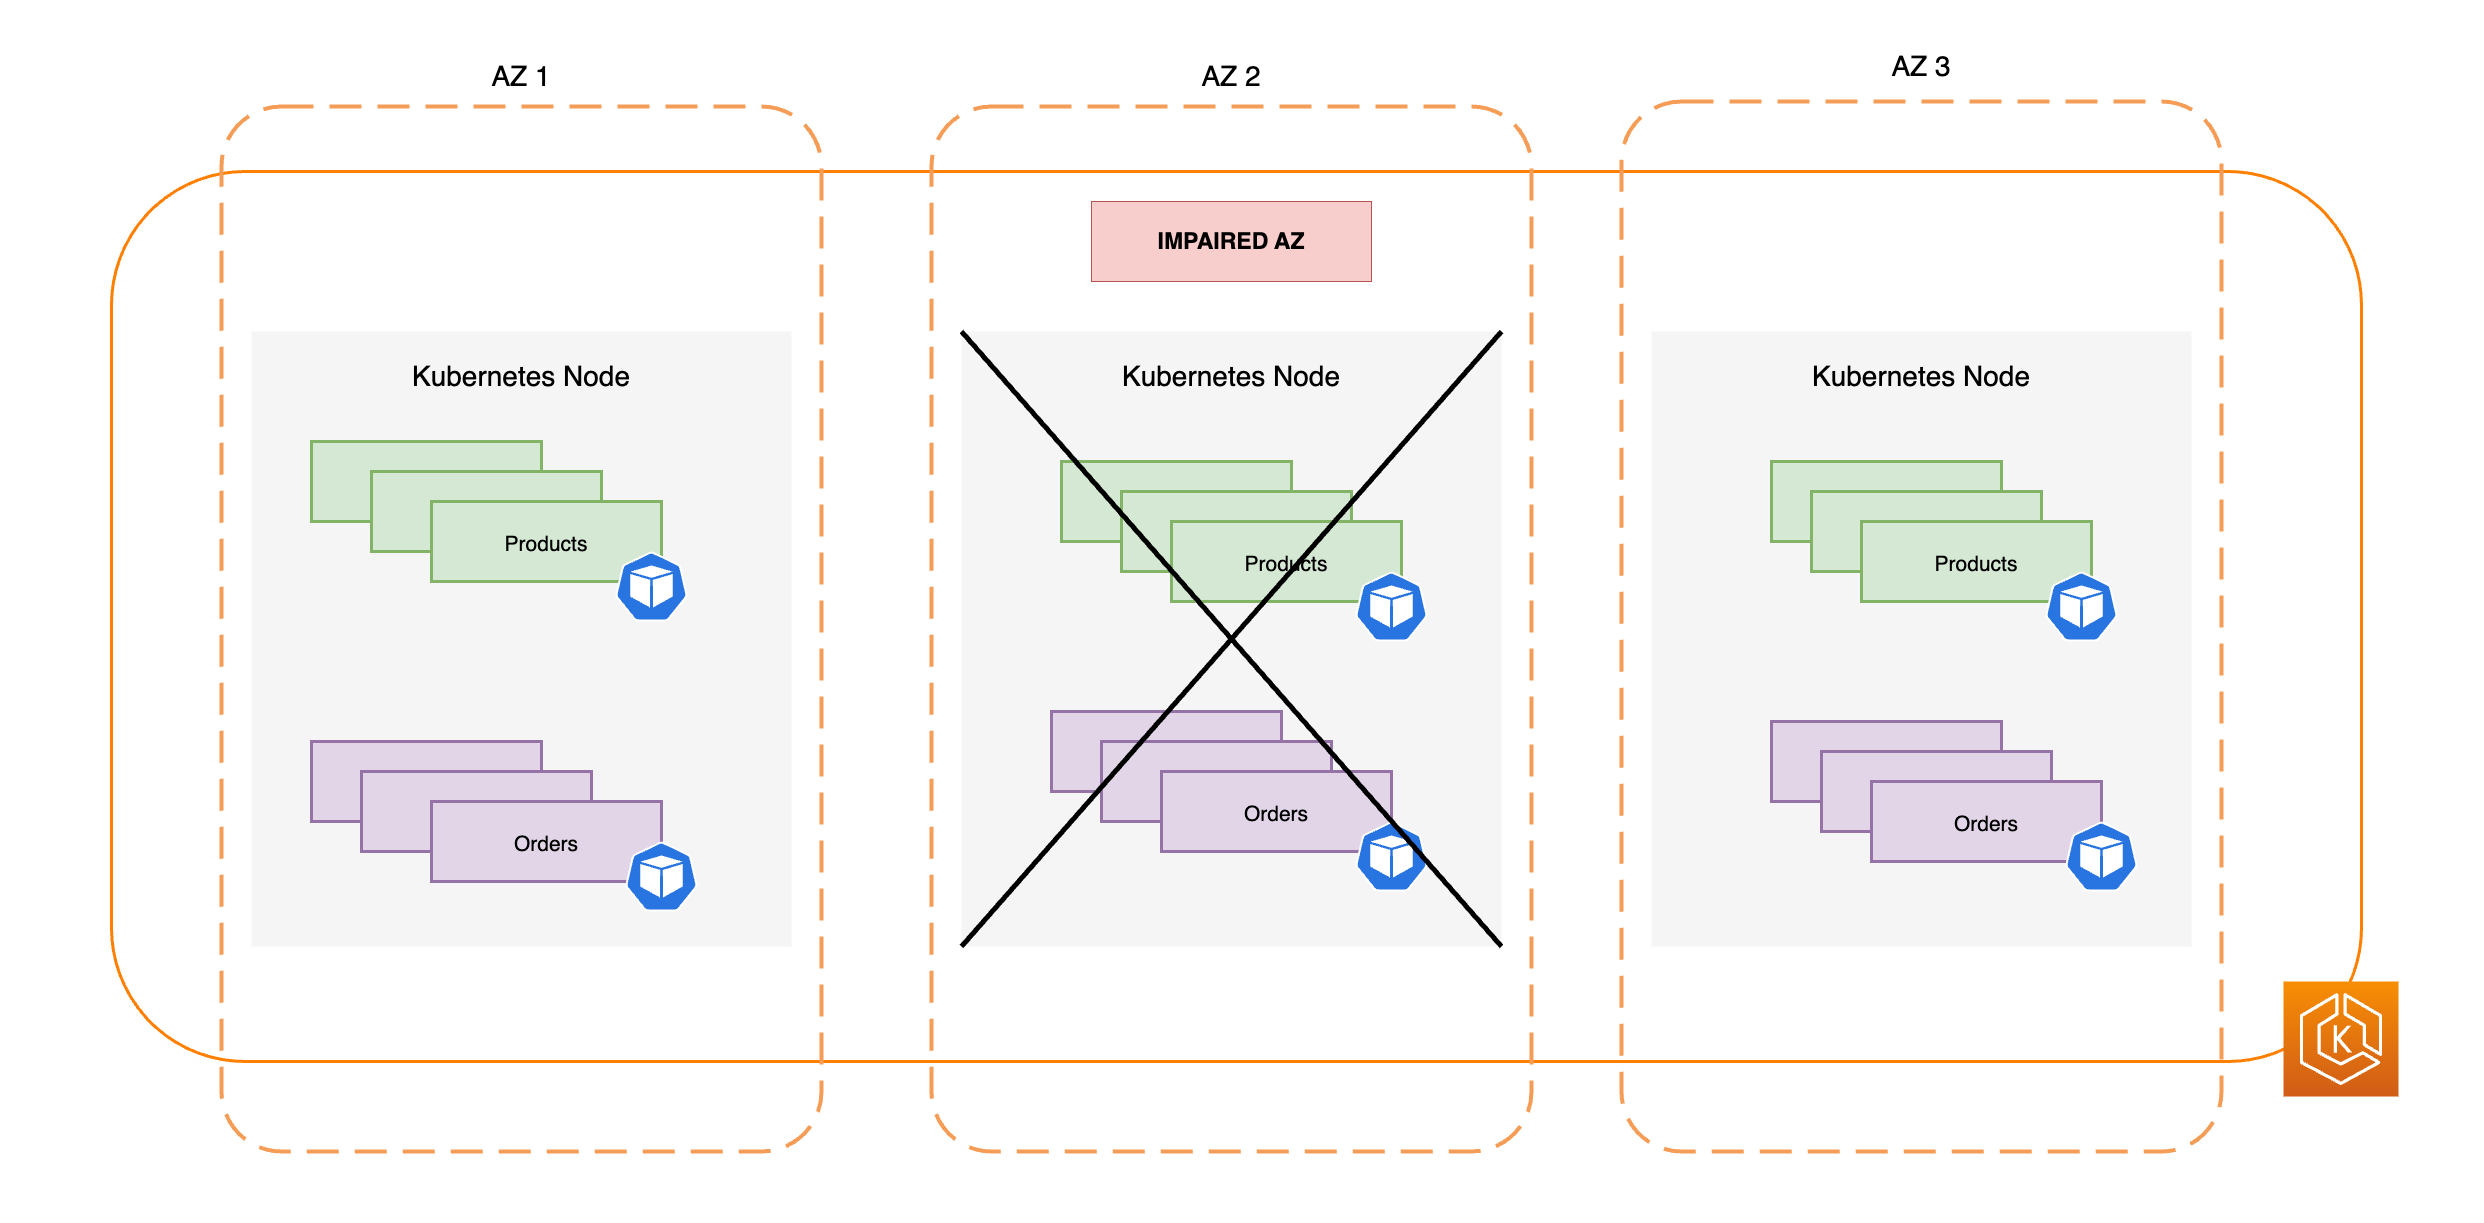
- Deploying high-availability applications
-
Using Elastic Load Balancing, you can make sure that your applications are highly available across multiple Availability Zones.
- Building microservices architectures
-
Use Kubernetes service discovery features with
AWSCloud Map or Amazon VPC Lattice to build resilient systems. - Automating software release process
-
Manage continuous integration and continuous deployment (CICD) pipelines that simplify the process of automated building, testing, and deployment of applications.
- Running serverless applications
-
Use
AWSFargate with Amazon EKS to run serverless applications. This means you can focus solely on application development, while Amazon EKS and Fargate handle the underlying infrastructure. - Executing machine learning workloads
-
Amazon EKS is compatible with popular machine learning frameworks such as TensorFlow, MXNet, and PyTorch. With GPU support, you can handle even complex machine learning tasks effectively.
- Deploying consistently on premises and in the cloud
-
To simplify running Kubernetes in on-premises environments, you can use the same Amazon EKS clusters, features, and tools to run self-managed nodes on
AWSOutposts or can use Amazon EKS Hybrid Nodes with your own infrastructure. For self-contained, air-gapped environments, you can use Amazon EKS Anywhere to automate Kubernetes cluster lifecycle management on your own infrastructure. - Running cost-effective batch processing and big data workloads
-
Utilize Spot Instances to run your batch processing and big data workloads such as Apache Hadoop and Spark, at a fraction of the cost. This lets you take advantage of unused Amazon EC2 capacity at discounted prices.
- Securing application and ensuring compliance
-
Implement strong security practices and maintain compliance with Amazon EKS, which integrates with
AWSsecurity services such asAWSIdentity and Access Management (IAM), Amazon Virtual Private Cloud (Amazon VPC), andAWSKey Management Service (AWSKMS). This ensures data privacy and protection as per industry standards.
Amazon EKS architecture
Learn how Amazon EKS aligns with Kubernetes cluster architecture, offering a highly available and resilient control plane, and flexible compute options like
AWSFargate, Karpenter, managed node groups, and self-managed nodes to meet diverse workload requirements.
Amazon EKS aligns with the general cluster architecture of Kubernetes. For more information, see Kubernetes Components in the Kubernetes documentation. The following sections summarize some extra architecture details for Amazon EKS.
Control plane
Amazon EKS ensures every cluster has its own unique Kubernetes control plane. This design keeps each cluster’s infrastructure separate, with no overlaps between clusters or AWS accounts. The setup includes:
- Distributed components
-
The control plane positions at least two API server instances and three etcd instances across three
AWSAvailability Zones within anAWSRegion. - Optimal performance
-
Amazon EKS actively monitors and adjusts control plane instances to maintain peak performance.
- Resilience
-
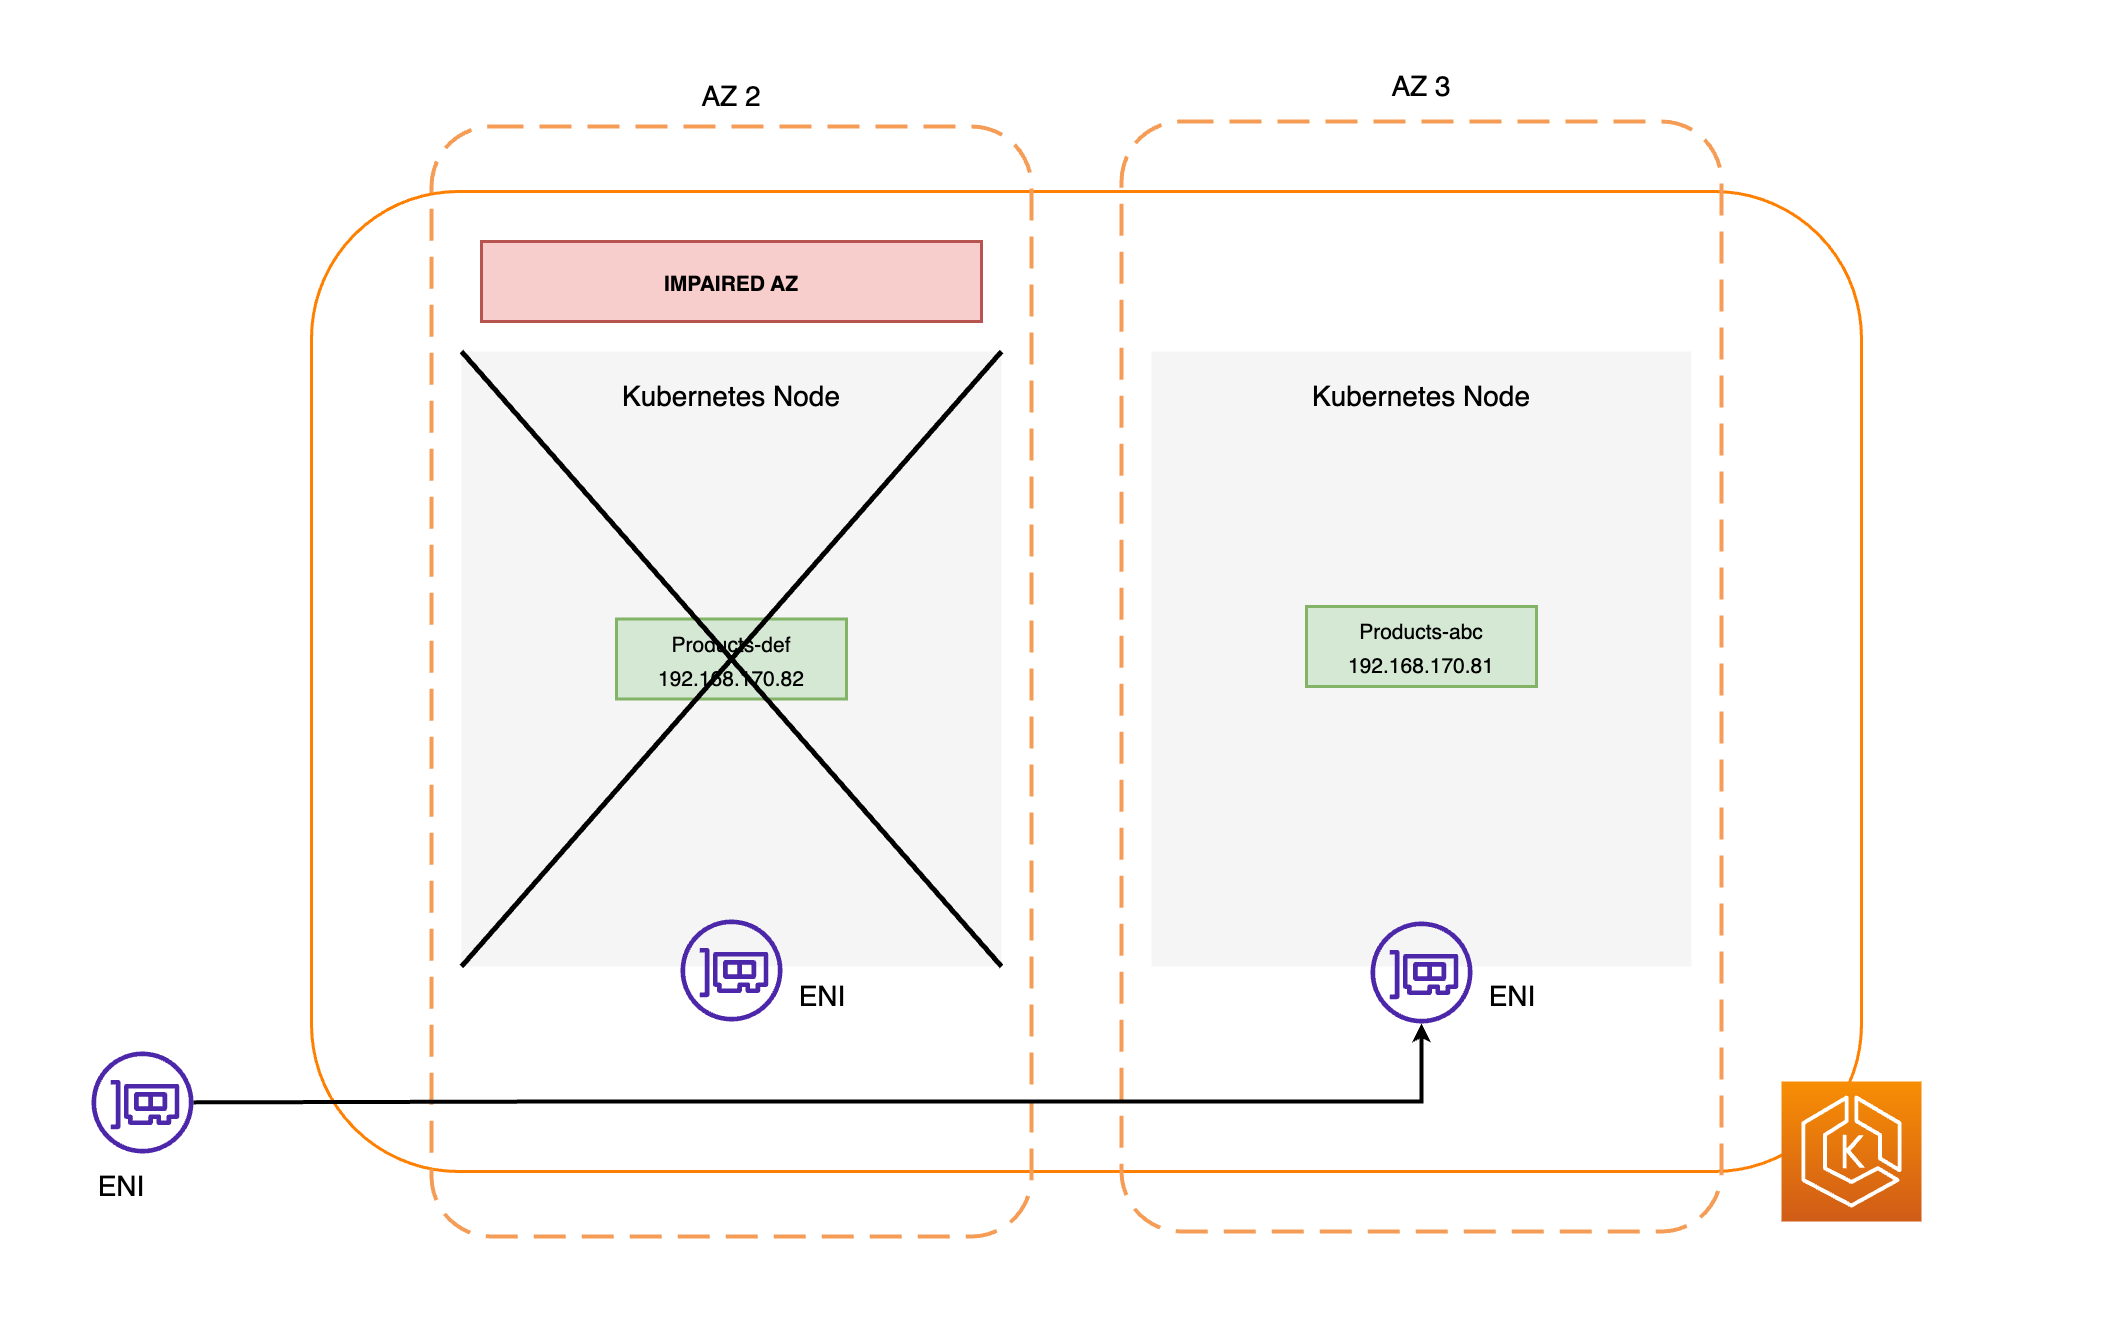
If a control plane instance falters, Amazon EKS quickly replaces it, using different Availability Zone if needed.
- Consistent uptime
-
By running clusters across multiple Availability Zones, a reliable API server endpoint availability Service Level Agreement (SLA) is achieved.
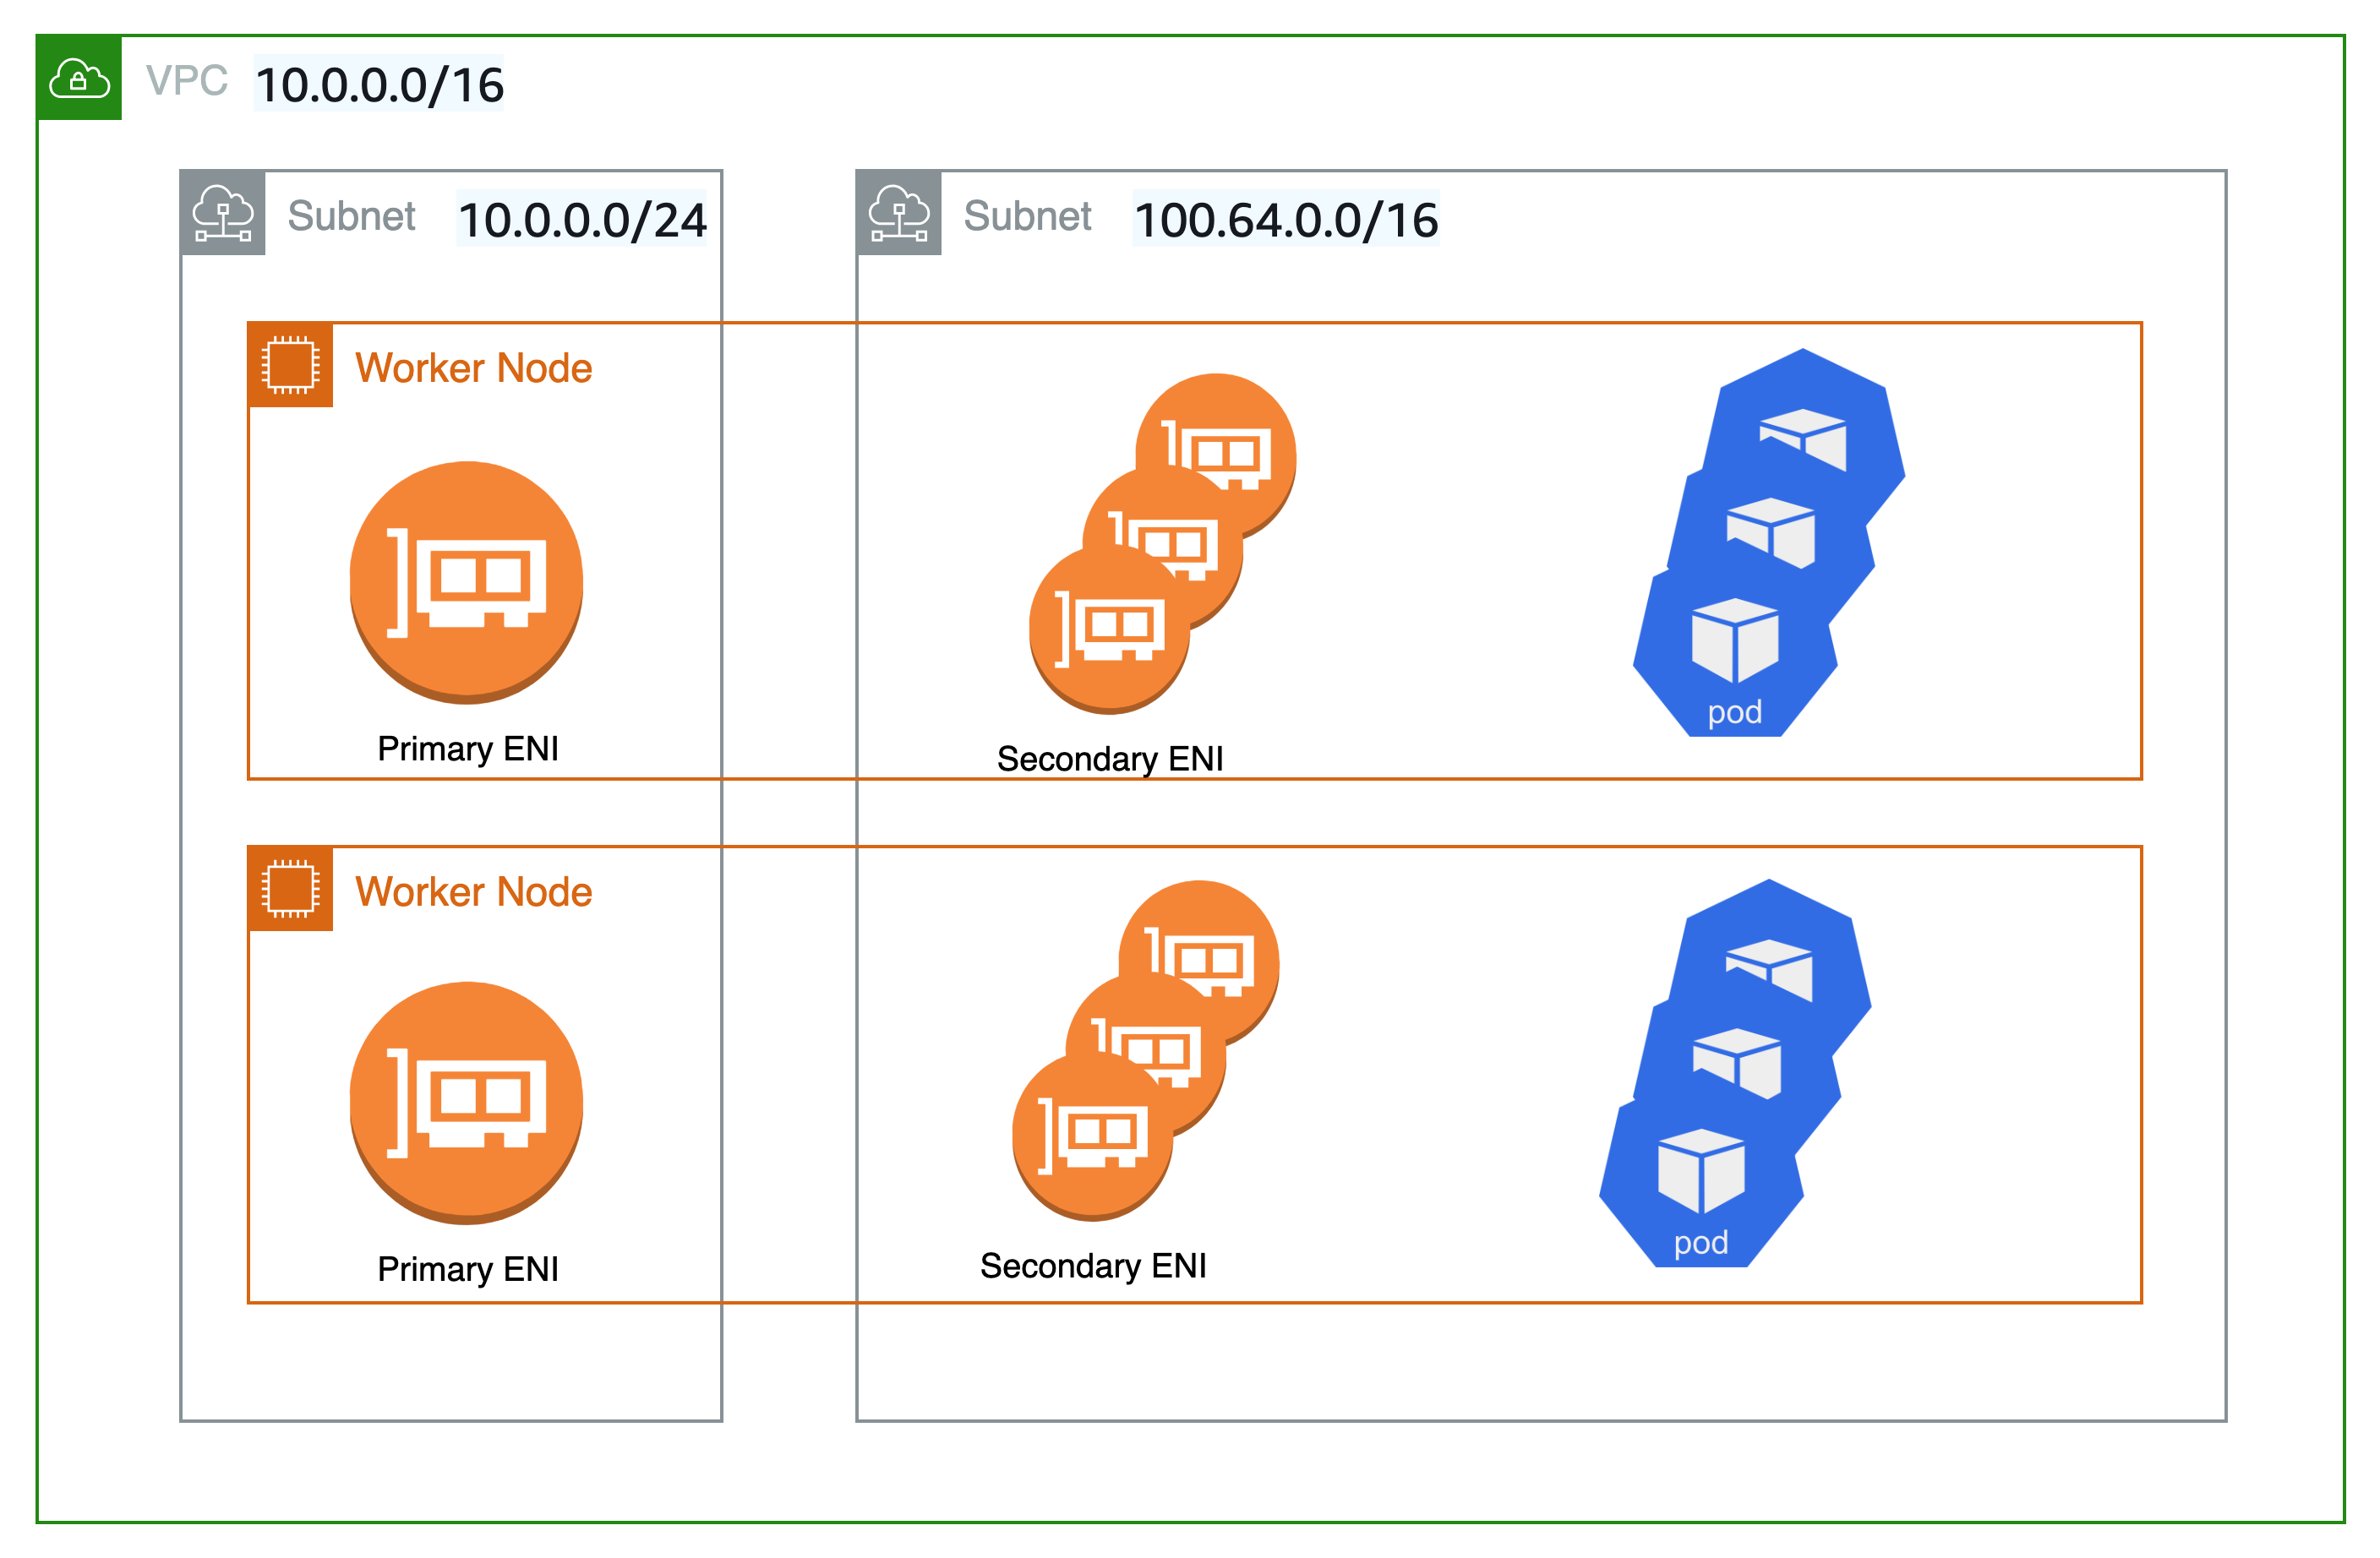
Amazon EKS uses Amazon Virtual Private Cloud (Amazon VPC) to limit traffic between control plane components within a single cluster. Cluster components can’t view or receive communication from other clusters or AWS accounts, except when authorized by Kubernetes role-based access control (RBAC) policies.
Compute
In addition to the control plane, an Amazon EKS cluster has a set of worker machines called nodes. Selecting the appropriate Amazon EKS cluster node type is crucial for meeting your specific requirements and optimizing resource utilization. Amazon EKS offers the following primary node types:
- EKS Auto Mode
-
EKS Auto Mode extends
AWSmanagement beyond the control plane to include the data plane, automating cluster infrastructure management. It integrates core Kubernetes capabilities as built-in components, including compute autoscaling, networking, load balancing, DNS, storage, and GPU support. EKS Auto Mode dynamically manages nodes based on workload demands, using immutable AMIs with enhanced security features. It automates updates and upgrades while respecting Pod Disruption Budgets, and includes managed components that would otherwise require add-on management. This option is ideal for users who want to leverageAWSexpertise for day-to-day operations, minimize operational overhead, and focus on application development rather than infrastructure management. AWSFargate-
Fargate is a serverless compute engine for containers that eliminates the need to manage the underlying instances. With Fargate, you specify your application’s resource needs, and
AWSautomatically provisions, scales, and maintains the infrastructure. This option is ideal for users who prioritize ease-of-use and want to concentrate on application development and deployment rather than managing infrastructure. - Karpenter
-
Karpenter is a flexible, high-performance Kubernetes cluster autoscaler that helps improve application availability and cluster efficiency. Karpenter launches right-sized compute resources in response to changing application load. This option can provision just-in-time compute resources that meet the requirements of your workload.
- Managed node groups
-
Managed node groups are a blend of automation and customization for managing a collection of Amazon EC2 instances within an Amazon EKS cluster.
AWStakes care of tasks like patching, updating, and scaling nodes, easing operational aspects. In parallel, customkubeletarguments are supported, opening up possibilities for advanced CPU and memory management policies. Moreover, they enhance security viaAWSIdentity and Access Management (IAM) roles for service accounts, while curbing the need for separate permissions per cluster. - Self-managed nodes
-
Self-managed nodes offer full control over your Amazon EC2 instances within an Amazon EKS cluster. You are in charge of managing, scaling, and maintaining the nodes, giving you total control over the underlying infrastructure. This option is suitable for users who need granular control and customization of their nodes and are ready to invest time in managing and maintaining their infrastructure.
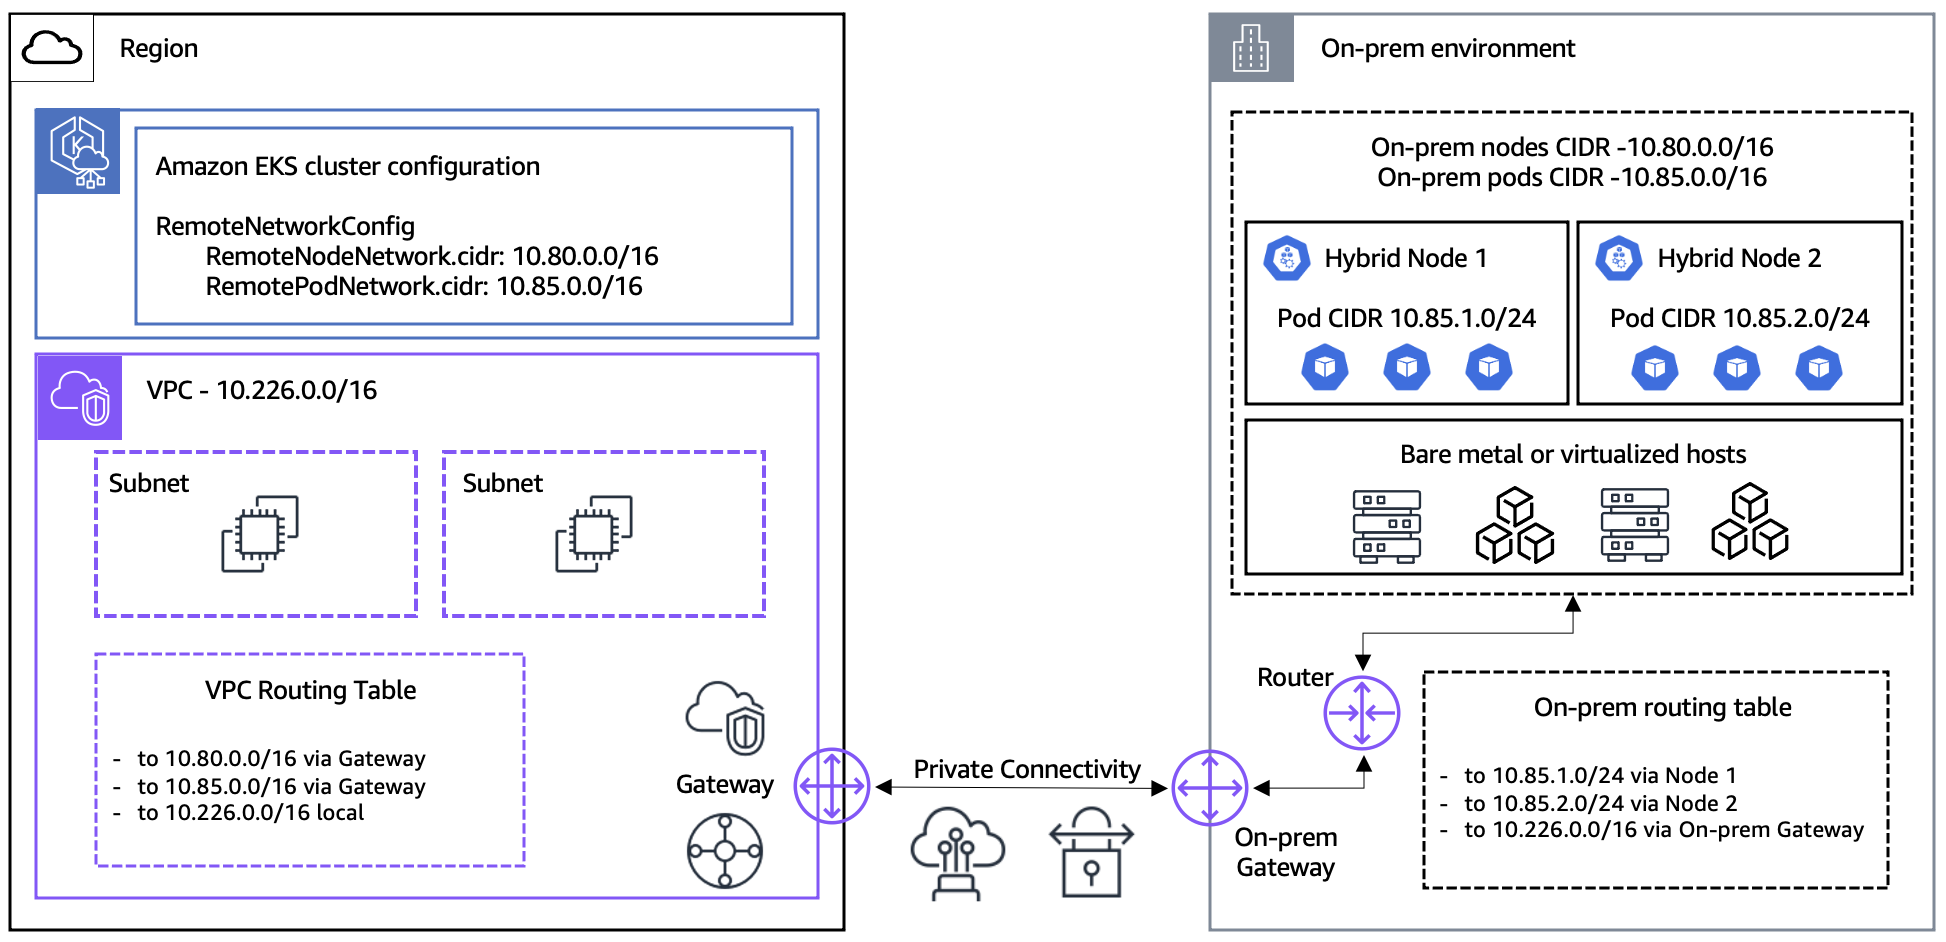
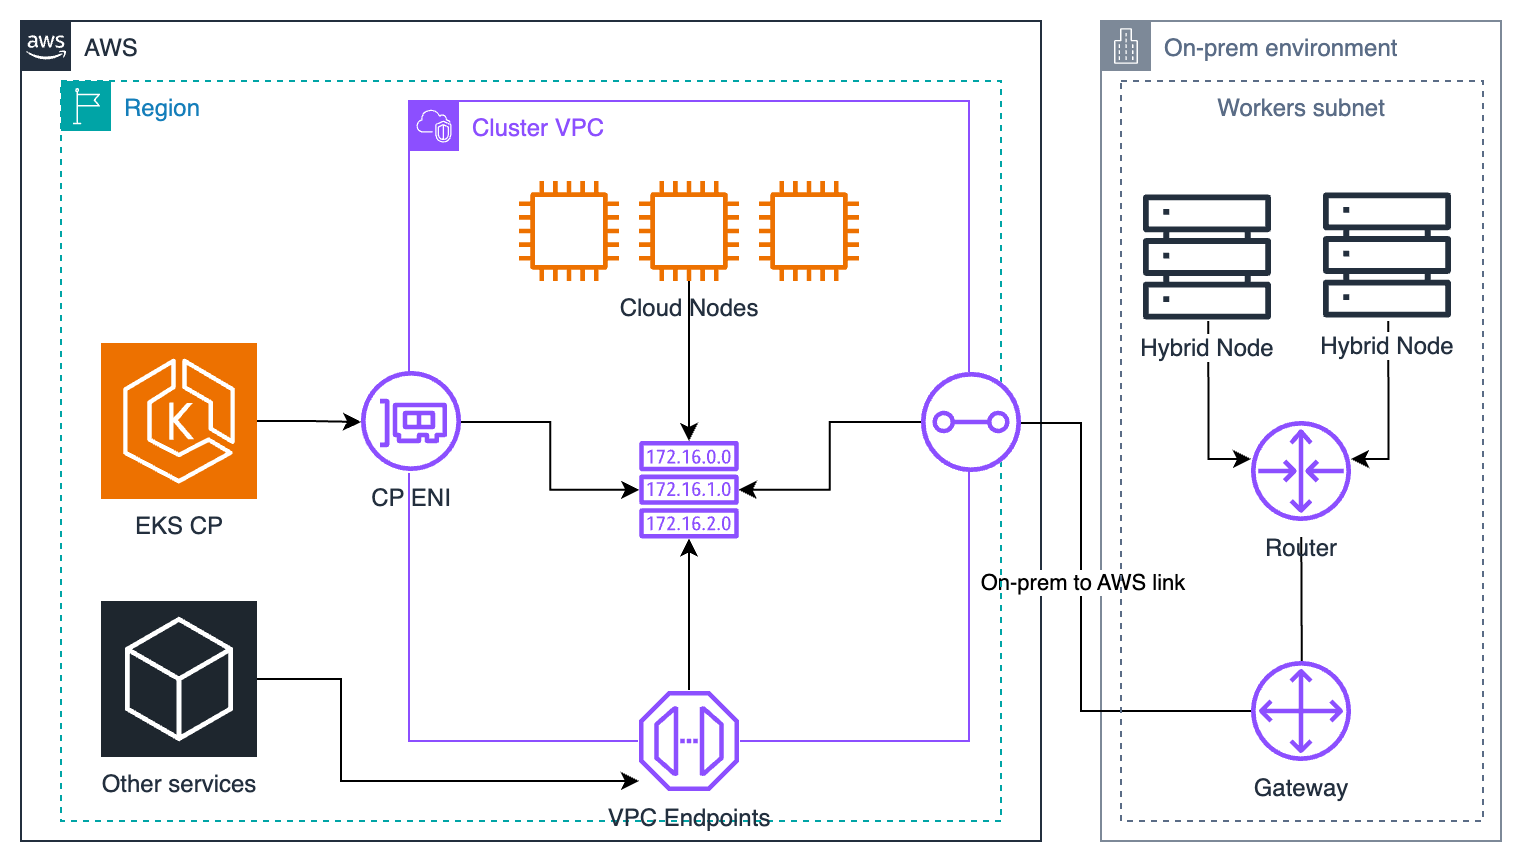
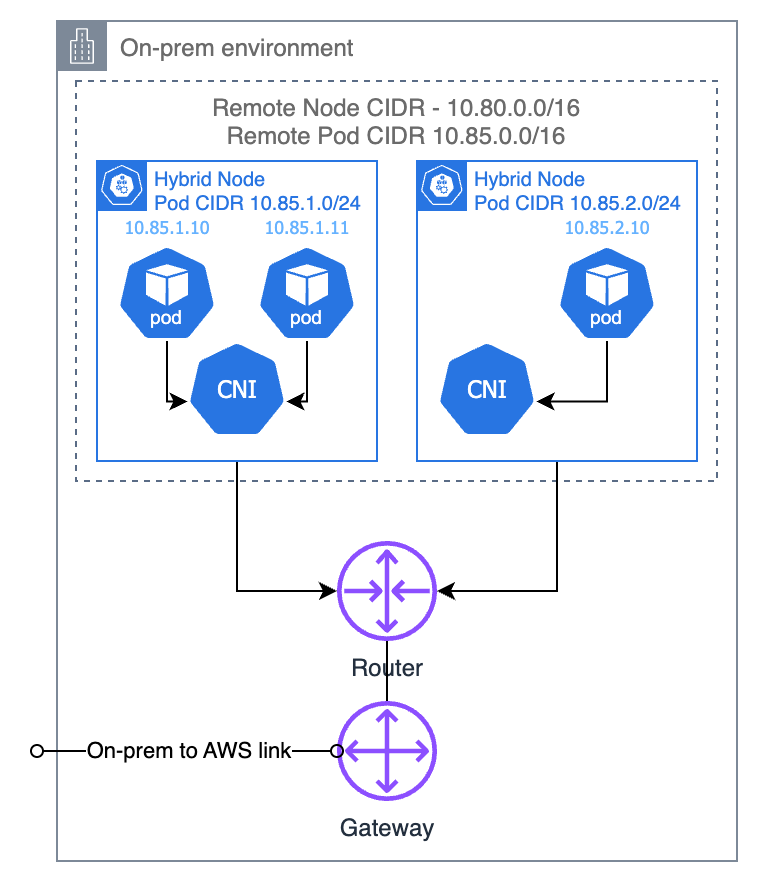
- Amazon EKS Hybrid Nodes
-
With Amazon EKS Hybrid Nodes, you can use your on-premises and edge infrastructure as nodes in Amazon EKS clusters. Amazon EKS Hybrid Nodes unifies Kubernetes management across environments and offloads Kubernetes control plane management to
AWSfor your on-premises and edge applications.
Kubernetes concepts
Learn core Kubernetes concepts and how they relate to deploying workloads, managing clusters, and working with control planes, nodes, Pods, containers, and networking on Amazon EKS.
Amazon Elastic Kubernetes Service (Amazon EKS) is an AWS managed service based on the open source Kubernetes project. While there are things you need to know about how the Amazon EKS service integrates with AWS Cloud (particularly when you first create an Amazon EKS cluster), once it’s up and running, you use your Amazon EKS cluster in much that same way as you would any other Kubernetes cluster. So to begin managing Kubernetes clusters and deploying workloads, you need at least a basic understanding of Kubernetes concepts.
This page divides Kubernetes concepts into three sections: Why Kubernetes?, Clusters, and Workloads. The first section describes the value of running a Kubernetes service, in particular as a managed service like Amazon EKS. The Workloads section covers how Kubernetes applications are built, stored, run, and managed. The Clusters section lays out the different components that make up Kubernetes clusters and what your responsibilities are for creating and maintaining Kubernetes clusters.
[[Topic List]]
As you go through this content, links will lead you to further descriptions of Kubernetes concepts in both Amazon EKS and Kubernetes documentation, in case you want to take deep dives into any of the topics we cover here. For details about how Amazon EKS implements Kubernetes control plane and compute features, see Amazon EKS architecture.
Why Kubernetes?
Kubernetes was designed to improve availability and scalability when running mission-critical, production-quality containerized applications. Rather than just running Kubernetes on a single machine (although that is possible), Kubernetes achieves those goals by allowing you to run applications across sets of computers that can expand or contract to meet demand. Kubernetes includes features that make it easier for you to:
-
Deploy applications on multiple machines (using containers deployed in Pods)
-
Monitor container health and restart failed containers
-
Scale containers up and down based on load
-
Update containers with new versions
-
Allocate resources between containers
-
Balance traffic across machines
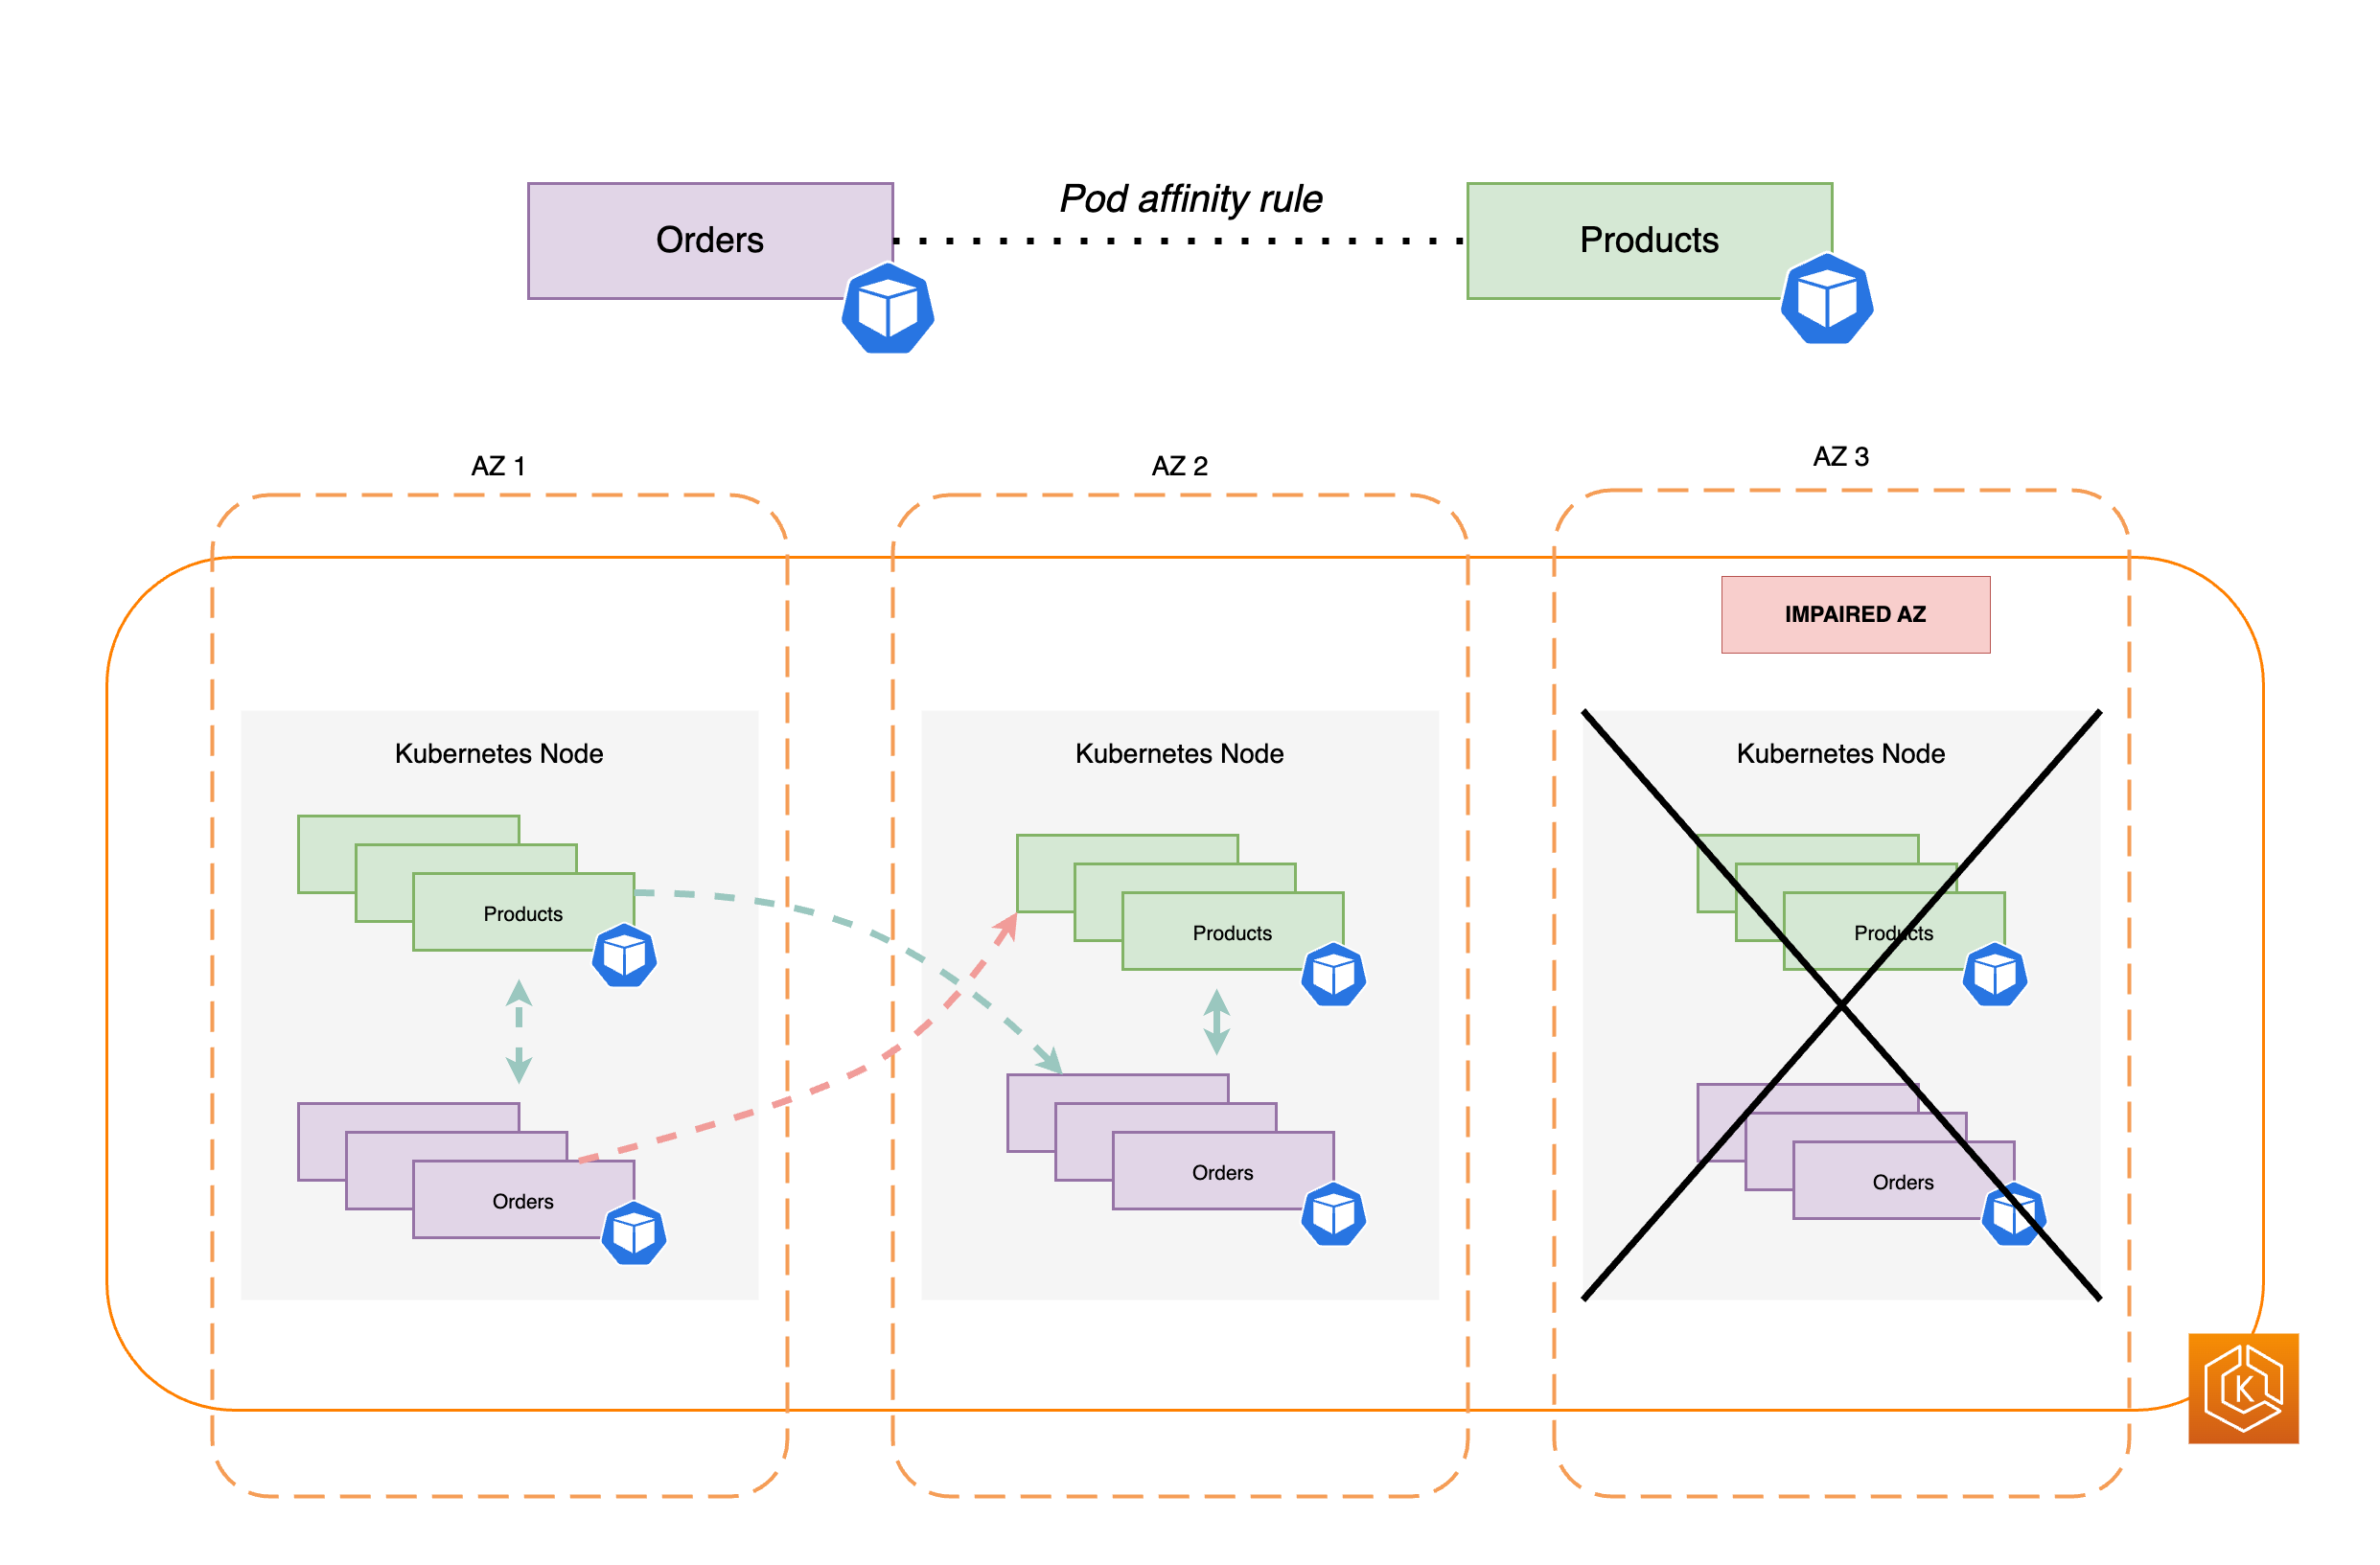
Having Kubernetes automate these types of complex tasks allows an application developer to focus on building and improving their application workloads, rather than worrying about infrastructure. The developer typically creates configuration files, formatted as YAML files, that describe the desired state of the application. This could include which containers to run, resource limits, number of Pod replicas, CPU/memory allocation, affinity rules, and more.
Attributes of Kubernetes
To achieve its goals, Kubernetes has the following attributes:
-
Containerized — Kubernetes is a container orchestration tool. To use Kubernetes, you must first have your applications containerized. Depending on the type of application, this could be as a set of microservices, as batch jobs or in other forms. Then, your applications can take advantage of a Kubernetes workflow that encompasses a huge ecosystem of tools, where containers can be stored as images in a container registry, deployed to a Kubernetes cluster, and run on an available node. You can build and test individual containers on your local computer with Docker or another container runtime, before deploying them to your Kubernetes cluster.
-
Scalable — If the demand for your applications exceeds the capacity of the running instances of those applications, Kubernetes is able to scale up. As needed, Kubernetes can tell if applications require more CPU or memory and respond by either automatically expanding available capacity or using more of existing capacity. Scaling can be done at the Pod level, if there is enough compute available to just run more instances of the application (horizontal Pod autoscaling), or at the node level, if more nodes need to be brought up to handle the increased capacity (Cluster Autoscaler or Karpenter). As capacity is no longer needed, these services can delete unnecessary Pods and shut down unneeded nodes.
-
Available — If an application or node becomes unhealthy or unavailable, Kubernetes can move running workloads to another available node. You can force the issue by simply deleting a running instance of a workload or node that’s running your workloads. The bottom line here is that workloads can be brought up in other locations if they can no longer run where they are.
-
Declarative — Kubernetes uses active reconciliation to constantly check that the state that you declare for your cluster matches the actual state. By applying Kubernetes objects to a cluster, typically through YAML-formatted configuration files, you can, for example, ask to start up the workloads you want to run on your cluster. You can later change the configurations to do something like use a later version of a container or allocate more memory. Kubernetes will do what it needs to do to establish the desired state. This can include bringing nodes up or down, stopping and restarting workloads, or pulling updated containers.
-
Composable — Because an application typically consists of multiple components, you want to be able to manage a set of these components (often represented by multiple containers) together. While Docker Compose offers a way to do this directly with Docker, the Kubernetes Kompose command can help you do that with Kubernetes. See Translate a Docker Compose File to Kubernetes Resources for an example of how to do this.
-
Extensible — Unlike proprietary software, the open source Kubernetes project is designed to be open to you extending Kubernetes any way that you like to meet your needs. APIs and configuration files are open to direct modifications. Third-parties are encouraged to write their own Controllers, to extend both infrastructure and end-user Kubernetes features. Webhooks let you set up cluster rules to enforce policies and adapt to changing conditions. For more ideas on how to extend Kubernetes clusters, see Extending Kubernetes.
-
Portable — Many organizations have standardized their operations on Kubernetes because it allows them to manage all of their application needs in the same way. Developers can use the same pipelines to build and store containerized applications. Those applications can then be deployed to Kubernetes clusters running on-premises, in clouds, on point-of-sales terminals in restaurants, or on IOT devices dispersed across company’s remote sites. Its open source nature makes it possible for people to develop these special Kubernetes distributions, along will tools needed to manage them.
Managing Kubernetes
Kubernetes source code is freely available, so with your own equipment you could install and manage Kubernetes yourself. However, self-managing Kubernetes requires deep operational expertise and takes time and effort to maintain. For those reasons, most people deploying production workloads choose a cloud provider (such as Amazon EKS) or on-premises provider (such as Amazon EKS Anywhere) with its own tested Kubernetes distribution and support of Kubernetes experts. This allows you to offload much of the undifferentiated heavy lifting needed to maintain your clusters, including:
-
Hardware — If you don’t have hardware available to run Kubernetes per your requirements, a cloud provider such as
AWSAmazon EKS can save you on upfront costs. With Amazon EKS, this means that you can consume the best cloud resources offered byAWS, including computer instances (Amazon Elastic Compute Cloud), your own private environment (Amazon VPC), central identity and permissions management (IAM), and storage (Amazon EBS).AWSmanages the computers, networks, data centers, and all the other physical components needed to run Kubernetes. Likewise, you don’t have to plan your datacenter to handle the maximum capacity on your highest-demand days. For Amazon EKS Anywhere, or other on premises Kubernetes clusters, you are responsible for managing the infrastructure used in your Kubernetes deployments, but you can still rely onAWSto help you keep Kubernetes up to date. -
Control plane management — Amazon EKS manages the security and availability of the
AWS-hosted Kubernetes control plane, which is responsible for scheduling containers, managing the availability of applications, and other key tasks, so you can focus on your application workloads. If your cluster breaks,AWSshould have the means to restore your cluster to a running state. For Amazon EKS Anywhere, you would manage the control plane yourself. -
Tested upgrades — When you upgrade your clusters, you can rely on Amazon EKS or Amazon EKS Anywhere to provide tested versions of their Kubernetes distributions.
-
Add-ons — There are hundreds of projects built to extend and work with Kubernetes that you can add to your cluster’s infrastructure or use to aid the running of your workloads. Instead of building and managing those add-ons yourself,
AWSprovides Amazon EKS add-ons that you can use with your clusters. Amazon EKS Anywhere provides Curated Packages that include builds of many popular open source projects. So you don’t have to build the software yourself or manage critical security patches, bug fixes, or upgrades. Likewise, if the defaults meet your needs, it’s typical for very little configuration of those add-ons to be needed. See Extend Clusters for details on extending your cluster with add-ons.
Kubernetes in action
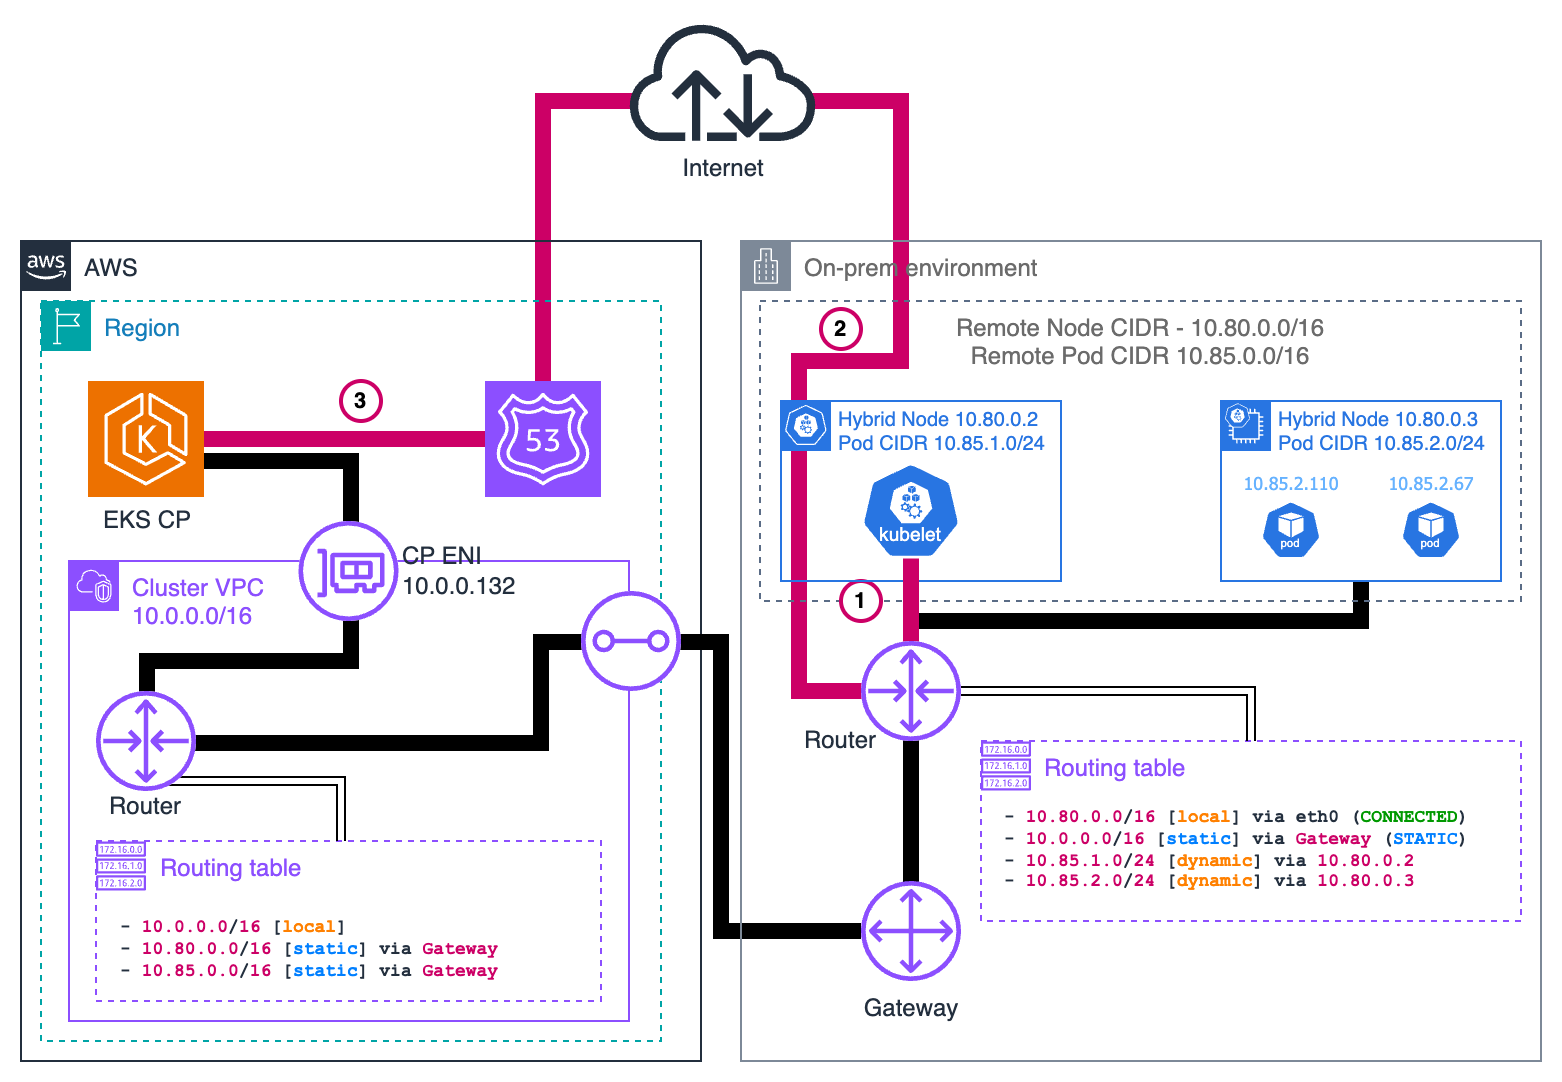
The following diagram shows key activities you would do as a Kubernetes Admin or Application Developer to create and use a Kubernetes cluster. In the process, it illustrates how Kubernetes components interact with each other, using the AWS cloud as the example of the underlying cloud provider.
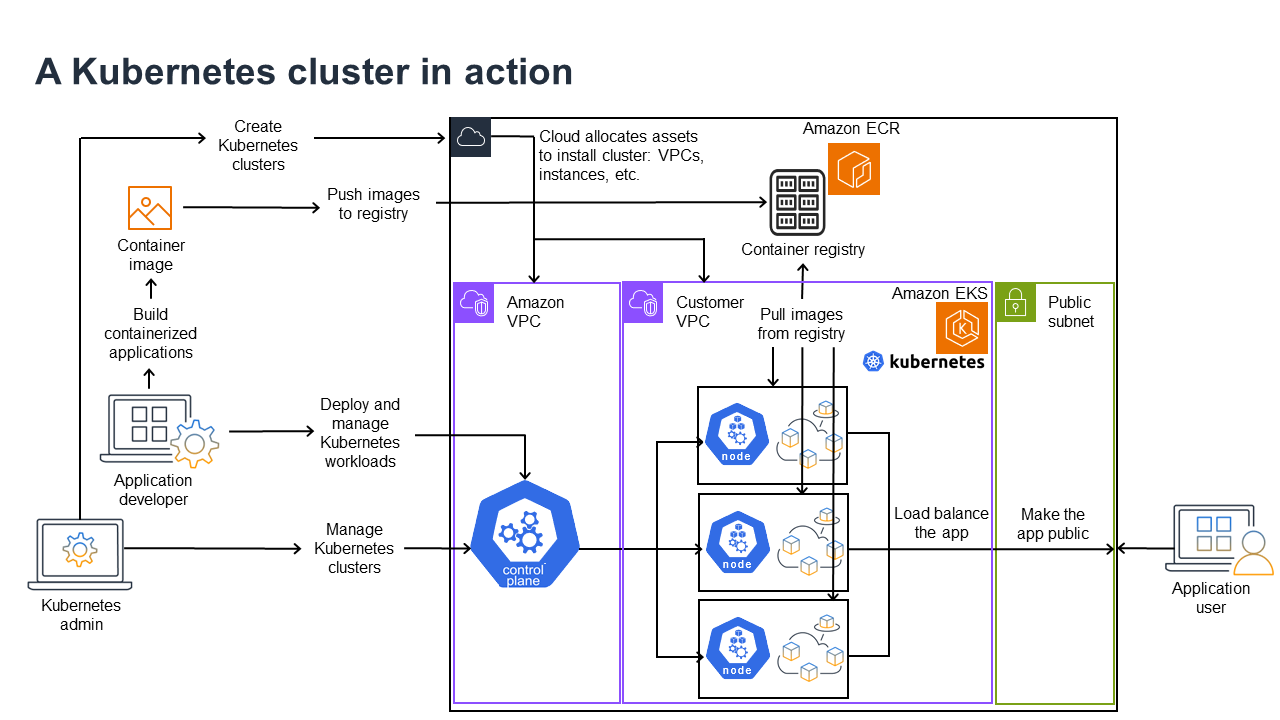
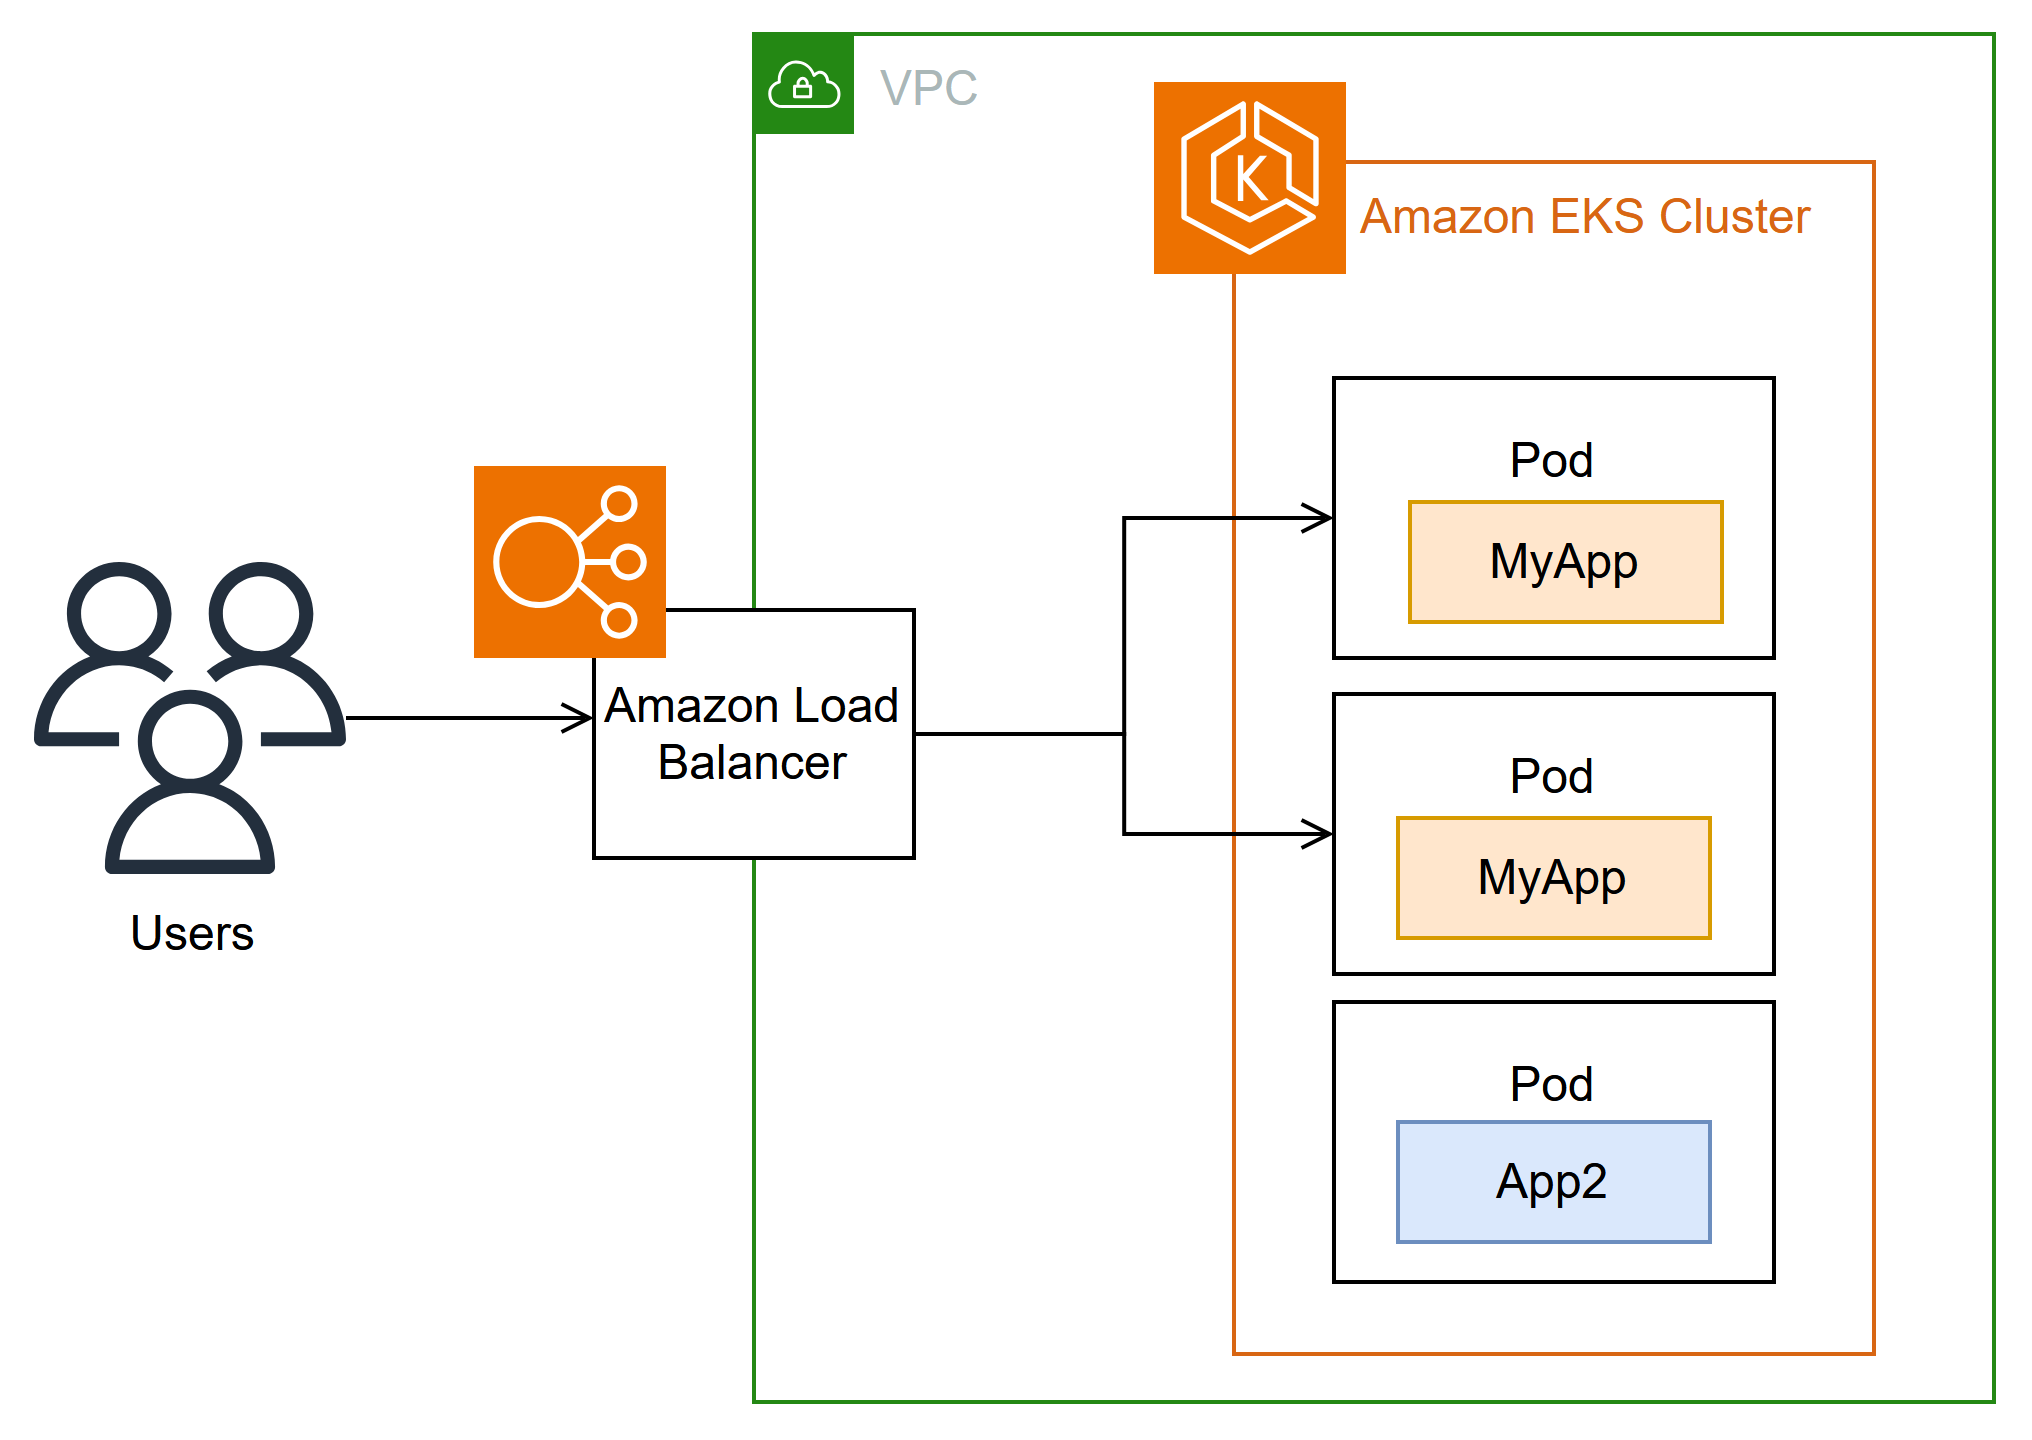
A Kubernetes Admin creates the Kubernetes cluster using a tool specific to the type of provider on which the cluster will be built. This example uses the AWS cloud as the provider, which offers the managed Kubernetes service called Amazon EKS. The managed service automatically allocates the resources needed to create the cluster, including creating two new Virtual Private Clouds (Amazon VPCs) for the cluster, setting up networking, and mapping Kubernetes permissions directly into the new VPCs for cloud asset management. The managed service also sees that the control plane services have places to run and allocates zero or more Amazon EC2 instances as Kubernetes nodes for running workloads. AWS manages one Amazon VPC itself for the control plane, while the other Amazon VPC contains the customer nodes that run workloads.
Many of the Kubernetes Admin’s tasks going forward are done using Kubernetes tools such as kubectl. That tool makes requests for services directly to the cluster’s control plane. The ways that queries and changes are made to the cluster are then very similar to the ways you would do them on any Kubernetes cluster.
An application developer wanting to deploy workloads to this cluster can perform several tasks. The developer needs to build the application into one or more container images, then push those images to a container registry that is accessible to the Kubernetes cluster. AWS offers the Amazon Elastic Container Registry (Amazon ECR) for that purpose.
To run the application, the developer can create YAML-formatted configuration files that tell the cluster how to run the application, including which containers to pull from the registry and how to wrap those containers in Pods. The control plane (scheduler) schedules the containers to one or more nodes and the container runtime on each node actually pulls and runs the needed containers. The developer can also set up an application load balancer to balance traffic to available containers running on each node and expose the application so it is available on a public network to the outside world. With that all done, someone wanting to use the application can connect to the application endpoint to access it.
The following sections go through details of each of these features, from the perspective of Kubernetes Clusters and Workloads.
Clusters
If your job is to start and manage Kubernetes clusters, you should know how Kubernetes clusters are created, enhanced, managed, and deleted. You should also know what the components are that make up a cluster and what you need to do to maintain those components.
Tools for managing clusters handle the overlap between the Kubernetes services and the underlying hardware provider. For that reason, automation of these tasks tend to be done by the Kubernetes provider (such as Amazon EKS or Amazon EKS Anywhere) using tools that are specific to the provider. For example, to start an Amazon EKS cluster you can use eksctl create cluster, while for Amazon EKS Anywhere you can use eksctl anywhere create cluster. Note that while these commands create a Kubernetes cluster, they are specific to the provider and are not part of the Kubernetes project itself.
Cluster creation and management tools
The Kubernetes project offers tools for creating a Kubernetes cluster manually. So if you want to install Kubernetes on a single machine, or run the control plane on a machine and add nodes manually, you can use CLI tools like kind, minikube, or kubeadm that are listed under Kubernetes Install Tools. To simplify and automate the full lifecycle of cluster creation and management, it is much easier to use tools supported by an established Kubernetes provider, such as Amazon EKS or Amazon EKS Anywhere.
In AWS Cloud, you can create Amazon EKS clusters using CLI tools, such as eksctl, or more declarative tools, such as Terraform (see Amazon EKS Blueprints for Terraform). You can also create a cluster from the consolelong. See Amazon EKS features for a list what you get with Amazon EKS. Kubernetes responsibilities that Amazon EKS takes on for you include:
-
Managed control plane —
AWSmakes sure that the Amazon EKS cluster is available and scalable because it manages the control plane for you and makes it available acrossAWSAvailability Zones. -
Node management — Instead of manually adding nodes, you can have Amazon EKS create nodes automatically as needed, using Managed Node Groups (see Simplify node lifecycle with managed node groups) or Karpenter. Managed Node Groups have integrations with Kubernetes Cluster Autoscaling. Using node management tools, you can take advantage of cost savings, with things like Spot Instances and node consolidation, and availability, using Scheduling features to set how workloads are deployed and nodes are selected.
-
Cluster networking — Using CloudFormation templates,
eksctlsets up networking between control plane and data plane (node) components in the Kubernetes cluster. It also sets up endpoints through which internal and external communications can take place. See De-mystifying cluster networking for Amazon EKS worker nodes for details. Communications between Pods in Amazon EKS is done using Amazon EKS Pod Identities (see Learn how EKS Pod Identity grants pods access toAWSservices), which provides a means of letting Pods tap intoAWScloud methods of managing credentials and permissions. -
Add-Ons — Amazon EKS saves you from having to build and add software components that are commonly used to support Kubernetes clusters. For example, when you create an Amazon EKS cluster from the
consolelong, it automatically adds the Amazon EKS kube-proxy (Managekube-proxyin Amazon EKS clusters), Amazon VPC CNI plugin for Kubernetes (Assign IPs to Pods with the Amazon VPC CNI), and CoreDNS (Manage CoreDNS for DNS in Amazon EKS clusters) add-ons. See Amazon EKS add-ons for more on these add-ons, including a list of which are available.
To run your clusters on your own on-premises computers and networks, Amazon offers Amazon EKS Anywhere. Instead of the AWS Cloud being the provider, you have the choice of running Amazon EKS Anywhere on VMWare vSphere, bare metal (Tinkerbell provider), Snow, CloudStack, or Nutanix platforms using your own equipment.
Amazon EKS Anywhere is based on the same Amazon EKS Distro software that is used by Amazon EKS. However, Amazon EKS Anywhere relies on different implementations of the Kubernetes Cluster API (CAPI) interface to manage the full lifecycle of the machines in an Amazon EKS Anywhere cluster (such as CAPV for vSphere and CAPC for CloudStack). Because the entire cluster is running on your equipment, you take on the added responsibility of managing the control plane and backing up its data (see etcd later in this document).
Cluster components
Kubernetes cluster components are divided into two major areas: control plane and worker nodes. Control Plane Components manage the cluster and provide access to its APIs. Worker nodes (sometimes just referred to as Nodes) provide the places where the actual workloads are run. Node Components consist of services that run on each node to communicate with the control plane and run containers. The set of worker nodes for your cluster is referred to as the Data Plane.
Control plane
The control plane consists of a set of services that manage the cluster. These services may all be running on a single computer or may be spread across multiple computers. Internally, these are referred to as Control Plane Instances (CPIs). How CPIs are run depends on the size of the cluster and requirements for high availability. As demand increase in the cluster, a control plane service can scale to provide more instances of that service, with requests being load balanced between the instances.
Tasks that components of the Kubernetes control plane performs include:
-
Communicating with cluster components (API server) — The API server (kube-apiserver) exposes the Kubernetes API so requests to the cluster can be made from both inside and outside of the cluster. In other words, requests to add or change a cluster’s objects (Pods, Services, Nodes, and so on) can come from outside commands, such as requests from
kubectlto run a Pod. Likewise, requests can be made from the API server to components within the cluster, such as a query to thekubeletservice for the status of a Pod. -
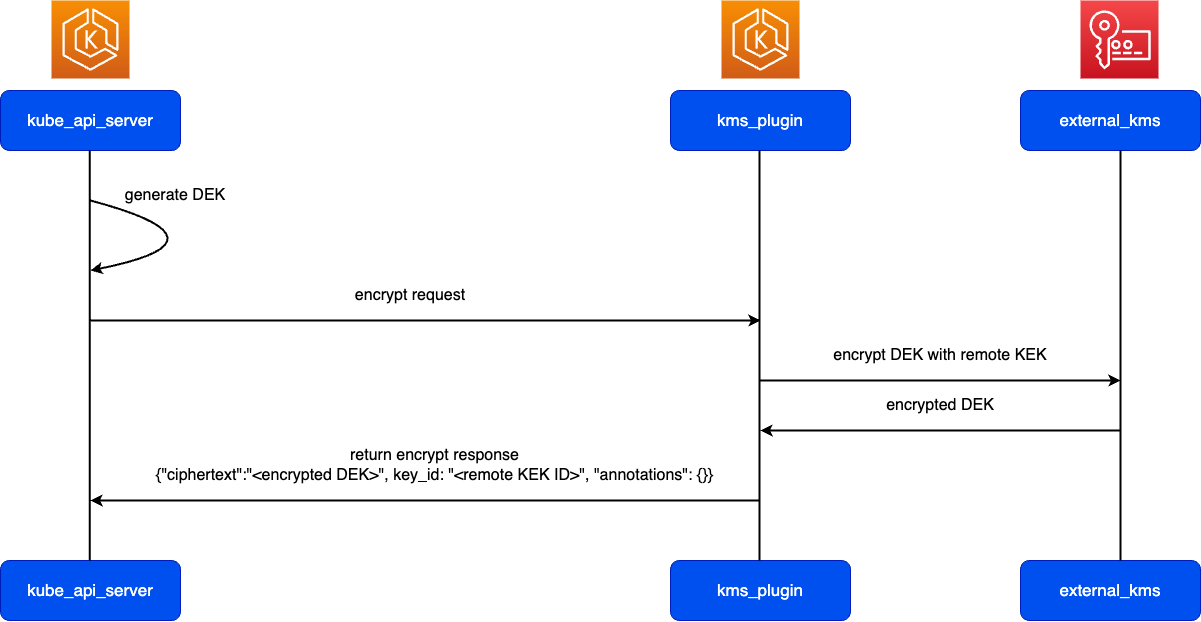
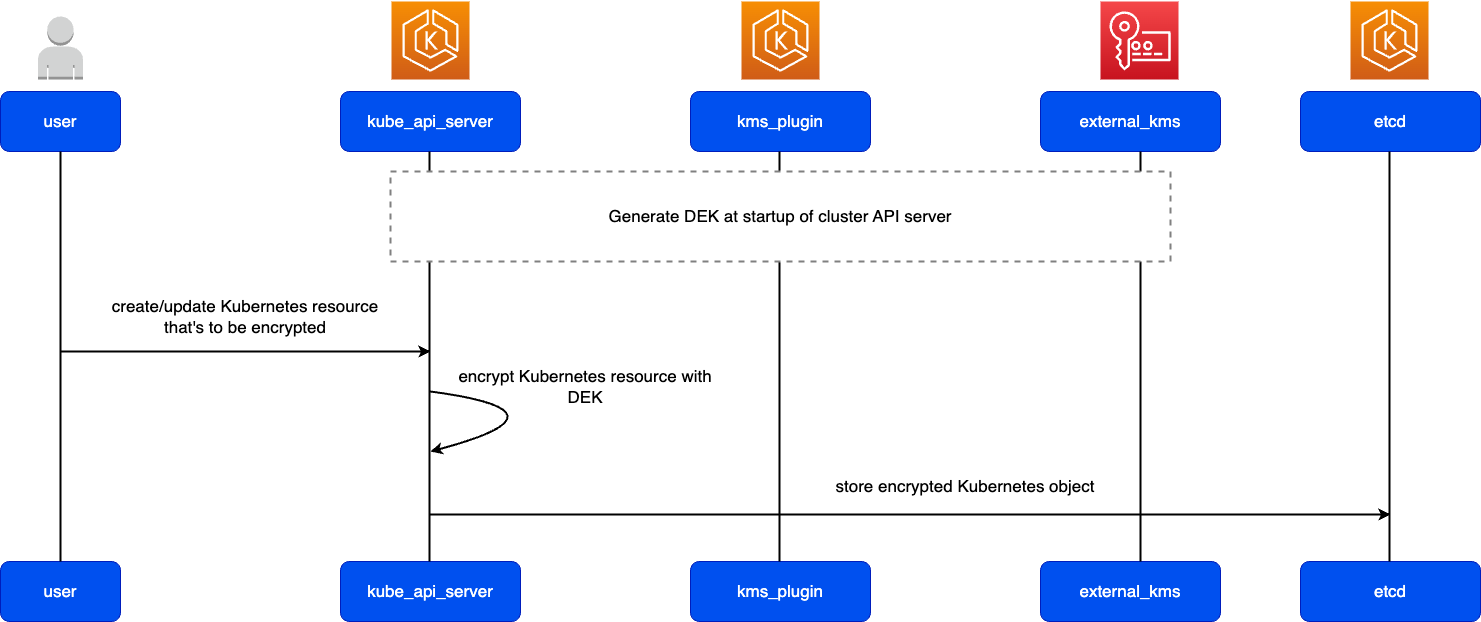
Store data about the cluster (
etcdkey value store) — Theetcdservice provides the critical role of keeping track of the current state of the cluster. If theetcdservice became inaccessible, you would be unable to update or query the status of the cluster, though workloads would continue to run for a while. For that reason, critical clusters typically have multiple, load-balanced instances of theetcdservice running at a time and do periodic backups of theetcdkey value store in case of data loss or corruption. Keep in mind that, in Amazon EKS, this is all handled for you automatically by default. Amazon EKS Anywhere provides instruction for etcd backup and restore. See the etcd Data Model to learn howetcdmanages data. -
Schedule Pods to nodes (Scheduler) — Requests to start or stop a Pod in Kubernetes are directed to the Kubernetes Scheduler (kube-scheduler). Because a cluster could have multiple nodes that are capable of running the Pod, it is up to the Scheduler to choose which node (or nodes, in the case of replicas) the Pod should run on. If there is not enough available capacity to run the requested Pod on an existing node, the request will fail, unless you have made other provisions. Those provisions could include enabling services such as Managed Node Groups (Simplify node lifecycle with managed node groups) or Karpenter that can automatically start up new nodes to handle the workloads.
-
Keep components in desired state (Controller Manager) — The Kubernetes Controller Manager runs as a daemon process (kube-controller-manager) to watch the state of the cluster and make changes to the cluster to reestablish the expected states. In particular, there are several controllers that watch over different Kubernetes objects, which includes a
statefulset-controller,endpoint-controller,cronjob-controller,node-controller, and others. -
Manage cloud resources (Cloud Controller Manager) — Interactions between Kubernetes and the cloud provider that carries out requests for the underlying data center resources are handled by the Cloud Controller Manager (cloud-controller-manager). Controllers managed by the Cloud Controller Manager can include a route controller (for setting up cloud network routes), service controller (for using cloud load balancing services), and node lifecycle controller (to keep nodes in sync with Kubernetes throughout their lifecycles).
Worker Nodes (data plane)
For a single-node Kubernetes cluster, workloads run on the same machine as the control plane. However, a more standard configuration is to have one or more separate computer systems (Nodes) that are dedicated to running Kubernetes workloads.
When you first create a Kubernetes cluster, some cluster creation tools allow you to configure a certain number nodes to be added to the cluster (either by identifying existing computer systems or by having the provider create new ones). Before any workloads are added to those systems, services are added to each node to implement these features:
-
Manage each node (
kubelet) — The API server communicates with the kubelet service running on each node to make sure that the node is properly registered and Pods requested by the Scheduler are running. The kubelet can read the Pod manifests and set up storage volumes or other features needed by the Pods on the local system. It can also check on the health of the locally running containers. -
Run containers on a node (container runtime) — The Container Runtime on each node manages the containers requested for each Pod assigned to the node. That means that it can pull container images from the appropriate registry, run the container, stop it, and responds to queries about the container. The default container runtime is containerd. As of Kubernetes 1.24, the special integration of Docker (
dockershim) that could be used as the container runtime was dropped from Kubernetes. While you can still use Docker to test and run containers on your local system, to use Docker with Kubernetes you would now have to Install Docker Engine on each node to use it with Kubernetes. -
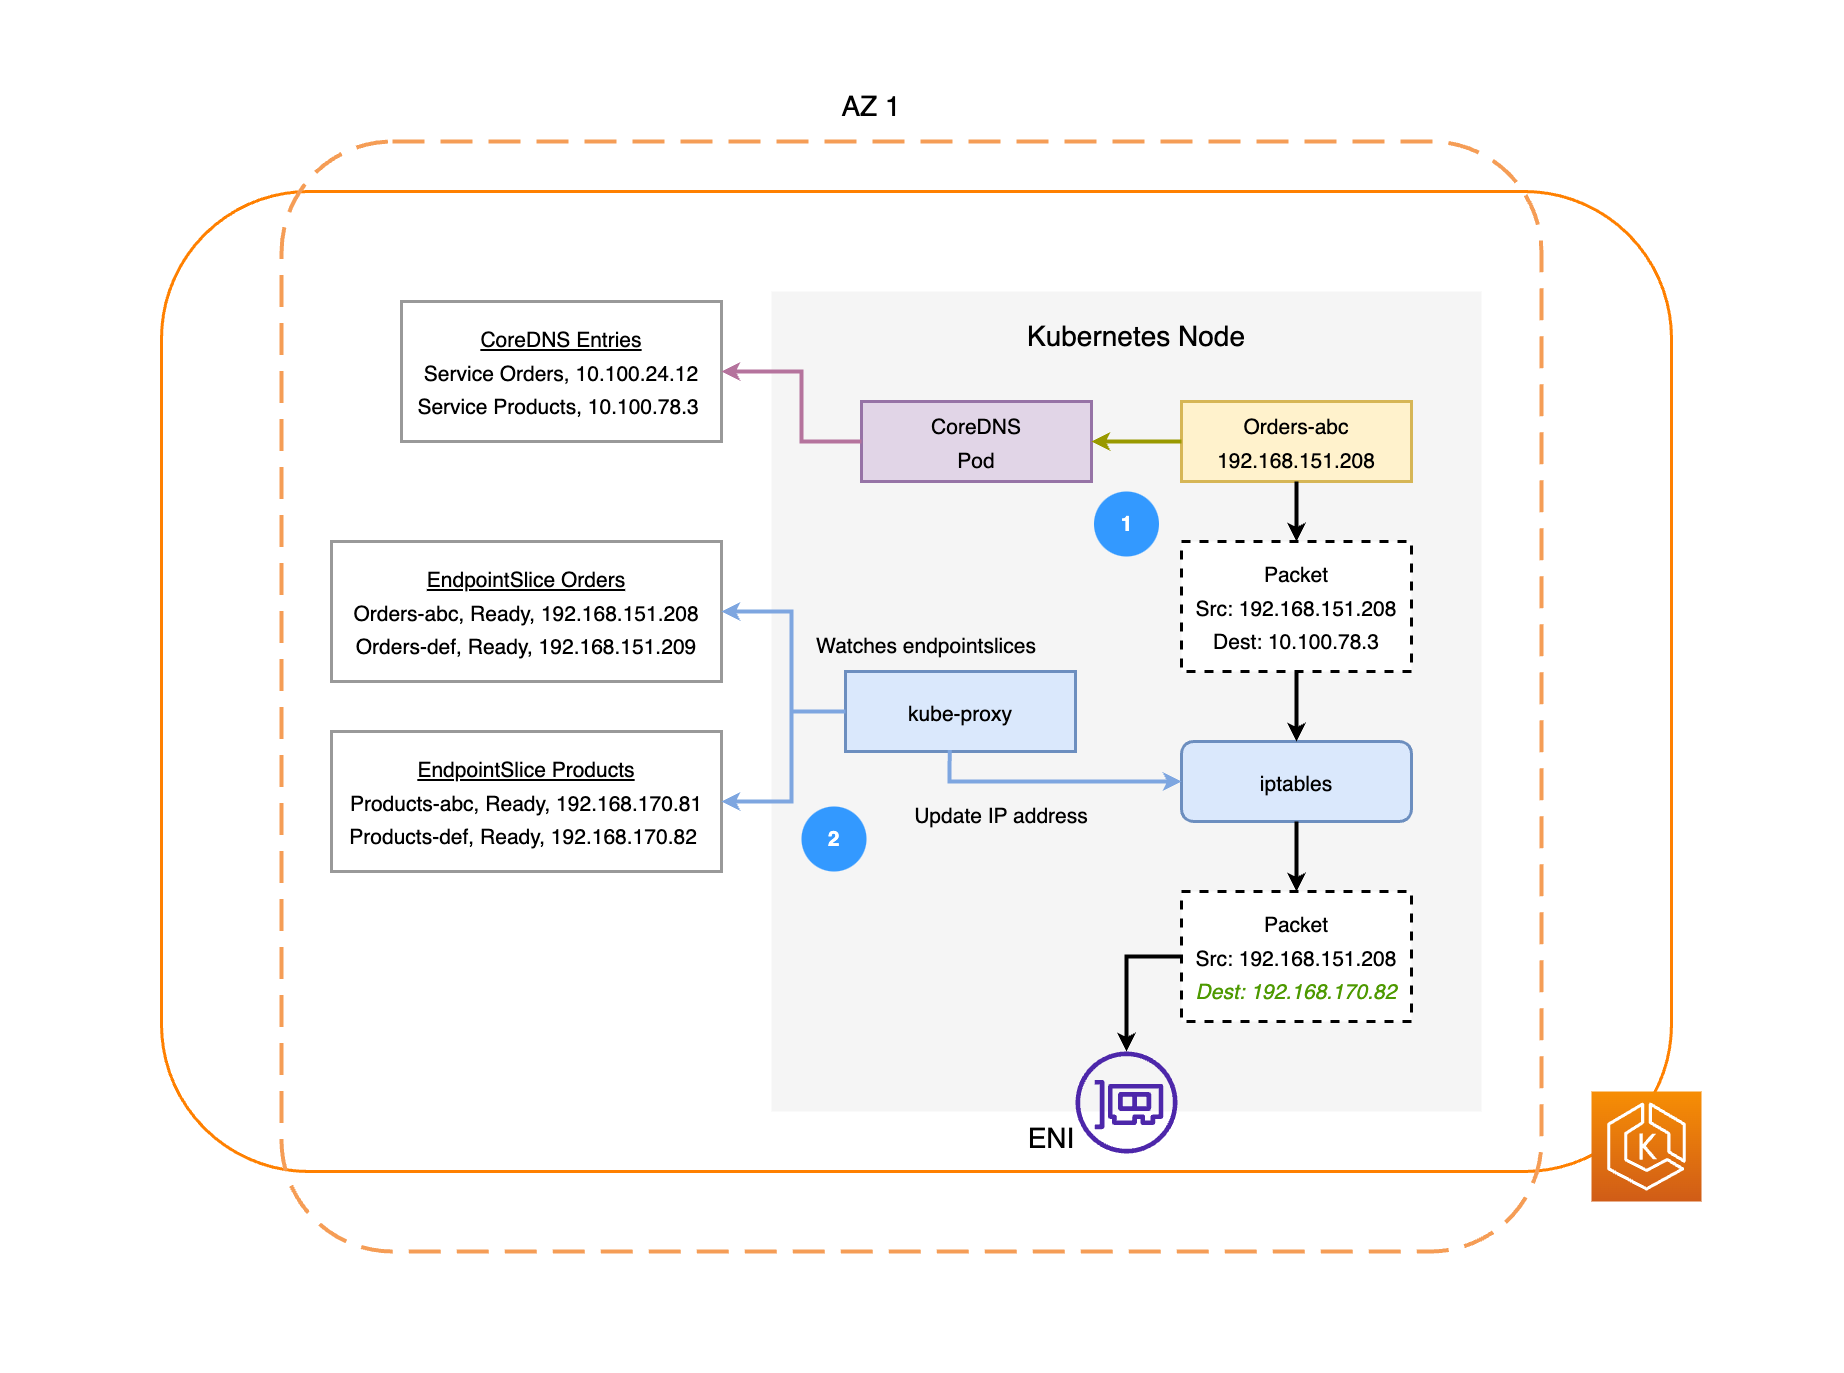
Manage networking between containers (
kube-proxy) — To be able to support communication between Pods, Kubernetes uses a feature referred to as a Service to set up Pod networks that track IP addresses and ports associated with those Pods. The kube-proxy service runs on every node to allow that communication between Pods to take place.
Extend Clusters
There are some services you can add to Kubernetes to support the cluster, but are not run in the control plane. These services often run directly on nodes in the kube-system namespace or in its own namespace (as is often done with third-party service providers). A common example is the CoreDNS service, which provides DNS services to the cluster. Refer to Discovering builtin services for information on how to see which cluster services are running in kube-system on your cluster.
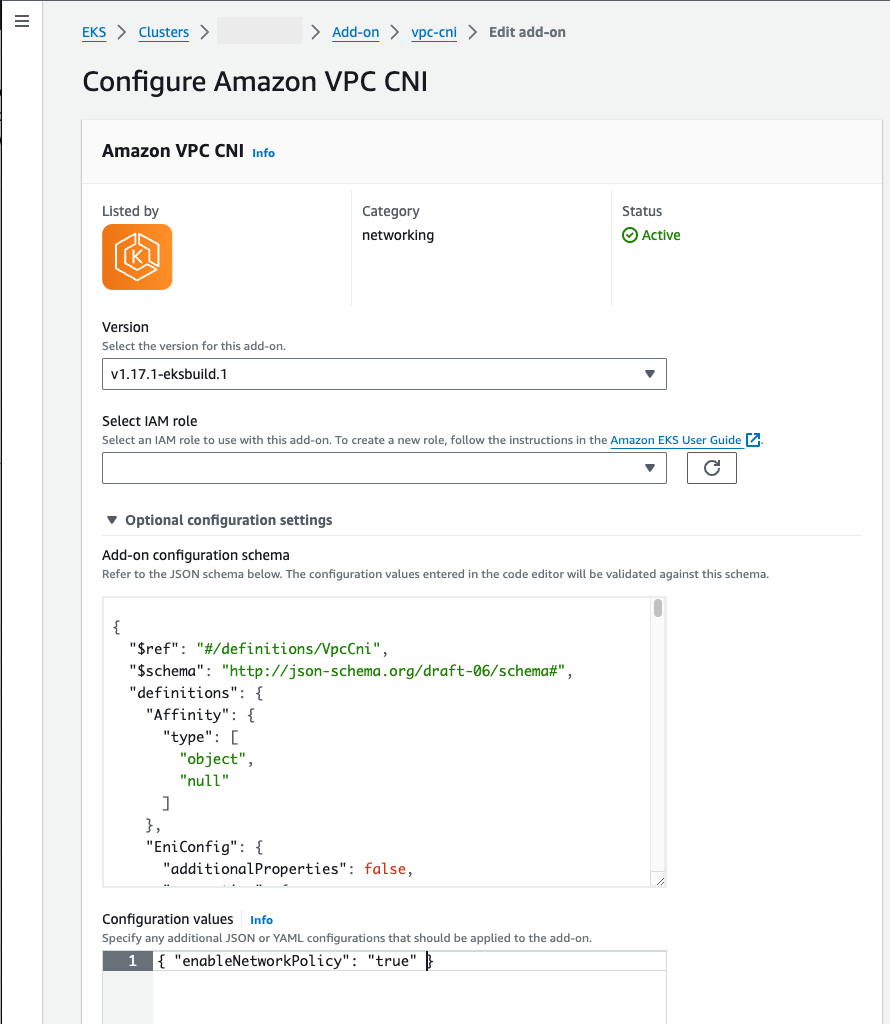
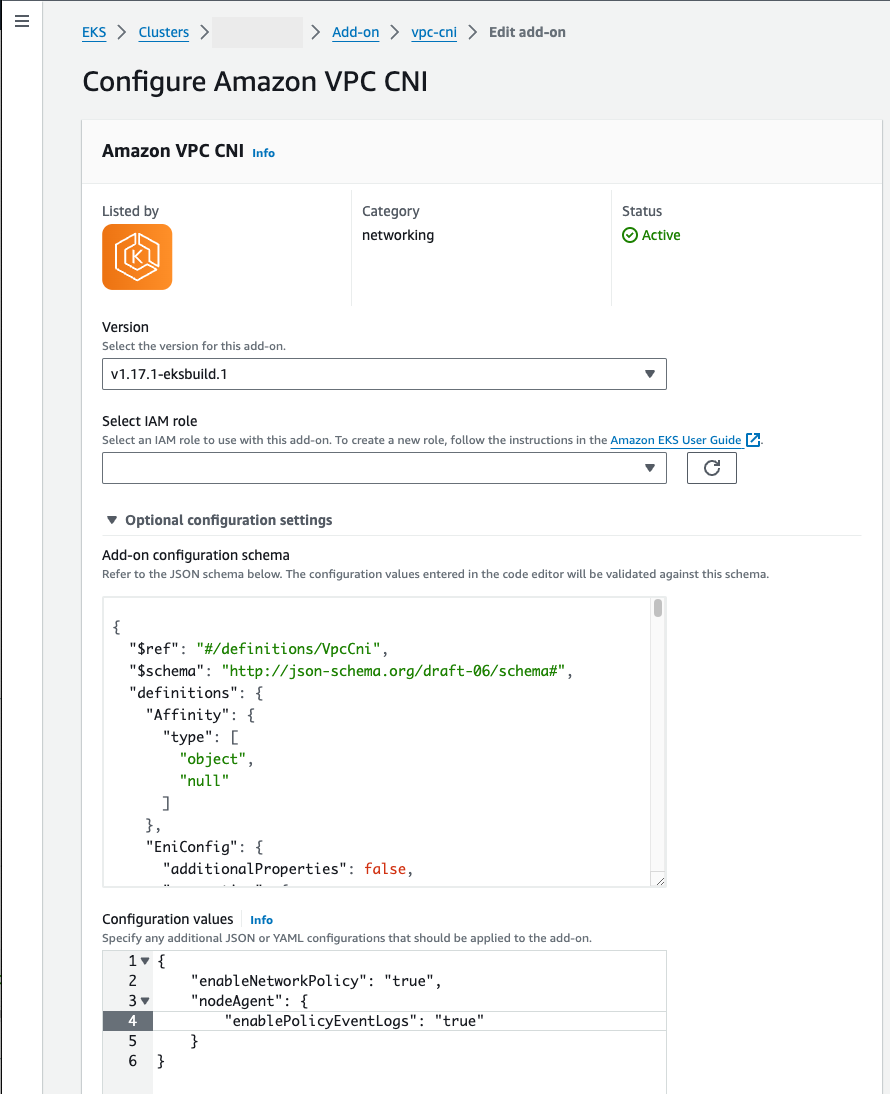
There are different types of add-ons you can consider adding to your clusters. To keep your clusters healthy, you can add observability features (see Monitor your cluster performance and view logs) that allow you to do things like logging, auditing, and metrics. With this information, you can troubleshoot problems that occur, often through the same observability interfaces. Examples of these types of services include Amazon GuardDuty, CloudWatch (see Monitor cluster data with Amazon CloudWatch), AWS Distro for OpenTelemetry, Amazon VPC CNI plugin for Kubernetes (see Assign IPs to Pods with the Amazon VPC CNI), and Grafana Kubernetes Monitoring. For storage (see Store application data for your cluster), add-ons to Amazon EKS include Amazon Elastic Block Store CSI Driver (see Store Kubernetes volumes with Amazon EBS), Amazon Elastic File System CSI Driver (see Store an elastic file system with Amazon EFS), and several third-party storage add-ons such as Amazon FSx for NetApp ONTAP CSI driver Store high-performance apps with FSx for NetApp ONTAP).
For a more complete list of available Amazon EKS add-ons, see Amazon EKS add-ons.
Workloads
Kubernetes defines a Workload as “an application running on Kubernetes.” That application can consist of a set of microservices run as Containers in Pods, or could be run as a batch job or other type of applications. The job of Kubernetes is to make sure that the requests that you make for those objects to be set up or deployed are carried out. As someone deploying applications, you should learn about how containers are built, how Pods are defined, and what methods you can use for deploying them.
Containers
The most basic element of an application workload that you deploy and manage in Kubernetes is a Pod. A Pod represents a way of holding the components of an application as well as defining specifications that describe the Pod’s attributes. Contrast this to something like an RPM or Deb package, which packages together software for a Linux system, but does not itself run as an entity.
Because the Pod is the smallest deployable unit, it typically holds a single container. However, multiple containers can be in a Pod in cases where the containers are tightly coupled. For example, a web server container might be packaged in a Pod with a sidecar type of container that may provide logging, monitoring, or other service that is closely tied to the web server container. In this case, being in the same Pod ensures that for each running instance of the Pod, both containers always run on the same node. Likewise, all containers in a Pod share the same environment, with the containers in a Pod running as though they are in the same isolated host. The effect of this is that the containers share a single IP address that provides access to the Pod and the containers can communicate with each other as though they were running on their own localhost.
Pod specifications (PodSpec) define the desired state of the Pod. You can deploy an individual Pod or multiple Pods by using workload resources to manage Pod Templates. Workload resources include Deployments (to manage multiple Pod Replicas), StatefulSets (to deploy Pods that need to be unique, such as database Pods), and DaemonSets (where a Pod needs to run continuously on every node). More on those later.
While a Pod is the smallest unit you deploy, a container is the smallest unit that you build and manage.
Building Containers
The Pod is really just a structure around one or more containers, with each container itself holding the file system, executables, configuration files, libraries, and other components to actually run the application. Because a company called Docker Inc. first popularized containers, some people refer to containers as Docker Containers. However, the Open Container Initiative has since defined container runtimes, images, and distribution methods for the industry. Add to that the fact that containers were created from many existing Linux features, others often refer to containers as OCI Containers, Linux Containers, or just Containers.
When you build a container, you typically start with a Dockerfile (literally named that). Inside that Dockerfile, you identify:
-
A base image — A base container image is a container that is typically built from either a minimal version of an operating system’s file system (such as Red Hat Enterprise Linux or Ubuntu) or a minimal system that is enhanced to provide software to run specific types of applications (such as a nodejs or python apps).
-
Application software — You can add your application software to your container in much the same way you would add it to a Linux system. For example, in your Dockerfile you can run
npmandyarnto install a Java application oryumanddnfto install RPM packages. In other words, using a RUN command in a Dockerfile, you can run any command that is available in the file system of your base image to install software or configure software inside of the resulting container image. -
Instructions — The Dockerfile reference describes the instructions you can add to a Dockerfile when you configure it. These include instructions used to build what is in the container itself (
ADDorCOPYfiles from the local system), identify commands to execute when the container is run (CMDorENTRYPOINT), and connect the container to the system it runs on (by identifying theUSERto run as, a localVOLUMEto mount, or the ports toEXPOSE).
While the docker command and service have traditionally been used to build containers (docker build), other tools that are available to build container images include podman and nerdctl. See Building Better Container Images or Overview of Docker Build to learn about building containers.
Storing Containers
Once you’ve built your container image, you can store it in a container distribution registry on your workstation or on a public container registry. Running a private container registry on your workstation allows you to store container images locally, making them readily available to you.
To store container images in a more public manner, you can push them to a public container registry. Public container registries provide a central location for storing and distributing container images. Examples of public container registries include the Amazon Elastic Container Registry, Red Hat Quay registry, and Docker Hub registry.
When running containerized workloads on Amazon Elastic Kubernetes Service (Amazon EKS) we recommend pulling copies of Docker Official Images that are stored in Amazon Elastic Container Registry. Amazon ECR has been storing these images since 2021. You can search for popular container images in the Amazon ECR Public Gallery, and specifically for the Docker Hub images, you can search the Amazon ECR Docker Gallery.
Running containers
Because containers are built in a standard format, a container can run on any machine that can run a container runtime (such as Docker) and whose contents match the local machine’s architecture (such as x86_64 or arm). To test a container or just run it on your local desktop, you can use docker run or podman run commands to start up a container on the localhost. For Kubernetes, however, each worker node has a container runtime deployed and it is up to Kubernetes to request that a node run a container.
Once a container has been assigned to run on a node, the node looks to see if the requested version of the container image already exists on the node. If it doesn’t, Kubernetes tells the container runtime to pull that container from the appropriate container registry, then run that container locally. Keep in mind that a container image refers to the software package that is moved around between your laptop, the container registry, and Kubernetes nodes. A container refers to a running instance of that image.
Pods
Once your containers are ready, working with Pods includes configuring, deploying, and making the Pods accessible.
Configuring Pods
When you define a Pod, you assign a set of attributes to it. Those attributes must include at least the Pod name and the container image to run. However, there are many other things you want to configure with your Pod definitions as well (see the PodSpec page for details on what can go into a Pod). These include:
-
Storage — When a running container is stopped and deleted, data storage in that container will disappear, unless you set up more permanent storage. Kubernetes supports many different storage types and abstracts them under the umbrella of Volumes. Storage types include CephFS, NFS, iSCSI, and others. You can even use a local block device from the local computer. With one of those storage types available from your cluster, you can mount the storage volume to a selected mount point in your container’s file system. A Persistent Volume is one that continues to exist after the Pod is deleted, while an Ephemeral Volume is deleted when the Pod is deleted. If your cluster administrator created different storage classes for your cluster, you might have the option for choosing the attributes of the storage you use, such as whether the volume is deleted or reclaimed after use, whether it will expand if more space is needed, and even whether it meets certain performance requirements.
-
Secrets — By making Secrets available to containers in Pod specs, you can provide the permissions those containers need to access file systems, data bases, or other protected assets. Keys, passwords, and tokens are among the items that can be stored as secrets. Using secrets makes it so you don’t have to store this information in container images, but need only make the secrets available to running containers. Similar to Secrets are ConfigMaps. A
ConfigMaptends to hold less critical information, such as key-value pairs for configuring a service. -
Container resources — Objects for further configuring containers can take the form of resource configuration. For each container, you can request the amount of memory and CPU that it can use, as well as place limits of the total amount of those resources that the container can use. See Resource Management for Pods and Containers for examples.
-
Disruptions — Pods can be disrupted involuntarily (a node goes down) or voluntarily (an upgrade is desired). By configuring a Pod disruption budget, you can exert some control over how available your application remains when disruptions occur. See Specifying a Disruption Budget for your application for examples.
-
Namespaces — Kubernetes provides different ways to isolate Kubernetes components and workloads from each other. Running all the Pods for a particular application in the same Namespace is a common way to secure and manage those Pods together. You can create your own namespaces to use or choose to not indicate a namespace (which causes Kubernetes to use the
defaultnamespace). Kubernetes control plane components typically run in the kube-system namespace.
The configuration just described is typically gathered together in a YAML file to be applied to the Kubernetes cluster. For personal Kubernetes clusters, you might just store these YAML files on your local system. However, with more critical clusters and workloads, GitOps is a popular way to automate storage and updates to both workload and Kubernetes infrastructure resources.
The objects used to gather together and deploy Pod information is defined by one of the following deployment methods.
Deploying Pods
The method you would choose for deploying Pods depends on the type of application you plan to run with those Pods. Here are some of your choices:
-
Stateless applications — A stateless application doesn’t save a client’s session data, so another session doesn’t need to refer back to what happened to a previous session. This makes is easier to just replace Pods with new ones if they become unhealthy or move them around without saving state. If you are running a stateless application (such as a web server), you can use a Deployment to deploy Podsand ReplicaSets. A ReplicaSet defines how many instances of a Pod that you want running concurrently. Although you can run a ReplicaSet directly, it is common to run replicas directly within a Deployment, to define how many replicas of a Pod should be running at a time.
-
Stateful applications — A stateful application is one where the identity of the Pod and the order in which Pods are launched are important. These applications need persistent storage that is stable and need to be deployed and scaled in a consistent manner. To deploy a stateful application in Kubernetes, you can use StatefulSets. An example of an application that is typically run as a StatefulSet is a database. Within a StatefulSet, you could define replicas, the Pod and its containers, storage volumes to mount, and locations in the container where data are stored. See Run a Replicated Stateful Application for an example of a database being deployed as a ReplicaSet.
-
Per-node applications — There are times when you want to run an application on every node in your Kubernetes cluster. For example, your data center might require that every computer run a monitoring application or a particular remote access service. For Kubernetes, you can use a DaemonSet to ensure that the selected application runs on every node in your cluster.
-
Applications run to completion — There are some applications you want to run to complete a particular task. This could include one that runs monthly status reports or cleans out old data. A Job object can be used to set up an application to start up and run, then exit when the task is done. A CronJob object lets you set up an application to run at a specific hour, minute, day of the month, month, or day of the week, using a structure defined by the Linux crontab format.
Making applications accessible from the network
With applications often deployed as a set of microservices that moved around to different places, Kubernetes needed a way for those microservices to be able to find each other. Also, for others to access an application outside of the Kubernetes cluster, Kubernetes needed a way to expose that application on outside addresses and ports. These networking-related features are done with Service and Ingress objects, respectively:
-
Services — Because a Pod can move around to different nodes and addresses, another Pod that needed to communicate with the first Pod could find it difficult to find where it is. To solve this problem, Kubernetes lets you represent an application as a Service. With a Service, you can identify a Pod or set of Pods with a particular name, then indicate what port exposes that application’s service from the Pod and what ports another application could use to contact that service. Another Pod within a cluster can simply request a Service by name and Kubernetes will direct that request to the proper port for an instance of the Pod running that service.
-
Ingress — Ingress is what can make applications represented by Kubernetes Services available to clients that are outside of the cluster. Basic features of Ingress include a load balancer (managed by Ingress), the Ingress controller, and rules for routing requests from the controller to the Service. There are several Ingress Controllers that you can choose from with Kubernetes.
Next steps
Understanding basic Kubernetes concepts and how they relate to Amazon EKS will help you navigate both the Amazon EKS documentation and Kubernetes documentation to find the information you need to manage Amazon EKS clusters and deploy workloads to those clusters. To begin using Amazon EKS, choose from the following:
Deploy Amazon EKS clusters across cloud and on-premises environments
Learn to deploy Kubernetes clusters with Amazon EKS across cloud and on-premises environments to meet your operational needs, while leveraging
AWSservices and support.
Understand Amazon EKS deployment options
Amazon Elastic Kubernetes Service (Amazon EKS) is a fully managed Kubernetes service that enables you to run Kubernetes seamlessly in the cloud and in your on-premises environments.
In the cloud, Amazon EKS automates Kubernetes cluster infrastructure management for the Kubernetes control plane and nodes. This is essential for scheduling containers, managing application availability, dynamically scaling resources, optimizing compute, storing cluster data, and performing other critical functions. With Amazon EKS, you get the robust performance, scalability, reliability, and availability of AWS infrastructure, along with native integrations with AWS networking, security, storage, and observability services.
To simplify running Kubernetes in your on-premises environments, you can use the same Amazon EKS clusters, features, and tools to Create Amazon Linux nodes on AWS Outposts or Amazon EKS Hybrid Nodes on your own infrastructure, or you can use Amazon EKS Anywhere for self-contained air-gapped environments.
Amazon EKS in the cloud
You can use Amazon EKS with compute in AWS Regions, AWS Local Zones, and AWS Wavelength Zones. With Amazon EKS in the cloud, the security, scalability, and availability of the Kubernetes control plane is fully managed by AWS in the AWS Region. When running applications with compute in AWS Regions, you get the full breadth of AWS and Amazon EKS features, including Amazon EKS Auto Mode, which fully automates Kubernetes cluster infrastructure management for compute, storage, and networking on AWS with a single click. When running applications with compute in AWS Local Zones and AWS Wavelength Zones, you can use Amazon EKS self-managed nodes to connect Amazon EC2 instances for your cluster compute and can use the other available AWS services in AWS Local Zones and AWS Wavelength Zones. For more information see AWS Local Zones features and AWS Wavelength Zones features.
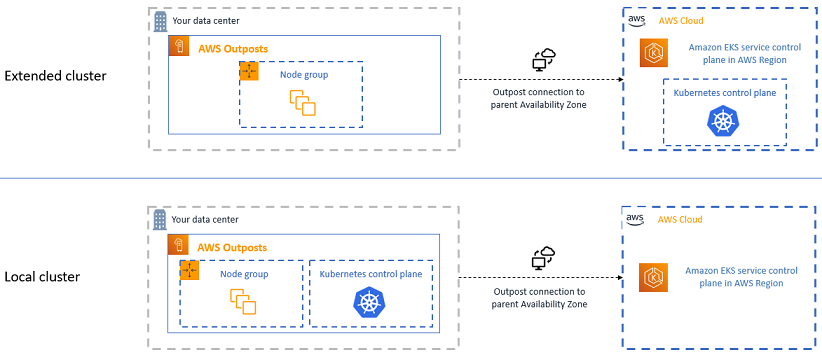
Amazon EKS in AWS Regions |
Amazon EKS in Local/Wavelength Zones | |
|---|---|---|
Kuberenetes control plane management |
|
|
Kubernetes control plane location |
|
|
Kubernetes data plane |
|
|
Kubernetes data plane location |
|
|
Amazon EKS in your data center or edge environments
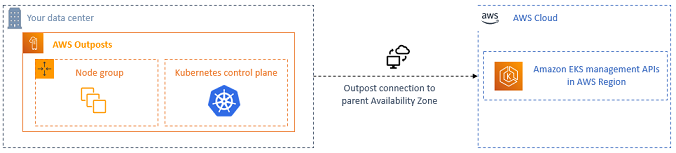
If you need to run applications in your own data centers or edge environments, you can use Deploy Amazon EKS on-premises with AWS Outposts or Amazon EKS Hybrid Nodes. You can use self-managed nodes with Amazon EC2 instances on AWS Outposts for your cluster compute, or you can use Amazon EKS Hybrid Nodes with your own on-premises or edge infrastructure for your cluster compute. AWS Outposts is AWS-managed infrastructure that you run in your data centers or co-location facilities, whereas Amazon EKS Hybrid Nodes runs on your physical or virtual machines that you manage in your on-premises or edge environments. Amazon EKS on AWS Outposts and Amazon EKS Hybrid Nodes require a reliable connection from your on-premises environments to an AWS Region, and you can use the same Amazon EKS clusters, features, and tools you use to run applications in the cloud. When running on AWS Outposts, you can alternatively deploy the entire Kubernetes cluster on AWS Outposts with Amazon EKS local clusters on AWS Outposts.
| Amazon EKS Hybrid Nodes | Amazon EKS on AWS Outposts |
|
|---|---|---|
Kuberenetes control plane management |
|
|
Kubernetes control plane location |
|
|
Kubernetes data plane |
Customer-managed physical or virtual machines |
Amazon EC2 self-managed nodes |
Kubernetes data plane location |
Customer data center or edge environment |
Customer data center or edge environment |
Amazon EKS Anywhere for air-gapped environments
Amazon EKS Anywhere simplifies Kubernetes cluster management through the automation of undifferentiated heavy lifting such as infrastructure setup and Kubernetes cluster lifecycle operations in on-premises and edge environments. Unlike Amazon EKS, Amazon EKS Anywhere is a customer-managed product and customers are responsible for cluster lifecycle operations and maintenance of Amazon EKS Anywhere clusters. Amazon EKS Anywhere is built on the Kubernetes sub-project Cluster API (CAPI) and supports a range of infrastructure including VMware vSphere, bare metal, Nutanix, Apache CloudStack, and AWS Snow. Amazon EKS Anywhere can be run in air-gapped environments and offers optional integrations with regional AWS services for observability and identity management. To receive support for Amazon EKS Anywhere and access to AWS-vended Kubernetes add-ons, you can purchase Amazon EKS Anywhere Enterprise Subscriptions.
| Amazon EKS Anywhere | |
|---|---|
Kuberenetes control plane management |
Customer-managed |
Kubernetes control plane location |
Customer data center or edge environment |
Kubernetes data plane |
Customer-managed physical or virtual machines |
Kubernetes data plane location |
Customer data center or edge environment |
Amazon EKS tooling
You can use the Amazon EKS Connector to register and connect any conformant Kubernetes cluster to AWS and view it in the Amazon EKS console. After a cluster is connected, you can see the status, configuration, and workloads for that cluster in the Amazon EKS console. You can use this feature to view connected clusters in Amazon EKS console, but the Amazon EKS Connector does not enable management or mutating operations for your connected clusters through the Amazon EKS console.
Amazon EKS Distro is the AWS distribution of the underlying Kubernetes components that power all Amazon EKS offerings. It includes the core components required for a functioning Kubernetes cluster such as Kubernetes control plane components (etcd, kube-apiserver, kube-scheduler, kube-controller-manager) and networking components (CoreDNS, kube-proxy, CNI plugins). Amazon EKS Distro can be used to self-manage Kubernetes clusters with your choice of tooling. Amazon EKS Distro deployments are not covered by AWS Support Plans.
Set up to use Amazon EKS
Set up the tools needed for creating and working with an Amazon EKS cluster.
To prepare for the command-line management of your Amazon EKS clusters, you need to install several tools. Use the following to set up credentials, create and modify clusters, and work with clusters once they are running:
-
Set up
AWSCLI – Get theAWSCLI to set up and manage the services you need to work with Amazon EKS clusters. In particular, you needAWSCLI to configure credentials, but you also need it with otherAWSservices. -
Set up kubectl and eksctl – The
eksctlCLI interacts withAWSto create, modify, and delete Amazon EKS clusters. Once a cluster is up, use the open sourcekubectlcommand to manage Kubernetes objects within your Amazon EKS clusters. -
Set up a development environment (optional)– Consider adding the following tools:
-
Local deployment tool – If you’re new to Kubernetes, consider installing a local deployment tool like minikube or kind. These tools allow you to have an Amazon EKS cluster on your local machine for testing applications.
-
Package manager – helm is a popular package manager for Kubernetes that simplifies the installation and management of complex packages. With Helm, it’s easier to install and manage packages like the
AWSLoad Balancer Controller on your Amazon EKS cluster.
-
Set up AWS CLI
Set up the
AWSCLI for managingAWSresources needed to use Amazon EKS. Follow these instructions to set up the credentials withAWSCLI.
The AWS CLI is a command line tool for working with AWS services, including Amazon EKS. It is also used to authenticate IAM users or roles for access to the Amazon EKS cluster and other AWS resources from your local machine. To provision resources in AWS from the command line, you need to obtain an AWS access key ID and secret key to use in the command line. Then you need to configure these credentials in the AWS CLI. If you haven’t already installed the AWS CLI, see Install or update the latest version of the AWS CLI in the AWS Command Line Interface User Guide.
To create an access key
-
Sign into the
consolelong. -
For single-user or multiple-user accounts:
-
Single-user account –:: In the top right, choose your
AWSuser name to open the navigation menu. For example, choosewebadmin. -
Multiple-user account –:: Choose IAM from the list of services. From the IAM Dashboard, select Users, and choose the name of the user.
-
-
Choose Security credentials.
-
Under Access keys, choose Create access key.
-
Choose Command Line Interface (CLI), then choose Next.
-
Choose Create access key.
-
Choose Download .csv file.
To configure the AWS CLI
After installing the AWS CLI, do the following steps to configure it. For more information, see Configure the AWS CLI in the AWS Command Line Interface User Guide.
-
In a terminal window, enter the following command:
aws configureOptionally, you can configure a named profile, such as
--profile cluster-admin. If you configure a named profile in theAWSCLI, you must always pass this flag in subsequent commands. -
Enter your
AWScredentials. For example:Access Key ID [None]: AKIAIOSFODNN7EXAMPLE Secret Access Key [None]: wJalrXUtnFEMI/K7MDENG/bPxRfiCYEXAMPLEKEY Default region name [None]: region-code Default output format [None]: json
To get a security token
If needed, run the following command to get a new security token for the AWS CLI. For more information, see get-session-token in the AWS CLI Command Reference.
By default, the token is valid for 15 minutes. To change the default session timeout, pass the --duration-seconds flag. For example:
aws sts get-session-token --duration-seconds 3600This command returns the temporary security credentials for an AWS CLI session. You should see the following response output:
{
    "Credentials": {
        "AccessKeyId": "ASIA5FTRU3LOEXAMPLE",
        "SecretAccessKey": "JnKgvwfqUD9mNsPoi9IbxAYEXAMPLE",
        "SessionToken": "VERYLONGSESSIONTOKENSTRING",
        "Expiration": "2023-02-17T03:14:24+00:00"
    }
}
To verify the user identity
If needed, run the following command to verify the AWS credentials for your IAM user identity (such as ClusterAdmin) for the terminal session.
aws sts get-caller-identityThis command returns the Amazon Resource Name (ARN) of the IAM entity that’s configured for the AWS CLI. You should see the following example response output:
{
    "UserId": "AKIAIOSFODNN7EXAMPLE",
    "Account": "01234567890",
    "Arn": "region.arniam::01234567890:user/ClusterAdmin"
}Set up kubectl and eksctl
Learn how to install or update the
kubectlandeksctlcommand line tools to work with Kubernetes and Amazon EKS features.
Kubectl is a command line tool that you use to communicate with the Kubernetes API server. The kubectl binary is available in many operating system package managers. Using a package manager for your installation is often easier than a manual download and install process. The eksctl command lets you create and modify Amazon EKS clusters.
Topics on this page help you install and set up these tools:
Install or update kubectl
This topic helps you to download and install, or update, the kubectl binary on your device. The binary is identical to the upstream community versions. The binary is not unique to Amazon EKS or AWS. Use the steps below to get the specific version of kubectl that you need, although many builders simply run brew install kubectl to install it.
|
You must use a |
Step 1: Check if kubectl is installed
Determine whether you already have kubectl installed on your device.
kubectl version --clientIf you have kubectl installed in the path of your device, the example output includes information similar to the following. If you want to update the version that you currently have installed with a later version, complete the next step, making sure to install the new version in the same location that your current version is in.
Client Version: v1.31.X-eks-1234567If you receive no output, then you either don’t have kubectl installed, or it’s not installed in a location that’s in your device’s path.
Step 2: Install or update kubectl
Install or update kubectl on one of the following operating systems:
|
If downloads are slow to your region from the regions used in this section, consider setting up CloudFront to front the content. For further information, see Get started with a basic CloudFront distribution. |
macOS
-
Download the binary for your cluster’s Kubernetes version from Amazon S3.
-
Kubernetes
1.32curl -O https://s3.us-west-2.amazonaws.com/amazon-eks/1.32.0/2025-01-10/bin/darwin/amd64/kubectl -
Kubernetes
1.31curl -O https://s3.us-west-2.amazonaws.com/amazon-eks/1.31.4/2025-01-10/bin/darwin/amd64/kubectl -
Kubernetes
1.30curl -O https://s3.us-west-2.amazonaws.com/amazon-eks/1.30.8/2025-01-10/bin/darwin/amd64/kubectl -
Kubernetes
1.29curl -O https://s3.us-west-2.amazonaws.com/amazon-eks/1.29.12/2025-01-10/bin/darwin/amd64/kubectl -
Kubernetes
1.28curl -O https://s3.us-west-2.amazonaws.com/amazon-eks/1.28.15/2025-01-10/bin/darwin/amd64/kubectl -
Kubernetes
1.27curl -O https://s3.us-west-2.amazonaws.com/amazon-eks/1.27.16/2025-01-10/bin/darwin/amd64/kubectl -
Kubernetes
1.26curl -O https://s3.us-west-2.amazonaws.com/amazon-eks/1.26.15/2024-12-12/bin/darwin/amd64/kubectl -
Kubernetes
1.25curl -O https://s3.us-west-2.amazonaws.com/amazon-eks/1.25.16/2024-12-12/bin/darwin/amd64/kubectl -
Kubernetes
1.24curl -O https://s3.us-west-2.amazonaws.com/amazon-eks/1.24.17/2024-12-12/bin/darwin/amd64/kubectl -
Kubernetes
1.23curl -O https://s3.us-west-2.amazonaws.com/amazon-eks/1.23.17/2024-09-11/bin/darwin/amd64/kubectl -
Kubernetes
1.22curl -O https://s3.us-west-2.amazonaws.com/amazon-eks/1.22.17/2024-09-11/bin/darwin/amd64/kubectl -
Kubernetes
1.21curl -O https://s3.us-west-2.amazonaws.com/amazon-eks/1.21.14/2024-09-11/bin/darwin/amd64/kubectl
-
-
(Optional) Verify the downloaded binary with the
SHA-256checksum for your binary.-
Download the
SHA-256checksum for your cluster’s Kubernetes version.-
Kubernetes
1.32curl -O https://s3.us-west-2.amazonaws.com/amazon-eks/1.32.0/2025-01-10/bin/darwin/amd64/kubectl.sha256 -
Kubernetes
1.31curl -O https://s3.us-west-2.amazonaws.com/amazon-eks/1.31.4/2025-01-10/bin/darwin/amd64/kubectl.sha256 -
Kubernetes
1.30curl -O https://s3.us-west-2.amazonaws.com/amazon-eks/1.30.8/2025-01-10/bin/darwin/amd64/kubectl.sha256 -
Kubernetes
1.29curl -O https://s3.us-west-2.amazonaws.com/amazon-eks/1.29.12/2025-01-10/bin/darwin/amd64/kubectl.sha256 -
Kubernetes
1.28curl -O https://s3.us-west-2.amazonaws.com/amazon-eks/1.28.15/2025-01-10/bin/darwin/amd64/kubectl.sha256 -
Kubernetes
1.27curl -O https://s3.us-west-2.amazonaws.com/amazon-eks/1.27.16/2025-01-10/bin/darwin/amd64/kubectl.sha256 -
Kubernetes
1.26curl -O https://s3.us-west-2.amazonaws.com/amazon-eks/1.26.15/2024-12-12/bin/darwin/amd64/kubectl.sha256 -
Kubernetes
1.25curl -O https://s3.us-west-2.amazonaws.com/amazon-eks/1.25.16/2024-12-12/bin/darwin/amd64/kubectl.sha256 -
Kubernetes
1.24curl -O https://s3.us-west-2.amazonaws.com/amazon-eks/1.24.17/2024-12-12/bin/darwin/amd64/kubectl.sha256 -
Kubernetes
1.23curl -O https://s3.us-west-2.amazonaws.com/amazon-eks/1.23.17/2024-09-11/bin/darwin/amd64/kubectl.sha256 -
Kubernetes
1.22curl -O https://s3.us-west-2.amazonaws.com/amazon-eks/1.22.17/2024-09-11/bin/darwin/amd64/kubectl.sha256 -
Kubernetes
1.21curl -O https://s3.us-west-2.amazonaws.com/amazon-eks/1.21.14/2024-09-11/bin/darwin/amd64/kubectl.sha256
-
-
Check the
SHA-256checksum for your downloaded binary.openssl sha1 -sha256 kubectl -
Make sure that the generated checksum in the output matches in the checksum in the downloaded
kubectl.sha256file.
-
-
Apply execute permissions to the binary.
chmod +x ./kubectl -
Copy the binary to a folder in your
PATH. If you have already installed a version ofkubectl, then we recommend creating a$HOME/bin/kubectland ensuring that$HOME/bincomes first in your$PATH.mkdir -p $HOME/bin && cp ./kubectl $HOME/bin/kubectl && export PATH=$HOME/bin:$PATH -
(Optional) Add the
$HOME/binpath to your shell initialization file so that it is configured when you open a shell.echo 'export PATH=$HOME/bin:$PATH' >> ~/.bash_profile
Linux (amd64)
-
Download the
kubectlbinary for your cluster’s Kubernetes version from Amazon S3.-
Kubernetes
1.32curl -O https://s3.us-west-2.amazonaws.com/amazon-eks/1.32.0/2024-12-20/bin/linux/amd64/kubectl -
Kubernetes
1.31curl -O https://s3.us-west-2.amazonaws.com/amazon-eks/1.31.3/2024-12-12/bin/linux/amd64/kubectl -
Kubernetes
1.30curl -O https://s3.us-west-2.amazonaws.com/amazon-eks/1.30.7/2024-12-12/bin/linux/amd64/kubectl -
Kubernetes
1.29curl -O https://s3.us-west-2.amazonaws.com/amazon-eks/1.29.10/2024-12-12/bin/linux/amd64/kubectl -
Kubernetes
1.28curl -O https://s3.us-west-2.amazonaws.com/amazon-eks/1.28.15/2024-12-12/bin/linux/amd64/kubectl -
Kubernetes
1.27curl -O https://s3.us-west-2.amazonaws.com/amazon-eks/1.27.16/2024-12-12/bin/linux/amd64/kubectl -
Kubernetes
1.26curl -O https://s3.us-west-2.amazonaws.com/amazon-eks/1.26.15/2024-12-12/bin/linux/amd64/kubectl -
Kubernetes
1.25curl -O https://s3.us-west-2.amazonaws.com/amazon-eks/1.25.16/2024-12-12/bin/linux/amd64/kubectl -
Kubernetes
1.24curl -O https://s3.us-west-2.amazonaws.com/amazon-eks/1.24.17/2024-12-12/bin/linux/amd64/kubectl -
Kubernetes
1.23curl -O https://s3.us-west-2.amazonaws.com/amazon-eks/1.23.17/2024-09-11/bin/linux/amd64/kubectl -
Kubernetes
1.22curl -O https://s3.us-west-2.amazonaws.com/amazon-eks/1.22.17/2024-09-11/bin/linux/amd64/kubectl -
Kubernetes
1.21curl -O https://s3.us-west-2.amazonaws.com/amazon-eks/1.21.14/2024-09-11/bin/linux/amd64/kubectl
-
-
(Optional) Verify the downloaded binary with the
SHA-256checksum for your binary.-
Download the
SHA-256checksum for your cluster’s Kubernetes version from Amazon S3using the command for your device’s hardware platform.-
Kubernetes
1.32curl -O https://s3.us-west-2.amazonaws.com/amazon-eks/1.32.0/2024-12-20/bin/linux/amd64/kubectl.sha256 -
Kubernetes
1.31curl -O https://s3.us-west-2.amazonaws.com/amazon-eks/1.31.3/2024-12-12/bin/linux/amd64/kubectl.sha256 -
Kubernetes
1.30curl -O https://s3.us-west-2.amazonaws.com/amazon-eks/1.30.7/2024-12-12/bin/linux/amd64/kubectl.sha256 -
Kubernetes
1.29curl -O https://s3.us-west-2.amazonaws.com/amazon-eks/1.29.10/2024-12-12/bin/linux/amd64/kubectl.sha256 -
Kubernetes
1.28curl -O https://s3.us-west-2.amazonaws.com/amazon-eks/1.28.15/2024-12-12/bin/linux/amd64/kubectl.sha256 -
Kubernetes
1.27curl -O https://s3.us-west-2.amazonaws.com/amazon-eks/1.27.16/2024-12-12/bin/linux/amd64/kubectl.sha256 -
Kubernetes
1.26curl -O https://s3.us-west-2.amazonaws.com/amazon-eks/1.26.15/2024-12-12/bin/linux/amd64/kubectl.sha256 -
Kubernetes
1.25curl -O https://s3.us-west-2.amazonaws.com/amazon-eks/1.25.16/2024-12-12/bin/linux/amd64/kubectl.sha256 -
Kubernetes
1.24curl -O https://s3.us-west-2.amazonaws.com/amazon-eks/1.24.17/2024-12-12/bin/linux/amd64/kubectl.sha256 -
Kubernetes
1.23curl -O https://s3.us-west-2.amazonaws.com/amazon-eks/1.23.17/2024-09-11/bin/linux/amd64/kubectl.sha256 -
Kubernetes
1.22curl -O https://s3.us-west-2.amazonaws.com/amazon-eks/1.22.17/2024-09-11/bin/linux/amd64/kubectl.sha256 -
Kubernetes
1.21curl -O https://s3.us-west-2.amazonaws.com/amazon-eks/1.21.14/2024-09-11/bin/linux/amd64/kubectl.sha256
-
-
Check the
SHA-256checksum for your downloaded binary with one of the following commands.sha256sum -c kubectl.sha256or
openssl sha1 -sha256 kubectl
-
For the first, you should see
kubectl: OK, for the second, you can check that the generated checksum in the output matches in the checksum in the downloadedkubectl.sha256file.
-
-
Apply execute permissions to the binary.
chmod +x ./kubectl -
Copy the binary to a folder in your
PATH. If you have already installed a version ofkubectl, then we recommend creating a$HOME/bin/kubectland ensuring that$HOME/bincomes first in your$PATH.mkdir -p $HOME/bin && cp ./kubectl $HOME/bin/kubectl && export PATH=$HOME/bin:$PATH -
(Optional) Add the
$HOME/binpath to your shell initialization file so that it is configured when you open a shell.This step assumes you are using the Bash shell; if you are using another shell, change the command to use your specific shell initialization file. echo 'export PATH=$HOME/bin:$PATH' >> ~/.bashrc
Linux (arm64)
-
Download the
kubectlbinary for your cluster’s Kubernetes version from Amazon S3.-
Kubernetes
1.32curl -O https://s3.us-west-2.amazonaws.com/amazon-eks/1.32.0/2024-12-20/bin/linux/arm64/kubectl -
Kubernetes
1.31curl -O https://s3.us-west-2.amazonaws.com/amazon-eks/1.31.3/2024-12-12/bin/linux/arm64/kubectl -
Kubernetes
1.30curl -O https://s3.us-west-2.amazonaws.com/amazon-eks/1.30.7/2024-12-12/bin/linux/arm64/kubectl -
Kubernetes
1.29curl -O https://s3.us-west-2.amazonaws.com/amazon-eks/1.29.10/2024-12-12/bin/linux/arm64/kubectl -
Kubernetes
1.28curl -O https://s3.us-west-2.amazonaws.com/amazon-eks/1.28.15/2024-12-12/bin/linux/arm64/kubectl -
Kubernetes
1.27curl -O https://s3.us-west-2.amazonaws.com/amazon-eks/1.27.16/2024-12-12/bin/linux/arm64/kubectl -
Kubernetes
1.26curl -O https://s3.us-west-2.amazonaws.com/amazon-eks/1.26.15/2024-12-12/bin/linux/arm64/kubectl -
Kubernetes
1.25curl -O https://s3.us-west-2.amazonaws.com/amazon-eks/1.25.16/2024-12-12/bin/linux/arm64/kubectl -
Kubernetes
1.24curl -O https://s3.us-west-2.amazonaws.com/amazon-eks/1.24.17/2024-12-12/bin/linux/arm64/kubectl -
Kubernetes
1.23curl -O https://s3.us-west-2.amazonaws.com/amazon-eks/1.23.17/2024-09-11/bin/linux/arm64/kubectl -
Kubernetes
1.22curl -O https://s3.us-west-2.amazonaws.com/amazon-eks/1.22.17/2024-09-11/bin/linux/arm64/kubectl -
Kubernetes
1.21curl -O https://s3.us-west-2.amazonaws.com/amazon-eks/1.21.14/2024-09-11/bin/linux/arm64/kubectl
-
-
(Optional) Verify the downloaded binary with the
SHA-256checksum for your binary.-
Download the
SHA-256checksum for your cluster’s Kubernetes version from Amazon S3using the command for your device’s hardware platform.-
Kubernetes
1.32curl -O https://s3.us-west-2.amazonaws.com/amazon-eks/1.32.0/2024-12-20/bin/linux/arm64/kubectl.sha256 -
Kubernetes
1.31curl -O https://s3.us-west-2.amazonaws.com/amazon-eks/1.31.3/2024-12-12/bin/linux/arm64/kubectl.sha256 -
Kubernetes
1.30curl -O https://s3.us-west-2.amazonaws.com/amazon-eks/1.30.7/2024-12-12/bin/linux/arm64/kubectl.sha256 -
Kubernetes
1.29curl -O https://s3.us-west-2.amazonaws.com/amazon-eks/1.29.10/2024-12-12/bin/linux/arm64/kubectl.sha256 -
Kubernetes
1.28curl -O https://s3.us-west-2.amazonaws.com/amazon-eks/1.28.15/2024-12-12/bin/linux/arm64/kubectl.sha256 -
Kubernetes
1.27curl -O https://s3.us-west-2.amazonaws.com/amazon-eks/1.27.16/2024-12-12/bin/linux/arm64/kubectl.sha256 -
Kubernetes
1.26curl -O https://s3.us-west-2.amazonaws.com/amazon-eks/1.26.15/2024-12-12/bin/linux/arm64/kubectl.sha256 -
Kubernetes
1.25curl -O https://s3.us-west-2.amazonaws.com/amazon-eks/1.25.16/2024-12-12/bin/linux/arm64/kubectl.sha256 -
Kubernetes
1.24curl -O https://s3.us-west-2.amazonaws.com/amazon-eks/1.24.17/2024-12-12/bin/linux/arm64/kubectl.sha256 -
Kubernetes
1.23curl -O https://s3.us-west-2.amazonaws.com/amazon-eks/1.23.17/2024-09-11/bin/linux/arm64/kubectl.sha256 -
Kubernetes
1.22curl -O https://s3.us-west-2.amazonaws.com/amazon-eks/1.22.17/2024-09-11/bin/linux/arm64/kubectl.sha256 -
Kubernetes
1.21curl -O https://s3.us-west-2.amazonaws.com/amazon-eks/1.21.14/2024-09-11/bin/linux/arm64/kubectl.sha256
-
-
Check the
SHA-256checksum for your downloaded binary with one of the following commands.sha256sum -c kubectl.sha256or
openssl sha1 -sha256 kubectl
-
For the first, you should see
kubectl: OK, for the second, you can check that the generated checksum in the output matches in the checksum in the downloadedkubectl.sha256file.
-
-
Apply execute permissions to the binary.
chmod +x ./kubectl -
Copy the binary to a folder in your
PATH. If you have already installed a version ofkubectl, then we recommend creating a$HOME/bin/kubectland ensuring that$HOME/bincomes first in your$PATH.mkdir -p $HOME/bin && cp ./kubectl $HOME/bin/kubectl && export PATH=$HOME/bin:$PATH -
(Optional) Add the
$HOME/binpath to your shell initialization file so that it is configured when you open a shell.This step assumes you are using the Bash shell; if you are using another shell, change the command to use your specific shell initialization file. echo 'export PATH=$HOME/bin:$PATH' >> ~/.bashrc
Windows
-
Open a PowerShell terminal.
-
Download the
kubectlbinary for your cluster’s Kubernetes version from Amazon S3.-
Kubernetes
1.32curl.exe -O https://s3.us-west-2.amazonaws.com/amazon-eks/1.32.0/2024-12-20/bin/windows/amd64/kubectl.exe -
Kubernetes
1.31curl.exe -O https://s3.us-west-2.amazonaws.com/amazon-eks/1.31.3/2024-12-12/bin/windows/amd64/kubectl.exe -
Kubernetes
1.30curl.exe -O https://s3.us-west-2.amazonaws.com/amazon-eks/1.30.7/2024-12-12/bin/windows/amd64/kubectl.exe -
Kubernetes
1.29curl.exe -O https://s3.us-west-2.amazonaws.com/amazon-eks/1.29.10/2024-12-12/bin/windows/amd64/kubectl.exe -
Kubernetes
1.28curl.exe -O https://s3.us-west-2.amazonaws.com/amazon-eks/1.28.15/2024-12-12/bin/windows/amd64/kubectl.exe -
Kubernetes
1.27curl.exe -O https://s3.us-west-2.amazonaws.com/amazon-eks/1.27.16/2024-12-12/bin/windows/amd64/kubectl.exe -
Kubernetes
1.26curl.exe -O https://s3.us-west-2.amazonaws.com/amazon-eks/1.26.15/2024-12-12/bin/windows/amd64/kubectl.exe -
Kubernetes
1.25curl.exe -O https://s3.us-west-2.amazonaws.com/amazon-eks/1.25.16/2024-12-12/bin/windows/amd64/kubectl.exe -
Kubernetes
1.24curl.exe -O https://s3.us-west-2.amazonaws.com/amazon-eks/1.24.17/2024-12-12/bin/windows/amd64/kubectl.exe -
Kubernetes
1.23curl.exe -O https://s3.us-west-2.amazonaws.com/amazon-eks/1.23.17/2024-09-11/bin/windows/amd64/kubectl.exe -
Kubernetes
1.22curl.exe -O https://s3.us-west-2.amazonaws.com/amazon-eks/1.22.17/2024-09-11/bin/windows/amd64/kubectl.exe -
Kubernetes
1.21curl.exe -O https://s3.us-west-2.amazonaws.com/amazon-eks/1.21.14/2024-09-11/bin/windows/amd64/kubectl.exe
-
-
(Optional) Verify the downloaded binary with the
SHA-256checksum for your binary.-
Download the
SHA-256checksum for your cluster’s Kubernetes version for Windows.-
Kubernetes
1.32curl.exe -O https://s3.us-west-2.amazonaws.com/amazon-eks/1.32.0/2024-12-20/bin/windows/amd64/kubectl.exe.sha256 -
Kubernetes
1.31curl.exe -O https://s3.us-west-2.amazonaws.com/amazon-eks/1.31.3/2024-12-12/bin/windows/amd64/kubectl.exe.sha256 -
Kubernetes
1.30curl.exe -O https://s3.us-west-2.amazonaws.com/amazon-eks/1.30.7/2024-12-12/bin/windows/amd64/kubectl.exe.sha256 -
Kubernetes
1.29curl.exe -O https://s3.us-west-2.amazonaws.com/amazon-eks/1.29.10/2024-12-12/bin/windows/amd64/kubectl.exe.sha256 -
Kubernetes
1.28curl.exe -O https://s3.us-west-2.amazonaws.com/amazon-eks/1.28.15/2024-12-12/bin/windows/amd64/kubectl.exe.sha256 -
Kubernetes
1.27curl.exe -O https://s3.us-west-2.amazonaws.com/amazon-eks/1.27.16/2024-12-12/bin/windows/amd64/kubectl.exe.sha256 -
Kubernetes
1.26curl.exe -O https://s3.us-west-2.amazonaws.com/amazon-eks/1.26.15/2024-12-12/bin/windows/amd64/kubectl.exe.sha256 -
Kubernetes
1.25curl.exe -O https://s3.us-west-2.amazonaws.com/amazon-eks/1.25.16/2024-12-12/bin/windows/amd64/kubectl.exe.sha256 -
Kubernetes
1.24curl.exe -O https://s3.us-west-2.amazonaws.com/amazon-eks/1.24.17/2024-12-12/bin/windows/amd64/kubectl.exe.sha256 -
Kubernetes
1.23curl.exe -O https://s3.us-west-2.amazonaws.com/amazon-eks/1.23.17/2024-09-11/bin/windows/amd64/kubectl.exe.sha256 -
Kubernetes
1.22curl.exe -O https://s3.us-west-2.amazonaws.com/amazon-eks/1.22.17/2024-09-11/bin/windows/amd64/kubectl.exe.sha256 -
Kubernetes
1.21curl.exe -O https://s3.us-west-2.amazonaws.com/amazon-eks/1.21.14/2024-09-11/bin/windows/amd64/kubectl.exe.sha256
-
-
Check the
SHA-256checksum for your downloaded binary.Get-FileHash kubectl.exe -
Make sure that the generated checksum in the output matches in the checksum in the downloaded
kubectl.sha256file. The PowerShell output should be an uppercase equivalent string of characters.
-
-
Copy the binary to a folder in your
PATH. If you have an existing directory in yourPATHthat you use for command line utilities, copy the binary to that directory. Otherwise, complete the following steps.-
Create a new directory for your command line binaries, such as
C:\bin. -
Copy the
kubectl.exebinary to your new directory. -
Edit your user or system
PATHenvironment variable to add the new directory to yourPATH. -
Close your PowerShell terminal and open a new one to pick up the new
PATHvariable.
-
-
After you install
kubectl, you can verify its version.kubectl version --client -
When first installing
kubectl, it isn’t yet configured to communicate with any server. We will cover this configuration as needed in other procedures. If you ever need to update the configuration to communicate with a particular cluster, you can run the following command.Replaceregion-codewith theAWSRegion that your cluster is in. Replacemy-clusterwith the name of your cluster.aws eks update-kubeconfig --region region-code --name my-cluster -
Consider configuring auto completion, which lets you use the tab key to complete
kubectlsubcommands after typing the first few letters. See Kubectl autocomplete in the Kubernetes documentation for details.
Install eksctl
The eksctl CLI is used to work with EKS clusters. It automates many individual tasks. See Installation in the eksctl documentation for instructions on installing eksctl.
When using eksctl the IAM security principal that you’re using must have permissions to work with Amazon EKS IAM roles, service linked roles, AWS CloudFormation, a VPC, and related resources. For more information, see Actions and Using service-linked roles in the IAM User Guide. You must complete all steps in this guide as the same user. To check the current user, run the following command:
aws sts get-caller-identityNext steps
Quickstart: Deploy a web app and store data
Deploy a game application and persist its data on Amazon EKS
Deploy a game application and persist its data on Amazon EKS
This quickstart tutorial shows the steps to deploy the 2048 game sample application and persist its data on an Amazon EKS Auto Mode cluster using eksctl. Amazon EKS Auto Mode automates routine tasks for cluster block storage, networking, load balancing, and compute autoscaling.
As we progress, we’ll walk you through the cluster setup process. Amazon EKS Auto Mode will automate tasks for creating a node using an EC2 managed instance, creating an application load balancer, and creating an EBS volume.
Overall, you’ll deploy a sample workload with the custom annotations required to fully integrate with AWS services.
In this tutorial
Using the eksctl cluster template that follows, you’ll build a cluster with EKS Auto Mode for automated node provisioning.
VPC Configuration When using the eksctl cluster template that follows, eksctl automatically creates an IPv4 Virtual Private Cloud (VPC) for the cluster. By default, eksctl configures a VPC that addresses all networking requirements, in addition to creating both public and private endpoints.
Instance Management EKS Auto Mode dynamically adds or removes nodes in your EKS cluster based on the demands of your Kubernetes applications.
Data Persistence Use the block storage capability of EKS Auto Mode to ensure the persistence of application data, even in scenarios involving pod restarts or failures.
External App Access Use the load balancing capability of EKS Auto Mode to dynamically provision an Application Load Balancer (ALB).
Prerequisites
Before you begin, ensure you have the following prerequisites set up to use Amazon EKS:
-
Set up
AWSCLI and configure credentials -
Install eksctl
-
Install kubectl
For more information, see Set up to use Amazon EKS.
Configure the cluster
In this section, you’ll create a cluster using EKS Auto Mode for dynamic node provisioning.
Create a cluster-config.yaml file and paste the following contents into it. Replace region-code with a valid Region, such as us-east-1:
apiVersion: eksctl.io/v1alpha5
kind: ClusterConfig

metadata:
  name: web-quickstart
  region: <region-code>

autoModeConfig:
  enabled: true
Now, we’re ready to create the cluster.
Create the Amazon EKS cluster:
eksctl create cluster -f cluster-config.yaml|
If you do not use eksctl to create the cluster, you need to manually tag the VPC subnets. |
Create IngressClass
Create a Kubernetes IngressClass for EKS Auto Mode. The IngressClass defines how EKS Auto Mode handles Ingress resources. This step configures the load balancing capability of EKS Auto Mode. When you create Ingress resources for your applications, EKS Auto Mode uses this IngressClass to automatically provision and manage load balancers, integrating your Kubernetes applications with AWS load balancing services.
Save the following yaml file as ingressclass.yaml:
apiVersion: networking.k8s.io/v1
kind: IngressClass
metadata:
  name: alb
  annotations:
    ingressclass.kubernetes.io/is-default-class: "true"
spec:
  controller: eks.amazonaws.com/alb
Apply the IngressClass to your cluster:
kubectl apply -f ingressclass.yamlDeploy the 2048 game sample application
In this section, we walk you through the steps to deploy the popular “2048 game” as a sample application within the cluster. The provided manifest includes custom annotations for the Application Load Balancer (ALB). These annotations integrate with and instruct the EKS to handle incoming HTTP traffic as "internet-facing" and route it to the appropriate service in the game-2048 namespace using the target type "ip".
|
The |
-
Create a Kubernetes namespace called
game-2048with the--save-configflag.kubectl create namespace game-2048 --save-configYou should see the following response output:
namespace/game-2048 created -
Deploy the 2048 Game Sample application.
kubectl apply -n game-2048 -f https://raw.githubusercontent.com/kubernetes-sigs/aws-load-balancer-controller/v2.8.0/docs/examples/2048/2048_full.yamlThis manifest sets up a Kubernetes Deployment, Service, and Ingress for the
game-2048namespace, creating the necessary resources to deploy and expose thegame-2048application within the cluster. It includes the creation of a service namedservice-2048that exposes the deployment on port80, and an Ingress resource namedingress-2048that defines routing rules for incoming HTTP traffic and annotations for an internet-facing Application Load Balancer (ALB). You should see the following response output:namespace/game-2048 configured deployment.apps/deployment-2048 created service/service-2048 created ingress.networking.k8s.io/ingress-2048 created -
Run the following command to get the Ingress resource for the
game-2048namespace.kubectl get ingress -n game-2048You should see the following response output:
NAME           CLASS   HOSTS   ADDRESS                                                                    PORTS   AGE
ingress-2048   alb     *       k8s-game2048-ingress2-eb379a0f83-378466616.region-code.elb.amazonaws.com   80      31s
You’ll need to wait several minutes for the Application Load Balancer (ALB) to provision before you begin the following steps.
-
Open a web browser and enter the
ADDRESSfrom the previous step to access the web application. For example:k8s-game2048-ingress2-eb379a0f83-378466616.region-code.elb.amazonaws.comYou should see the 2048 game in your browser. Play!

Persist Data using Amazon EKS Auto Mode
Now that the 2048 game is up and running on your Amazon EKS cluster, it’s time to ensure that your game data is safely persisted using the block storage capability of Amazon EKS Auto Mode.
-
Create a file named
storage-class.yaml:apiVersion: storage.k8s.io/v1 kind: StorageClass metadata: name: auto-ebs-sc annotations: storageclass.kubernetes.io/is-default-class: "true" provisioner: ebs.csi.eks.amazonaws.com volumeBindingMode: WaitForFirstConsumer parameters: type: gp3 encrypted: "true" -
Apply the
StorageClass:kubectl apply -f storage-class.yaml -
Create a Persistent Volume Claim (PVC) to request storage for your game data. Create a file named
ebs-pvc.yamland add the following content to it:apiVersion: v1 kind: PersistentVolumeClaim metadata: name: game-data-pvc namespace: game-2048 spec: accessModes: - ReadWriteOnce resources: requests: storage: 10Gi storageClassName: auto-ebs-sc -
Apply the PVC to your cluster:
kubectl apply -f ebs-pvc.yamlYou should see the following response output:
persistentvolumeclaim/game-data-pvc created -
Now, you need to update your 2048 game deployment to use this PVC for storing data. The following deployment is configured to use the PVC for storing game data. Create a file named
ebs-deployment.yamland add the following contents to it:apiVersion: apps/v1 kind: Deployment metadata: namespace: game-2048 name: deployment-2048 spec: replicas: 3 # Adjust the number of replicas as needed selector: matchLabels: app.kubernetes.io/name: app-2048 template: metadata: labels: app.kubernetes.io/name: app-2048 spec: containers: - name: app-2048 image: public.ecr.aws/l6m2t8p7/docker-2048:latest imagePullPolicy: Always ports: - containerPort: 80 volumeMounts: - name: game-data mountPath: /var/lib/2048 volumes: - name: game-data persistentVolumeClaim: claimName: game-data-pvc -
Apply the updated deployment:
kubectl apply -f ebs-deployment.yamlYou should see the following response output:
deployment.apps/deployment-2048 configured
With these steps, your 2048 game on the cluster is now set up to persist data using the block storage capability of Amazon EKS Auto Mode. This ensures that your game progress and data are safe even in the event of pod or node failures.
If you liked this tutorial, let us know by providing feedback so we’re able to provide you with more use case-specific quickstart tutorials like this one.
Delete your cluster and nodes
After you’ve finished with the cluster that you created for this tutorial, you should clean up by deleting the cluster with the following command. If you want to do more with this cluster before you clean up, see Next steps.
eksctl delete cluster -f ./cluster-config.yamlEKS will automatically clean up any nodes it provisioned when the cluster is deleted.
Learn Amazon EKS by example
Find learning paths to extend your knowledge of Amazon EKS.
Overview
This Amazon EKS User Guide contains general-purpose procedures to create your first EKS cluster from the command line or consolelong and a solid reference for all major Amazon EKS components. However, as an Amazon EKS cluster administrator or developer, you can gain a deeper understanding of Amazon EKS by following learning paths that exist in sites outside of this guide. These sites can help you:
-
Set up specific types of clusters. Specific cluster types can be based on your workload types or security requirements. For example, you may want to tune a cluster to run batch, machine learning, or compute-intensive workloads.
-
Enhance your clusters. You can add advanced features to your cluster to provide things like observability,flexible storage, autoscaling, or specialized cluster networking.
-
Automate updates. Using features like GitOps, you can set up to provision cluster infrastructure and workloads automatically, based on changes that occur to those components in your Git repositories.
-
Use advanced cluster setup tools. While
eksctlprovides a quick way to create a cluster, there are other tools that can make it easier to configure and upgrade more complex clusters. These include tools like Terraform and CloudFormation.
To start out on your Amazon EKS learning path, I recommend that you visit some of the sites described on this page. If you run into problems along the way, there are also resources to help you get through them. For example, the Re:post Knowledge Center lets you search the support database for Amazon EKS-related support issues. Also the Amazon EKS Best Practices Guide offers tips on the best ways to set up your production-grade clusters.
Amazon EKS Workshop
Starting with a basic understanding of Kubernetes and containers, the Amazon EKS workshop is a learning platform for walking a cluster administrator through important features of Amazon EKS. Here are ways you can engage with the Amazon EKS workshop:
-
Amazon EKS Basics: Watch the video on the Introduction page to learn about how Amazon EKS implements Kubernetes features on the
AWScloud. If you need an even more basic understanding of Kubernetes, watch the What is Kubernetes video. -
Amazon EKS Setup: If you have an
AWSaccount, the Setup section helps you set up a CloudShell environment to you for creating a cluster. It offers a choice of eksctl (a simple cluster creation command line) and Terraform (a more infrastructure-as-code approach to creating a cluster) for creating your Amazon EKS cluster. -
Amazon EKS Getting started: Try out a simple web store from the Sample application section. You can use this throughout the other exercises. In this section, you can also learn about packaging container images and how microservices are managed using Kubernetes Pods, Deployments, Services, StatefulSets and Namespaces. Then use Kustomize to deploy changes to Kubernetes manifests.
-
Amazon EKS Fundamentals: Using
AWSfeatures such as theAWSLoad Balancer Controller, the workshop shows you how to expose your applications to the outside world. For storage, the workshop showcases how to use Amazon EBS for block storage, Amazon EFS for filesystem storage, and Amazon FSx for NetApp ONTAP to manage ONTAP file systems inAWS. For node management, the workshop helps you set up Managed Node Groups. -
Amazon EKS advanced features: More advanced features offered through the Amazon EKS workshop include labs for setting up:
-
Autoscaling: This includes node autoscaling (with Cluster Autoscaler or Karpenter) and workload autoscaling (with Horizontal Pod Autoscaler and Cluster Proportional Autoscaler).
-
Observability: Learn about Logging, OpenSearch, Container Insights on Amazon EKS, and Cost Visibility with Kubecost in a set of Observability labs.
-
Security: This set of Security labs let you explore Secrets Management, Amazon GuardDuty, Pod Security Standards, and Kyverno policy management.
-
Networking: Learn networking features for Amazon EKS from Networking labs that include Amazon VPC CNI (supporting network plugins) and Amazon VPC Lattice (for configuring clusters across VC and user accounts).
-
Automation: Labs on Automation step you through GitOps methods of managing your clusters and projects like
AWSControllers for Kubernetes and Crossplane for managing Amazon EKS control planes.
-
Amazon EKS hands-on cluster setup tutorials
A set of Amazon EKS Cluster Setup tutorials on the AWS Community site can help you create special-purpose Amazon EKS clusters and enhance those clusters in various ways. The tutorials are divided into three different types:
Building clusters
These tutorials help you build clusters that can be used for special purposes. These special purposes include the ability to run:
Enhancing clusters
Once you have an existing cluster, you can extend and enhance that cluster in ways that allow it to run specialized workloads and otherwise enhance the clusters. These tutorials include ways to:
Optimizing AWS services
Using these tutorials, you can better integrate your clusters with AWS services. These tutorials include those that help you:
Amazon EKS Samples
The Amazon EKS Samples repository stores manifests to use with Amazon EKS. These manifests give you the opportunity to try out different kinds of applications in Amazon EKS or create specific types of Amazon EKS clusters. Samples include manifests to:
Keep in mind that these samples are for learning and testing purposes only and are not intended to be used in production.
AWS Tutorials
The AWS Tutorials site publishes a few Amazon EKS tutorials, but also offers a search tool to find other tutorials published on AWS sites (such as the AWS Community site). Amazon EKS tutorials published directly on this site include:
Developers Workshop
If you are a software developer, looking to create or refactor applications to run on Amazon EKS, the Amazon EKS Developers workshopis a good place to start. The workshop not only helps you build containerized applications, but also helps you deploy those containers to a container registry (ECR) and from there to an Amazon EKS cluster.
Start with the Amazon EKS Python Workshop to go through the process of refactoring a python application, then set up your development environment to prepare for deploying the application. Step through sections on Containers, Kubernetes, and Amazon EKS to prepare to run your containerized applications in those environments.
Terraform Workshop
While eksctl is a simple tool for creating a cluster, for more complex infrastructure-as-code types of Amazon EKS deployments, Terraform is a popular Amazon EKS cluster creation and management tool. The Terraform Amazon EKS Workshop teaches how to use Terraform to build an AWS VPC, create Amazon EKS clusters, and add optional enhancements to your cluster. In particular, there is a section for creating a private Amazon EKS cluster
AWS Amazon EKS Training
AWS offers formal training for learning about Amazon EKS. A three-day training course entitled Running Containers on Amazon Elastic Kubernetes Service teaches:
-
Kubernetes and Amazon EKS fundamentals
-
How to build Amazon EKS clusters
-
Securing Amazon EKS with
AWSIAM and Kubernetes RBAC authorization -
GitOps automation tools
-
Monitoring tools
-
Techniques for improving cost, efficiency, and resiliency
Get started with Amazon EKS
Learn about the tools needed for creating and working with an Amazon EKS cluster.
Make sure that you are set up to use Amazon EKS before going through the getting started guides. For more information, see Set up to use Amazon EKS.
There are two getting started guides available for creating a new Kubernetes cluster with nodes in Amazon EKS:
-
Get started with Amazon EKS – eksctl – This getting started guide helps you to install all of the required resources to get started with Amazon EKS using
eksctl, a simple command line utility for creating and managing Kubernetes clusters on Amazon EKS. At the end of the tutorial, you will have a running Amazon EKS cluster that you can deploy applications to. This is the fastest and simplest way to get started with Amazon EKS. -
Get started with Amazon EKS –
consolelongandAWSCLI – This getting started guide helps you to create all of the required resources to get started with Amazon EKS using theconsolelongandAWSCLI. At the end of the tutorial, you will have a running Amazon EKS cluster that you can deploy applications to. In this guide, you manually create each resource required for an Amazon EKS cluster. The procedures give you visibility into how each resource is created and how they interact with each other.
We also offer the following references:
-
For a collection of hands-on tutorials, see EKS Cluster Setup on
AWSCommunity. -
For code examples, see Code examples for Amazon EKS using
AWSSDKs.
Get started with Amazon EKS – EKS Auto Mode
Like other EKS getting started experiences, creating your first cluster with EKS Auto Mode delegates the management of the cluster itself to AWS.
However, EKS Auto Mode extends EKS automation by handing responsibility of many essential services needed to set up workload infrastructure (nodes, networks, and various services), making it easier to manage nodes and scale up to meet workload demands.
Choose from one of the following ways to create a cluster with EKS Auto Mode:
-
Create an EKS Auto Mode Cluster with the
AWSCLI: Use theawscommand line interface to create a cluster. -
Create an EKS Auto Mode Cluster with the
consolelong: Use theconsolelongto create a cluster. -
Create an EKS Auto Mode Cluster with the eksctl CLI: Use the
eksctlcommand line interface to create a cluster.
If you are comparing different approaches to creating your first EKS cluster,
you should know that EKS Auto Mode has AWS take over additional cluster management responsibilities
that include setting up components to:
-
Start up and scale nodes as workload demand increases and decreases.
-
Regularly upgrade the cluster itself (control plane), node operating systems, and services running on nodes.
-
Choose default settings that determine things like the size and speed of node storage and Pod network configuration.
For details on what you get with EKS Auto Mode clusters, see Automate cluster infrastructure with EKS Auto Mode.
Get started with Amazon EKS – eksctl
Learn how to create your first Amazon EKS cluster with nodes using the
eksctlcommand line tool.
|
This topic covers getting started without EKS Auto Mode. EKS Auto Mode automates routine tasks for cluster compute, storage, and networking. Learn how to get started with Amazon EKS Auto Mode. |
This guide helps you to create all of the required resources to get started with Amazon Elastic Kubernetes Service (Amazon EKS) using eksctl, a simple command line utility for creating and managing Kubernetes clusters on Amazon EKS. At the end of this tutorial, you will have a running Amazon EKS cluster that you can deploy applications to.
The procedures in this guide create several resources for you automatically that you have to create manually when you create your cluster using the consolelong. If you’d rather manually create most of the resources to better understand how they interact with each other, then use the consolelong to create your cluster and compute. For more information, see Get started with Amazon EKS – consolelong and AWS CLI.
Prerequisites
Before starting this tutorial, you must install and configure the AWS CLI, kubectl, and eksctl tools as described in Set up to use Amazon EKS.
Step 1: Create your Amazon EKS cluster and nodes
|
To get started as simply and quickly as possible, this topic includes steps to create a cluster and nodes with default settings. Before creating a cluster and nodes for production use, we recommend that you familiarize yourself with all settings and deploy a cluster and nodes with the settings that meet your requirements. For more information, see Create an Amazon EKS cluster and Manage compute resources by using nodes. Some settings can only be enabled when creating your cluster and nodes. |
You can create a cluster with one of the following node types. To learn more about each type, see Manage compute resources by using nodes. After your cluster is deployed, you can add other node types.
-
Fargate – Linux – Select this type of node if you want to run Linux applications on Simplify compute management with
AWSFargate. Fargate is a serverless compute engine that lets you deploy Kubernetes Pods without managing Amazon EC2 instances. -
Managed nodes – Linux – Select this type of node if you want to run Amazon Linux applications on Amazon EC2 instances. Though not covered in this guide, you can also add Windows self-managed and Bottlerocket nodes to your cluster.
Create your Amazon EKS cluster with the following command. You can replace my-cluster with your own value. The name can contain only alphanumeric characters (case-sensitive) and hyphens. It must start with an alphanumeric character and can’t be longer than 100 characters. The name must be unique within the AWS Region and AWS account that you’re creating the cluster in. Replace region-code with any AWS Region that is supported by Amazon EKS. For a list of AWS Regions, see Amazon EKS endpoints and quotas in the AWS General Reference guide.
- Fargate - Linux
-
eksctl create cluster --name my-cluster --region region-code --fargate - Managed nodes - Linux
-
eksctl create cluster --name my-cluster --region region-code
Cluster creation takes several minutes. During creation you’ll see several lines of output. The last line of output is similar to the following example line.
[...]
[✓]  EKS cluster "my-cluster" in "region-code" region is ready
eksctl created a kubectl config file in ~/.kube/config or added the new cluster’s configuration within an existing config file in ~/.kube/config on your computer.
After cluster creation is complete, view the AWS CloudFormation stack named eksctl- in the my-cluster-clusterAWS CloudFormation console to see all of the resources that were created.
Step 2: View Kubernetes resources
-
View your cluster nodes.
kubectl get nodes -o wideAn example output is as follows.
- Fargate - Linux
-
NAME STATUS ROLES AGE VERSION INTERNAL-IP EXTERNAL-IP OS-IMAGE KERNEL-VERSION CONTAINER-RUNTIME fargate-ip-192-0-2-0.region-code.compute.internal Ready <none> 8m3s v1.2.3-eks-1234567 192.0.2.0 <none> Amazon Linux 2 1.23.456-789.012.amzn2.x86_64 containerd://1.2.3 fargate-ip-192-0-2-1.region-code.compute.internal Ready <none> 7m30s v1.2.3-eks-1234567 192-0-2-1 <none> Amazon Linux 2 1.23.456-789.012.amzn2.x86_64 containerd://1.2.3 - Managed nodes - Linux
-
NAME                                        STATUS   ROLES    AGE    VERSION              INTERNAL-IP   EXTERNAL-IP   OS-IMAGE         KERNEL-VERSION                  CONTAINER-RUNTIME
ip-192-0-2-0.region-code.compute.internal   Ready    <none>   6m7s   v1.2.3-eks-1234567   192.0.2.0     192.0.2.2     Amazon Linux 2   1.23.456-789.012.amzn2.x86_64   containerd://1.2.3
ip-192-0-2-1.region-code.compute.internal   Ready    <none>   6m4s   v1.2.3-eks-1234567   192.0.2.1     192.0.2.3     Amazon Linux 2   1.23.456-789.012.amzn2.x86_64   containerd://1.2.3
For more information about what you see in the output, see View Kubernetes resources in the
consolelong. -
View the workloads running on your cluster.
kubectl get pods -A -o wideAn example output is as follows.
- Fargate - Linux
-
NAMESPACE NAME READY STATUS RESTARTS AGE IP NODE NOMINATED NODE READINESS GATES kube-system coredns-1234567890-abcde 1/1 Running 0 18m 192.0.2.0 fargate-ip-192-0-2-0.region-code.compute.internal <none> <none> kube-system coredns-1234567890-12345 1/1 Running 0 18m 192.0.2.1 fargate-ip-192-0-2-1.region-code.compute.internal <none> <none> - Managed nodes - Linux
-
NAMESPACE     NAME                       READY   STATUS    RESTARTS   AGE     IP          NODE                                        NOMINATED NODE   READINESS GATES
kube-system   aws-node-12345             1/1     Running   0          7m43s   192.0.2.1   ip-192-0-2-1.region-code.compute.internal   <none>           <none>
kube-system   aws-node-67890             1/1     Running   0          7m46s   192.0.2.0   ip-192-0-2-0.region-code.compute.internal   <none>           <none>
kube-system   coredns-1234567890-abcde   1/1     Running   0          14m     192.0.2.3   ip-192-0-2-3.region-code.compute.internal   <none>           <none>
kube-system   coredns-1234567890-12345   1/1     Running   0          14m     192.0.2.4   ip-192-0-2-4.region-code.compute.internal   <none>           <none>
kube-system   kube-proxy-12345           1/1     Running   0          7m46s   192.0.2.0   ip-192-0-2-0.region-code.compute.internal   <none>           <none>
kube-system   kube-proxy-67890           1/1     Running   0          7m43s   192.0.2.1   ip-192-0-2-1.region-code.compute.internal   <none>           <none>
For more information about what you see in the output, see View Kubernetes resources in the
consolelong.
Step 3: Delete your cluster and nodes
After you’ve finished with the cluster and nodes that you created for this tutorial, you should clean up by deleting the cluster and nodes with the following command. If you want to do more with this cluster before you clean up, see Next steps.
eksctl delete cluster --name my-cluster --region region-codeNext steps
The following documentation topics help you to extend the functionality of your cluster.
-
Deploy a sample application to your cluster.
-
The IAM principal that created the cluster is the only principal that can make calls to the Kubernetes API server with
kubectlor theconsolelong. If you want other IAM principals to have access to your cluster, then you need to add them. For more information, see Grant IAM users and roles access to Kubernetes APIs and Required permissions. -
Before deploying a cluster for production use, we recommend familiarizing yourself with all of the settings for clusters and nodes. Some settings (such as enabling SSH access to Amazon EC2 nodes) must be made when the cluster is created.
-
To increase security for your cluster, configure the Amazon VPC Container Networking Interface plugin to use IAM roles for service accounts.
Get started with Amazon EKS – consolelong and AWS CLI
Learn how to create your first Amazon EKS cluster with nodes using the
consolelongandAWSCLI.
|
This topic covers getting started without EKS Auto Mode. It uses Managed Node Groups to deploy nodes. EKS Auto Mode automates routine tasks for cluster compute, storage, and networking. Learn how to get started with Amazon EKS Auto Mode. EKS Auto Mode is the preferred method of deploying nodes. |
This guide helps you to create all of the required resources to get started with Amazon Elastic Kubernetes Service (Amazon EKS) using the consolelong and the AWS CLI. In this guide, you manually create each resource. At the end of this tutorial, you will have a running Amazon EKS cluster that you can deploy applications to.
The procedures in this guide give you complete visibility into how each resource is created and how the resources interact with each other. If you’d rather have most of the resources created for you automatically, use the eksctl CLI to create your cluster and nodes. For more information, see Get started with Amazon EKS – eksctl.
Prerequisites
Before starting this tutorial, you must install and configure the following tools and resources that you need to create and manage an Amazon EKS cluster.
-
AWSCLI – A command line tool for working withAWSservices, including Amazon EKS. For more information, see Installing in theAWSCommand Line Interface User Guide. After installing theAWSCLI, we recommend that you also configure it. For more information, see Quick configuration with aws configure in theAWSCommand Line Interface User Guide. Note thatAWSCLI v2 is required to use the update-kubeconfig option shown in this page. -
kubectl– A command line tool for working with Kubernetes clusters. For more information, see Set upkubectlandeksctl. -
Required IAM permissions – The IAM security principal that you’re using must have permissions to work with Amazon EKS IAM roles, service linked roles,
AWSCloudFormation, a VPC, and related resources. For more information, see Actions and Using service-linked roles in the IAM User Guide. You must complete all steps in this guide as the same user. To check the current user, run the following command:aws sts get-caller-identity
We recommend that you complete the steps in this topic in a Bash shell. If you aren’t using a Bash shell, some script commands such as line continuation characters and the way variables are set and used require adjustment for your shell. Additionally, the quoting and escaping rules for your shell might be different. For more information, see Using quotation marks with strings in the AWS CLI in the AWS Command Line Interface User Guide.
Step 1: Create your Amazon EKS cluster
|
To get started as simply and quickly as possible, this topic includes steps to create a cluster with default settings. Before creating a cluster for production use, we recommend that you familiarize yourself with all settings and deploy a cluster with the settings that meet your requirements. For more information, see Create an Amazon EKS cluster. Some settings can only be enabled when creating your cluster. |
-
Create an Amazon VPC with public and private subnets that meets Amazon EKS requirements. Replace
region-codewith anyAWSRegion that is supported by Amazon EKS. For a list ofAWSRegions, see Amazon EKS endpoints and quotas in theAWSGeneral Reference guide. You can replacemy-eks-vpc-stackwith any name you choose.aws cloudformation create-stack \ --regionregion-code\ --stack-name my-eks-vpc-stack \ --template-url https://s3.us-west-2.amazonaws.com/amazon-eks/cloudformation/2020-10-29/amazon-eks-vpc-private-subnets.yamlFor a list of all the resources the previous command creates, open the AWSCloudFormation console at https://console.aws.amazon.com/cloudformation/. Choose themy-eks-vpc-stackstack and then choose the Resources tab. -
Create a cluster IAM role and attach the required Amazon EKS IAM managed policy to it. Kubernetes clusters managed by Amazon EKS make calls to other
AWSservices on your behalf to manage the resources that you use with the service.-
Copy the following contents to a file named
eks-cluster-role-trust-policy.json.{ "Version": "2012-10-17", "Statement": [ { "Effect": "Allow", "Principal": { "Service": "eks.amazonaws.com" }, "Action": "sts:AssumeRole" } ] } -
Create the role.
aws iam create-role \ --role-name myAmazonEKSClusterRole \ --assume-role-policy-document file://"eks-cluster-role-trust-policy.json" -
Attach the required Amazon EKS managed IAM policy to the role.
aws iam attach-role-policy \ --policy-arnregion.arniam::aws:policy/AmazonEKSClusterPolicy \ --role-name myAmazonEKSClusterRole
-
-
Open the Amazon EKS console at
Make sure that the
AWSRegion shown in the upper right of your console is theAWSRegion that you want to create your cluster in. If it’s not, choose the dropdown next to theAWSRegion name and choose theAWSRegion that you want to use.
Choose Create cluster. If you don’t see this option, then choose Clusters in the left navigation pane first.
On the Configure cluster page, do the following:
-
Select Custom configuration and disable Use EKS Auto Mode. (If you prefer an EKS Auto Mode cluster, refer instead to Create an EKS Auto Mode Cluster with the
consolelong.) -
Enter a Name for your cluster, such as
my-cluster. The name can contain only alphanumeric characters (case-sensitive) and hyphens. It must start with an alphanumeric character and can’t be longer than 100 characters. The name must be unique within theAWSRegion andAWSaccount that you’re creating the cluster in. -
For Cluster Service Role, choose
myAmazonEKSClusterRole. -
Leave the remaining settings at their default values and choose Next.
On the Specify networking page, do the following:
-
Choose the ID of the VPC that you created in a previous step from the VPC dropdown list. It is something like
* | my-eks-vpc-stack-VPC. -
Choose the subnets created in a previous step from the Subnets dropdown list. The subnets will be something like
* | my-eks-vpc-stack-*. -
Choose the security group created in a previous step from the Additional security groups dropdown list. It is something like
* | my-eks-vpc-stack-ControlPlaneSecurityGroup-*. -
Leave the remaining settings at their default values and choose Next.
On the Configure observability page, choose Next.
On the Select add-ons page, choose Next.
For more information on add-ons, see Amazon EKS add-ons.
On the Configure selected add-ons settings page, choose Next.
On the Review and create page, choose Create.
To the right of the cluster’s name, the cluster status is Creating for several minutes until the cluster provisioning process completes. Don’t continue to the next step until the status is Active.
| You might receive an error that one of the Availability Zones in your request doesn’t have sufficient capacity to create an Amazon EKS cluster. If this happens, the error output contains the Availability Zones that can support a new cluster. Retry creating your cluster with at least two subnets that are located in the supported Availability Zones for your account. For more information, see Insufficient capacity. |
Step 2: Configure your computer to communicate with your cluster
In this section, you create a kubeconfig file for your cluster. The settings in this file enable the kubectl CLI to communicate with your cluster.
Before proceeding, be sure that your cluster creation completed successfully in Step 1.
-
Create or update a
kubeconfigfile for your cluster. Replaceregion-codewith theAWSRegion that you created your cluster in. Replacemy-clusterwith the name of your cluster.aws eks update-kubeconfig --regionregion-code--namemy-clusterBy default, the
configfile is created in~/.kubeor the new cluster’s configuration is added to an existingconfigfile in~/.kube. -
Test your configuration.
kubectl get svcIf you receive any authorization or resource type errors, see Unauthorized or access denied ( kubectl) in the troubleshooting topic.An example output is as follows.
NAME             TYPE        CLUSTER-IP   EXTERNAL-IP   PORT(S)   AGE
svc/kubernetes   ClusterIP   10.100.0.1   <none>        443/TCP   1m
Step 3: Create nodes
|
To get started as simply and quickly as possible, this topic includes steps to create nodes with mostly default settings. Before creating nodes for production use, we recommend that you familiarize yourself with all settings and deploy nodes with the settings that meet your requirements. For more information, see Manage compute resources by using nodes. Some settings can only be enabled when creating your nodes. |
This procedure configures your cluster to use Managed node groups to create nodes, specifying the subnets and node IAM role that you created in previous steps. It lets you run Amazon Linux applications on Amazon EC2 instances.
To learn more about different ways to configure nodes in EKS, see Manage compute resources by using nodes. After your cluster is deployed, you can add other node types. Though not covered in this guide, you can also add Windows self-managed and Bottlerocket nodes to your cluster.
To create your EC2 Linux managed node group
-
Create a node IAM role and attach the required Amazon EKS IAM managed policy to it. The Amazon EKS node
kubeletdaemon makes calls toAWSAPIs on your behalf. Nodes receive permissions for these API calls through an IAM instance profile and associated policies.-
Copy the following contents to a file named
node-role-trust-policy.json.{ "Version": "2012-10-17", "Statement": [ { "Effect": "Allow", "Principal": { "Service": "ec2.amazonaws.com" }, "Action": "sts:AssumeRole" } ] } -
Create the node IAM role.
aws iam create-role \ --role-name myAmazonEKSNodeRole \ --assume-role-policy-document file://"node-role-trust-policy.json" -
Attach the required managed IAM policies to the role.
aws iam attach-role-policy \ --policy-arnregion.arniam::aws:policy/AmazonEKSWorkerNodePolicy \ --role-name myAmazonEKSNodeRole aws iam attach-role-policy \ --policy-arnregion.arniam::aws:policy/AmazonEC2ContainerRegistryReadOnly \ --role-name myAmazonEKSNodeRole aws iam attach-role-policy \ --policy-arnregion.arniam::aws:policy/AmazonEKS_CNI_Policy \ --role-name myAmazonEKSNodeRole -
Open the Amazon EKS console at Step 1: Create your Amazon EKS cluster, such as
my-cluster. -
On the
my-clusterpage, do the following: -
Choose the Compute tab.
-
Choose Add Node Group.
-
-
On the Configure Node Group page, do the following:
-
For Name, enter a unique name for your managed node group, such as
my-nodegroup. The node group name can’t be longer than 63 characters. It must start with letter or digit, but can also include hyphens and underscores for the remaining characters. -
For Node IAM role name, choose
myAmazonEKSNodeRolerole that you created in a previous step. We recommend that each node group use its own unique IAM role. -
Choose Next.
-
-
On the Set compute and scaling configuration page, accept the default values and choose Next.
-
On the Specify networking page, accept the default values and choose Next.
-
On the Review and create page, review your managed node group configuration and choose Create.
-
After several minutes, the Status in the Node Group configuration section will change from Creating to Active. Don’t continue to the next step until the status is Active.
Step 4: View resources
You can view your nodes and Kubernetes workloads.
-
In the left navigation pane, choose Clusters. In the list of Clusters, choose the name of the cluster that you created, such as
my-cluster. -
On the
my-clusterpage, choose the following:-
Compute tab – You see the list of Nodes that were deployed for the cluster. You can choose the name of a node to see more information about it.
-
Resources tab – You see all of the Kubernetes resources that are deployed by default to an Amazon EKS cluster. Select any resource type in the console to learn more about it.
-
Step 5: Delete resources
After you’ve finished with the cluster and nodes that you created for this tutorial, you should delete the resources that you created. If you want to do more with this cluster before you delete the resources, see Next steps.
-
Delete any node groups profiles that you created.
-
Open the Amazon EKS console at my-cluster.
-
Choose the Compute tab.
-
If you created a node group, choose the
my-nodegroupnode group and then choose Delete. Entermy-nodegroup, and then choose Delete. -
Don’t continue until the node group profiles are deleted.
-
-
Delete the cluster.
-
In the left navigation pane, choose Clusters. In the list of clusters, choose
my-cluster. -
Choose Delete cluster.
-
Enter
my-clusterand then choose Delete. Don’t continue until the cluster is deleted.
-
-
Delete the VPC
AWSCloudFormation stack that you created.-
Open the CloudFormation console at https://console.aws.amazon.com/cloudformation/.
-
Choose the
my-eks-vpc-stackstack, and then choose Delete. -
In the Delete
my-eks-vpc-stackconfirmation dialog box, choose Delete stack.
-
-
Delete the IAM roles that you created.
-
Open the IAM console at https://console.aws.amazon.com/iam/.
-
In the left navigation pane, choose Roles.
-
Select each role you created from the list (
myAmazonEKSClusterRole, as well asmyAmazonEKSNodeRole). Choose Delete, enter the requested confirmation text, then choose Delete.
-
Next steps
The following documentation topics help you to extend the functionality of your cluster.
-
The IAM principal that created the cluster is the only principal that can make calls to the Kubernetes API server with
kubectlor theconsolelong. If you want other IAM principals to have access to your cluster, then you need to add them. For more information, see Grant IAM users and roles access to Kubernetes APIs and Required permissions. -
Deploy a sample application to your cluster.
-
Before deploying a cluster for production use, we recommend familiarizing yourself with all of the settings for clusters and nodes. Some settings (such as enabling SSH access to Amazon EC2 nodes) must be made when the cluster is created.
-
To increase security for your cluster, configure the Amazon VPC Container Networking Interface plugin to use IAM roles for service accounts.